.JPG.08f9e23d729418efb8a3e9fd398de605.JPG)
1avidflyer
Contributing Member-
Content count
4,229 -
Joined
-
Last visited
Posts posted by 1avidflyer
-
-
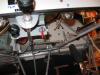
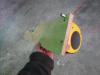
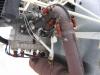
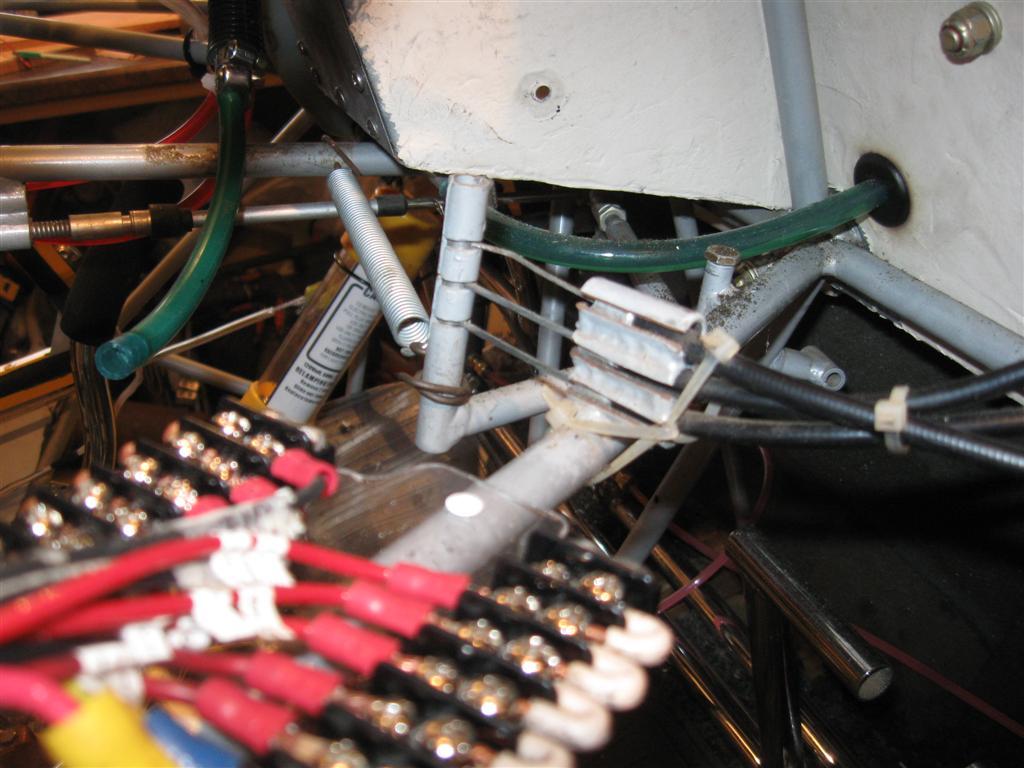
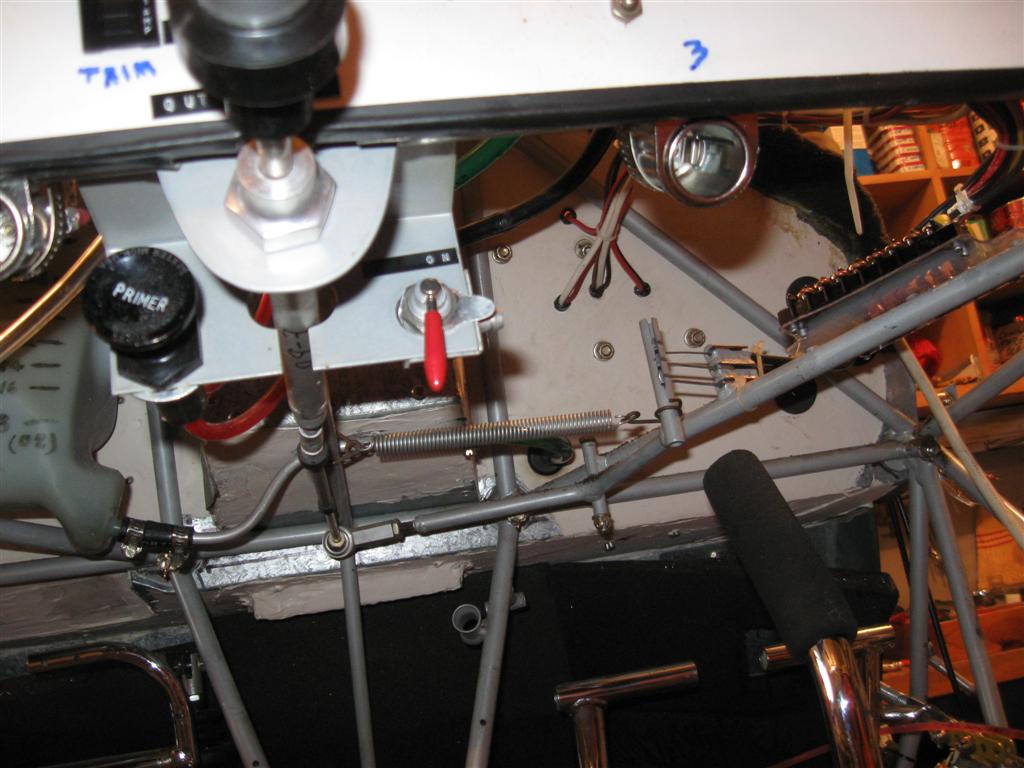
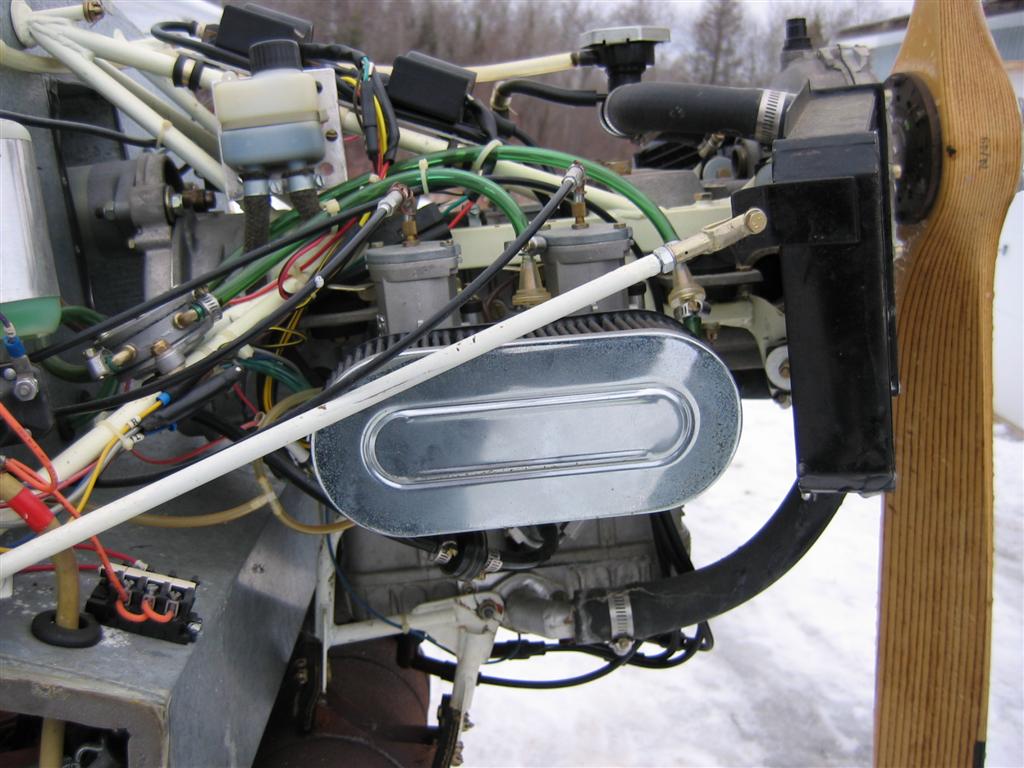
I found that I had a few pics of the factory throttel set up for the 582 on my latest Avid MK IV. My first MK IV was like this as well. It seems to work just fine as far as I can see. Smooth operation and all. Take care, Jim Chuk
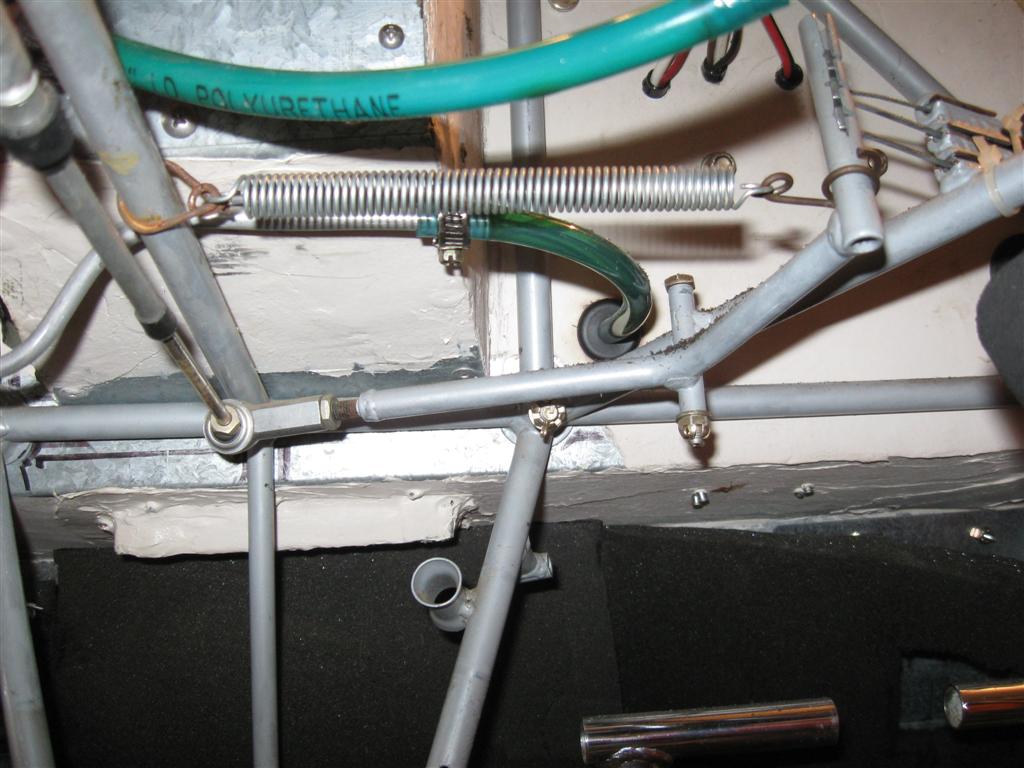
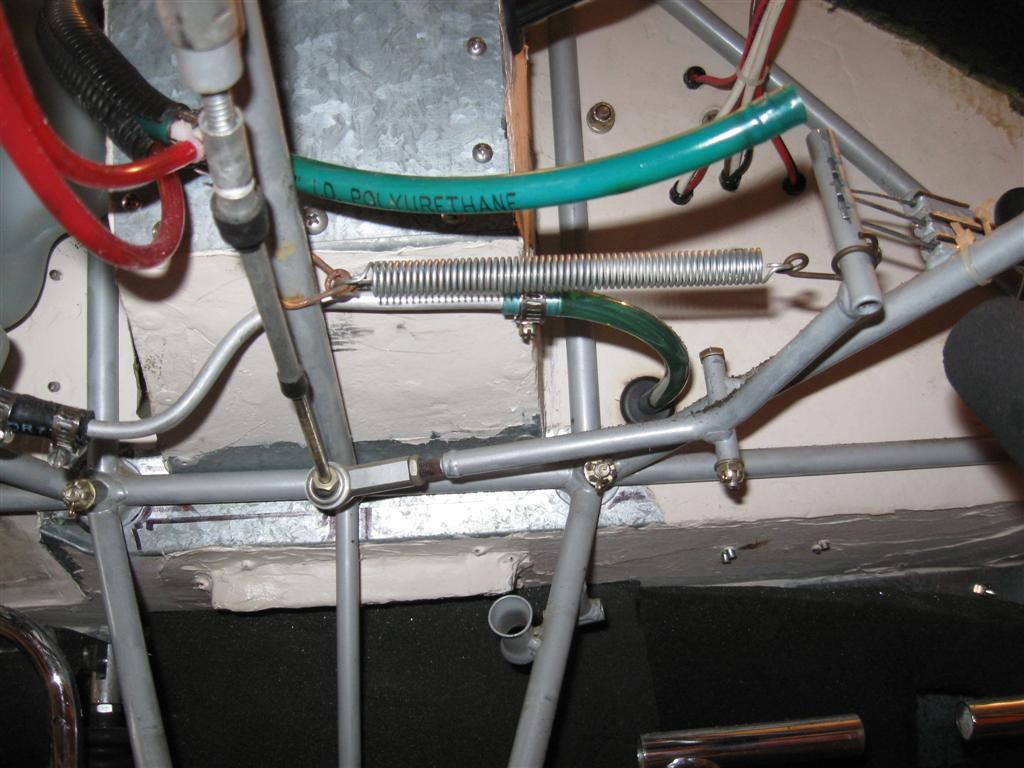
this is what mine looks like. It is just a straight arm that pivots on a bolt and the vernier throttle hooks into the bottom side. I am thinking a set up that rides on a bearing and then using the three into one throttle setup from the carbs to the swing arm. The rout the vernier cable has to take now put some pretty sharp bends in it and its just not very smooth.
:BC:/>


-
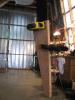
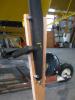
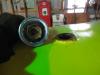
I had this pic in my photos of a 912 setup, it's not my plane. The verticle cable is for the choke, the horizontal cable is the throttel. Back of the engine is on the left. Take care, Jim Chuk
I am kind of lost on that setup. How does it not work backwards? Is the reverse mechanism inside the sleeve there or do you have to mount it goofy? Do you have a slide carb that the cables go into the top of on the 912? I am just trying to visualize how that dual system works.
Thanks guys
:BC:/>
-
And the winner is..... Well I got almost everything stripped off my Avid MK IV fusaloge. Only things left on were rudder cables, elevator control tube, flap control and tube, mixer controls behind the seat and the trim lever and cable running back to the elevator. Put it on two bathroom scales and back one said 26 and front one said 46. I think they are fairly close to right. Looks like 70lbs or a touch less stripped clean. Take care, Jim Chuk
My original KF1 fuselage, now hanging from the ceiling, weighs almost nothing - guessing under 70 lbs, compared to the new modified one, which I really believe will go well over 100 lbs. But big difference in gross weights when finished.
ED in MO
-
I was doing some searching about lithium ion batteries on the web just a couple of days ago, and from what I found, they don't last very long. I do realize that not everything on the web is totaly accurate, so who knows if it's true.?? The batteries I was looking at were for cordless drills so maybe that is somehow different. At any rate, I would check that out before I spend lots of money on a new battery. I do agree that getting rid of weight is the best thing we can do for the plane's performance. To bad it's so hard to do. Sorry if it sounds like I'm trying to bust your bubble, I've thought about getting a LI battery myself. Now I'm not so sure. Take care, Jim Chuk
-
You got a good price on the oil, I looked at my reciept and I paid $47.54 pluss tax for the 12 quart box. I wrote on the slip $63.20 for the 4 gallon box. That ends up being $15.80 before sales tax. Take care, Jim Chuk
Jim,
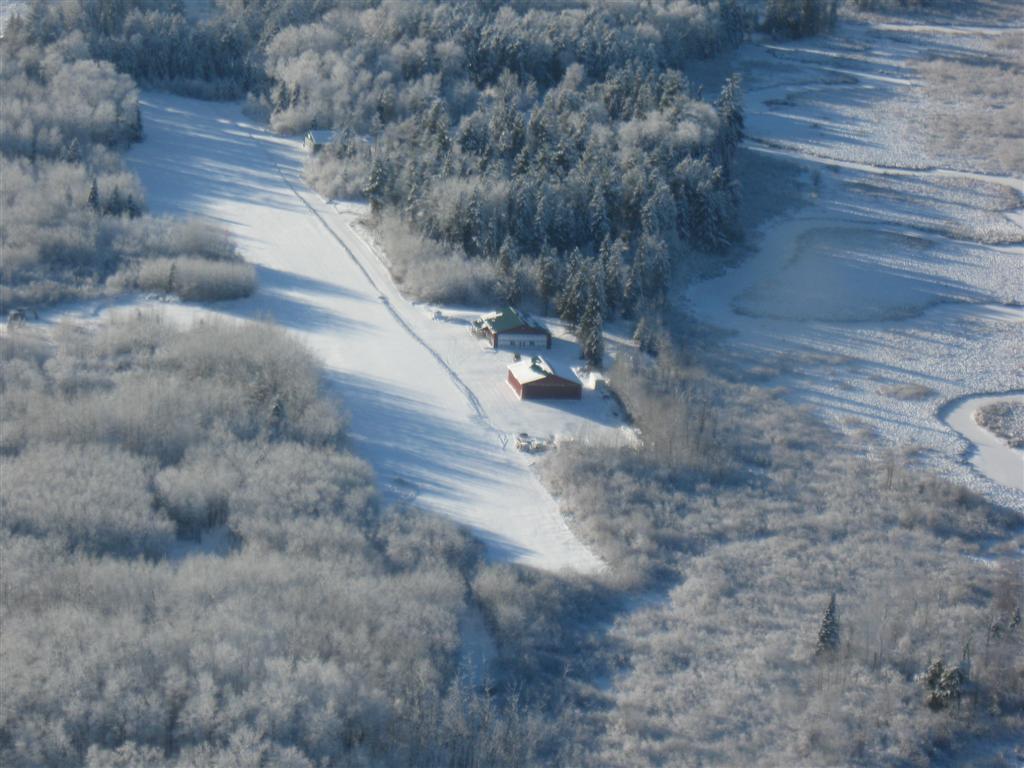
Looks like a SWEET strip and the terrain looks like it could right here in my local playground. Glad the oil is working out for you! The last cases I bought worked out to be around 11.50 a gallon for the CITGO. I can't get cases of the gallon jugs anymore so they are all in quarts, but that is actually easier as I dont have to pour from the gallon into the quarts anymore for keeping some extra in the plane.
At some point here I will have to switch oils as the distributor here only has 150 cases left and they are not planning on getting anymore when this runs out unless I can generate enough intrest to have them bring in more. I run it in the Plane, Boat and Snowmachines so I go through 8-10 cases a year on average. I should be good to go for awhile yet :lol:/>
:BC:/>
-
After you recomended it several years ago, I've been running the Citco Sea and Snow oil as well with good results. Priced right also. I buy it 12 quarts to the box from a local distributor. If I remember right it came out to about $4.30 a quart. It got up to +13 F today so I burned some of it in some very smooth Mn flying. Got the skis on early in the week and left some marks on a lake and a friend's strip. Should have got an after pic also, but didn't. Take care, Jim Chuk
How often do you plan to fly.. in reality. If you fly every couple days then a full synthetic is about the best you can go. If you will go a couple or a few weeks inbetween flights a semi synthetic is the best route. Full syn. will run right off the cylinder walls in a couple weeks and set you us for corrosion issues and is not nice to your engine on start up.
Up here, the local guys and me have been running the CITGO Sea n snow with great results. No fouling, not wearing issues, no problems.. Crowley has it in Palmer. The Mystic is another good one, but is full synthetic.
Some guys are running amsoil premix at 100/1 but I am not ready to give up the oil injection and trying to mix the gas out on the river or at a remote location. I just carry a couple quarts of oil in the plane and dump it in the injection tank.
ALOT of guys were running the penzoil aircooled 2 stroke oil, but I dont think you can find it anymore.
:BC:/>

-
I've been stripping down the Avid MK IV that I crash landed a year and a half ago and almost have it down to bare bones. I'll try to get it on the scales before I start adding anything back to it. My guess is about 100 lbs. Just to claify, I'm referring to just the fusaloge at that weight. Take care, Jim Chuk
My flying plane is a Kitfox Model IV-1050, with a Rotax 912UL and two standard 13 gallon wing tanks.
-
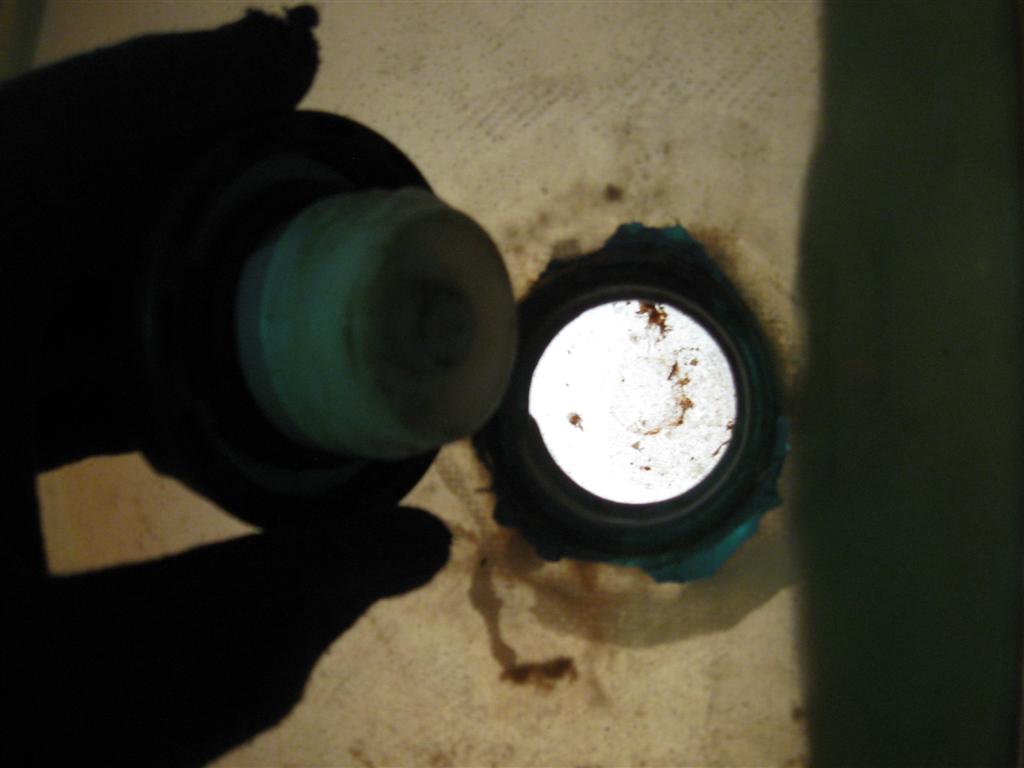
When I've filled the rotary valve oil, I slipped the hose off the bottle that goes to the lower port, and then slipped about a foot long larger hose over the smaller hose. I then slowly fill that hose till the oil comes out of the upper port and starts to fill the bottle. A 532 does not have the bleed screw, but the 582 does and I remove it also and let the oil come out there as well. With the oil going in the lower port, and no oil blocking the upper port, the oil pushes the air out as it fills the cavity. I've done this on 3 582s,and 2 532s with no bad results. Take care, Jim Chuk
The SECOND time, I pulled the bleed screw in the case and shoved a hose in there to make sure I got good flow out of it instead of closing it up at first sign of oil coming out. Then I tood the tube on the end of a turkey baster and sucked the oil in the RV tank through the lowest port to make sure that the cavity was full and no air bubbles were in the system. Make usre you do it slowly so you dont suck the oil out of the tank and cause a bubble. It is a very small tank and you can pull the oil out of it quick! It is not that big of a deal, just take the extra few minutes and the extra few onces of oil to make sure the system is fully bled.
:BC:/>
-
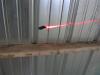
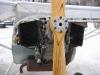
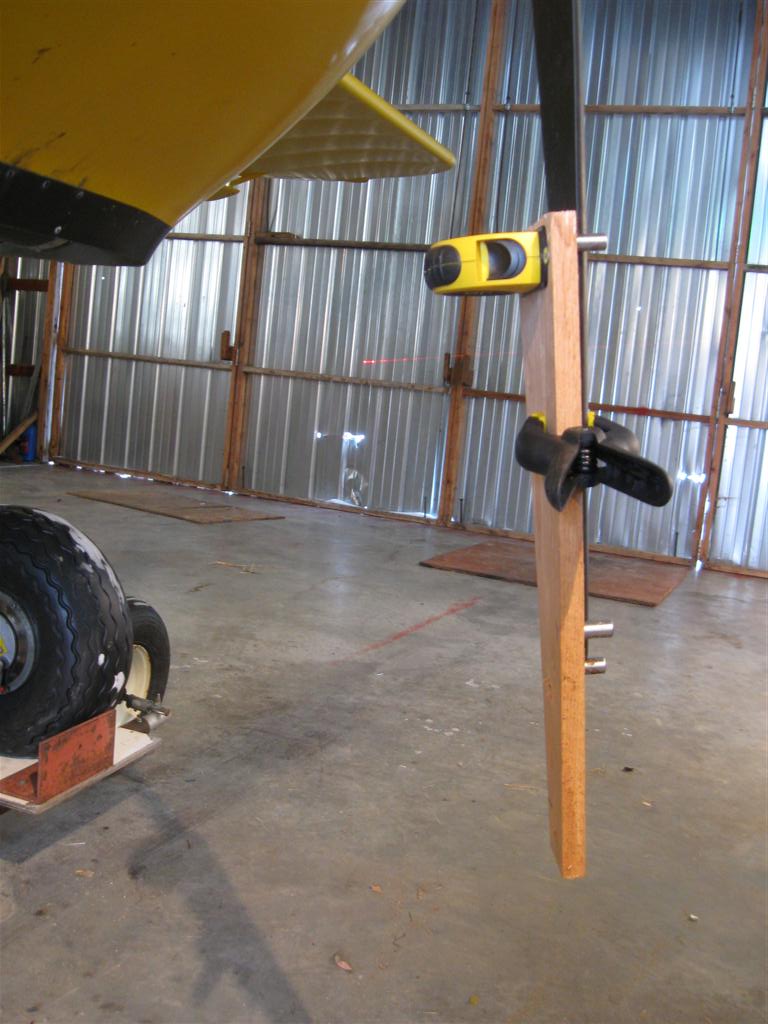
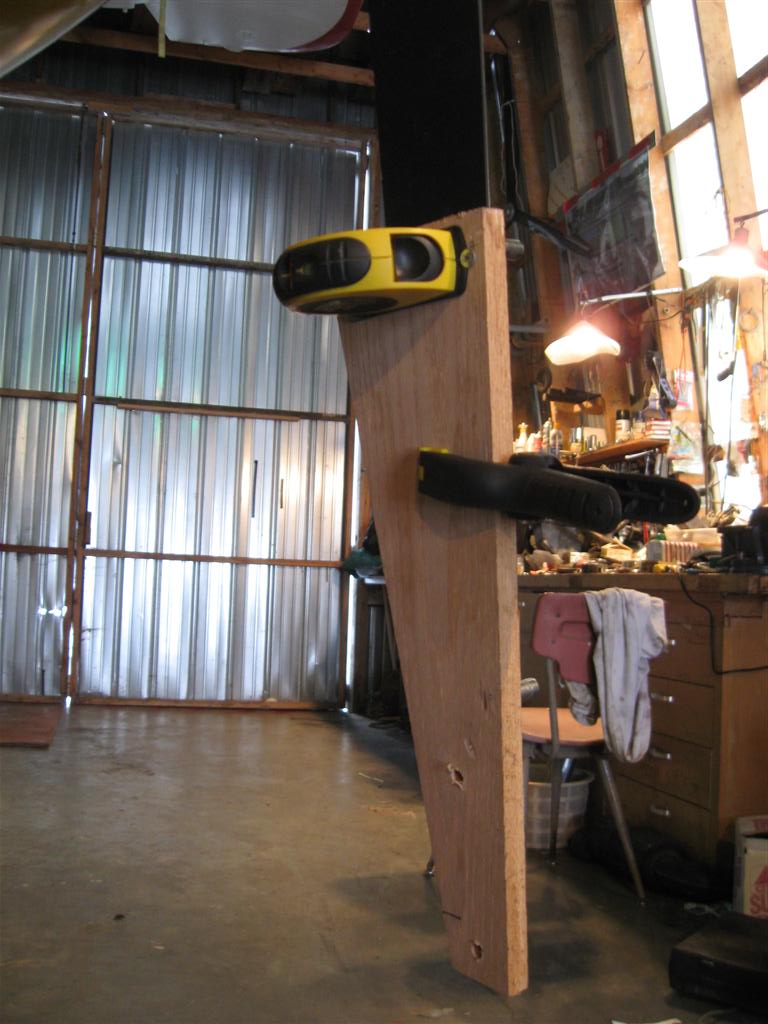
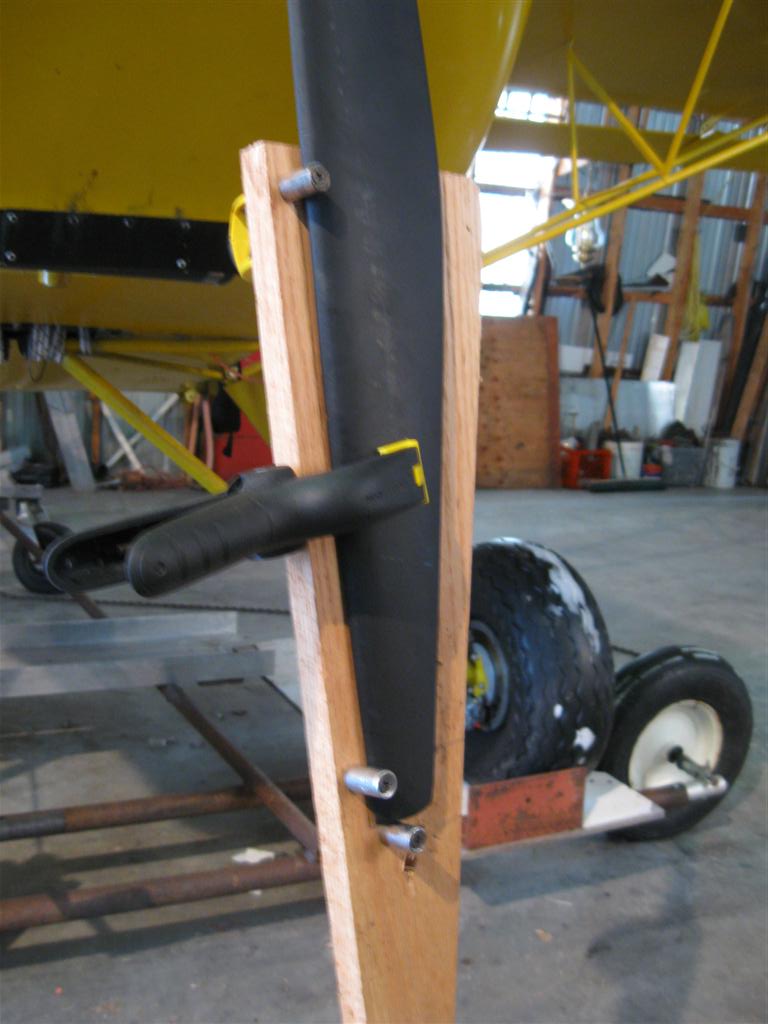
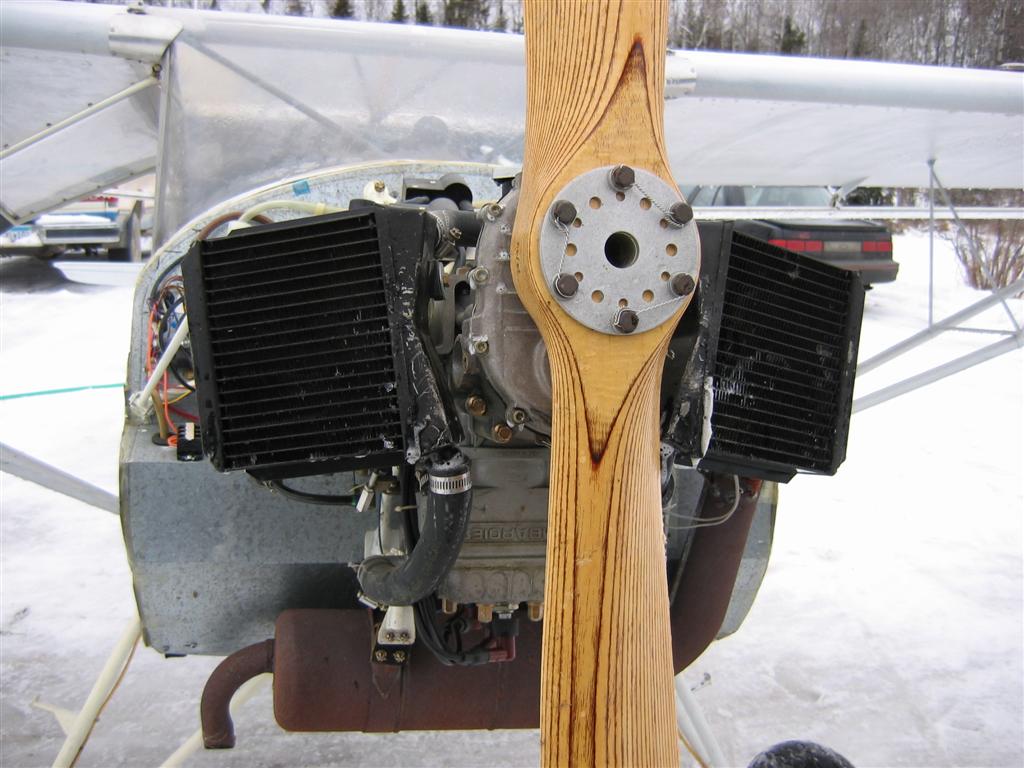
Hi Ed, look at the last picture, it shows the prop and the lazer line on the wall. If you twist the blade, the lazer line will move sideways. If you rotate the prop, the lazer line will move up or down. After you mark the spot the lazer is hitting when it's on the first blade, the next blade will be at the same location if when the lazer tool is on it and the lazer light is hitting the target. (blade doesn't have to be level, you could have your mark on the ceiling if you wanted, as long as you hit the same mark with the next blade.) Hope that is clear. Thanks, Jim Chuk
Jim,
I wasnt referring to setting the blade angle - somehow you have to set the blade vertical each time before using the lazer, so was guessing that the only way to do that would be with the bubble level on the lazer - Am I correct on this? If so, then we are back to relying on a bubble level for setting, I guess?
ED in MO
-
Ed, not sure if you were addressing this to me or Doug, but if it's me, then here goes. Suppose they tell you to set your prop to 10 degrees and see what it gives you for static RPM. Okey, so you set the first blade to that 10 degrees with the angle gauge or WD protractor or what ever else you can set the 10 degrees with. Then using the lazer tool, you adjust the other blade or 2 to match the first blade. Take care, Jim Chuk
Dont mean to bust your bubble )pun intended( but, arent you still using the bubble level to set your blade up for the lazer? could this affect accuracy?
Merry Christmas,
ED in MO
-
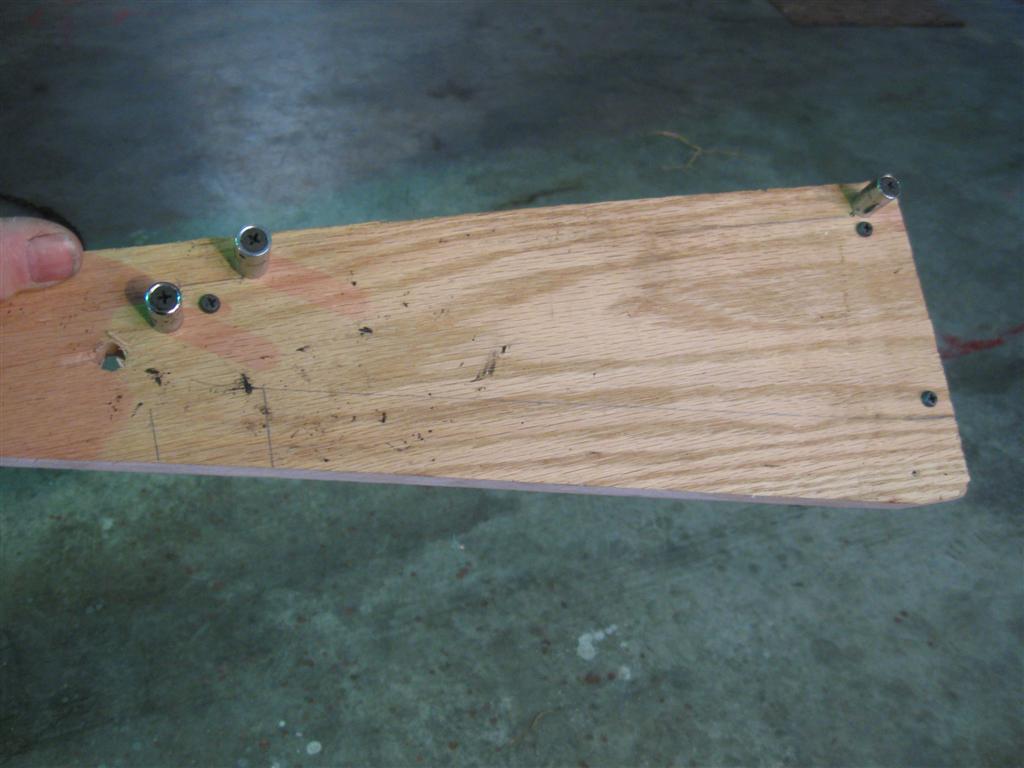
Sure, just set the first blade, mark where the lazer is pointing, and then get the other blade (or two) to hit the same mark. If you look at the third picture, below the lazer mark hitting the electrical tape, you see a couple of magic marker marks on the wood 2X4. Those were targets other times when I used this thing. One thing though is the plane can't move when you are doing this or ofcourse it wouldn't work. Pull a plug out of each cylinder and just turn the prop slowly and gently. Take care, Jim Chuk
Looks like a real good idea - Do you put a mark on the lazer spot so you can repeat?
ED in MO
-
Yesterday I mentioned that I would try to post some pictures of my lazer/prop setting tool, so here it is. Before I put the skis on the Avid today, I snapped a few pics of it. The nice thing about it is that it's so sensitive, you can watch the lazer beam move as you tighten the clamping bolts and tighten the oposite bolt to bring the pointer back on the mark. It's easy to get the lazer point within 1/8" at 20'. Being as how the blade is only about 4" wide at the point being measured, that is pretty accurate I think. Take care, Jim Chuk
First, I need some blades - well, first, I need to finish my plane and then put blades on it.
Thanks, ED


-
Noticed we didn't get a report about getting the Stinson. Hope things went well.... Take care, Jim Chuk
Now if the weather would cooperate I have a flight up north to coeur d'Alene planed to pick up a Stinson 108-3 for a friend who just bought it and bring it back down here to southern Idaho. I will put up some pics of the flight once we get back. It will be the furthest north I've flown yet over some amazing country I'm looking forward to it.
-Robert-
-
I was going to mention that you could use one of those to set the first blade if you had some idea where you should start, and then use the lazer to get the other blades to the exact same pitch as the first one. Got tired of typing in the other post though! Take care, Jim Chuk
Doug,
Ive had one of those for a long time - not set any blades with it, but it sure is handy for everything else you want to measure. I used mine to draw the prints of my nose gear parts and pivot angles.
ED in MO
-
If you were referring to stop drilling to keep the crack from going further, I wasn't about to take any chances with that windshield. It broke so easy that I didn't want to give it a chance to shatter and come flying into my face at 100 MPH. I had a sheet of 4'X4'X .090 Lexan that came with the kit and built the windshield out of that. I've heard of others that have had the plexiglass windshields break on them also. I know the Lexan scratches easier, but I'm sticking with that. I just bought a 4'X8' X.090 Lexan from a local commercial window builder/installer for $75, and that will make 2 windshields for me. Actually I got a break on the price cause my son who is a construction superintendent works quite often with this guy and they help each other out when they can. Take care, Jim Chuk
I sort of figured that for yours, since you said you could put 2 fingers in the crack. I was mostly referring to just a little crack with no missing pieces, but sometimes we have to do major things to keep the bugs out until we remove and replace. I've seen them with so much duct tape you needed radar!
ED in MO
1 person likes this -
I've used the WD protractor, but if you want to get real accurate setting your prop, build a device that holds a lazer tight to the blade. The lazer can shine halfway accross the hangar. Mark that spot on the wall and then set the other 2 blades to the same spot. The one I built has a stop at the end of the blade and 2 on the top. 3 screws screwed in just the right amount touch the flat side of the blade. It ends up at the exact same place on each blade because of this and so it will shine the lazer very accuratly. I just looked in my pictures and I didn't find any pics of mine. If I'm able to, I'll try to get some tomorrow so you can see what I'm talking about. Take care, Jim Chuk
Somebody ran the bid up on the protractor higher than you can buy a new one. I am going to call WD and see what I need to do, and will buy some new blocks, bolts, and protractor while at it. I wont need the blades for a while, unless I can buy some used ones at a discount.
Thanks again for the info Randy - I will post the info I get on this.
ED in MO
P.S. We never know who we may rub shoulders with - I used to work with the brother of the guy who owns WD props while I was supervisor with the Coast Guard - small world, sometimes. He gave me a WD T-shirt and cap.
-
Not saying this will happen to you, but when I got my Kitfox 4 kit, it had a windshield from LP Aeroplastics in a big box. When it came time to mount the windshield, as I was positioning it on the butt ribs, it cracked. I had it sitting in place, and lifted one corner about 3/4" to move it, and I heard this little plink sound... It broke right at the top of the cutout for the wing spar. Sure glad I wasn't the one who paid $400 for it. I've changed about 5 windshields on Avids, and never used heat on them. Never had problems with them cracking either. I'll take that back, I did break 2 of them, but they were trying to hold the rest of the plane up and they couldn't pass muster on that!. Oh well, that's my story and I'm sticking to it! Take care, Jim Chuk
I used the molded plexiglass windshield from LP Aeroplastics. I plan on the same for the project plane, also the bubble windows for the doors.
No crazing, no worries of the lexan.
For the record, the same window fits the Avid as the Kitfox IV. And they make bubble windows for the Avids, too.
-
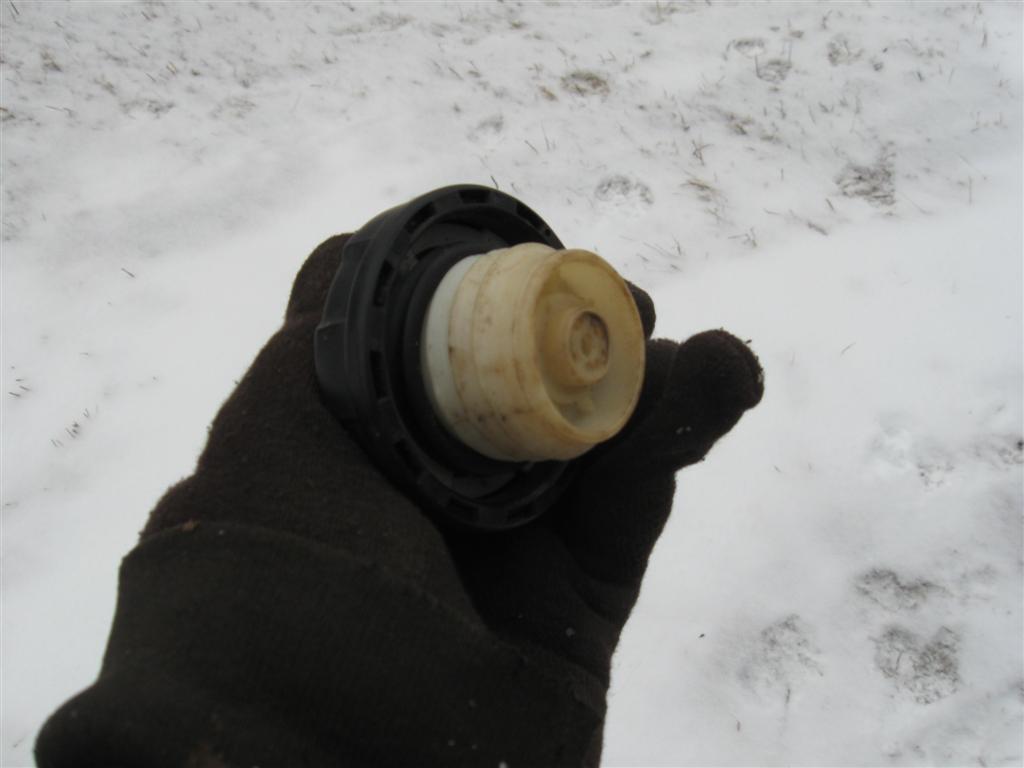
Ed, I didn't say they were interchangeable. They came from different models of Avids. The plastic cap was on a C model, and the metal one was on a MK IV. The plastic ones do stick down into the tank much further than the metal one does, so maybe that is what Leni has. I couldn't understand how fuel could come out of his tanks, but I was thinking about how my metal caps fit into the tank. Take care, Jim Chuk
Dont see how these can interchange - the metal ones have ears like the Kitfoxes, and I buy them at Auto stores.
They are also like the $130 Piper caps that I buy for about $10 and put my own tubes on them.
ED in MO
-
I took a few pictures today of the gas caps on my MK IV, and also some on a C model that I picked up as a project. They are different, MK IV are metal, C model are plastic and have threads to screw them in. Whi


 ch style do you have Leni? Take care, Jim Chuk
If anyone has a picture of the Avid metal cap, please post it up and I will see if I can find a replacement cap at the local parts house.
:BC:/>
-
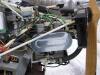
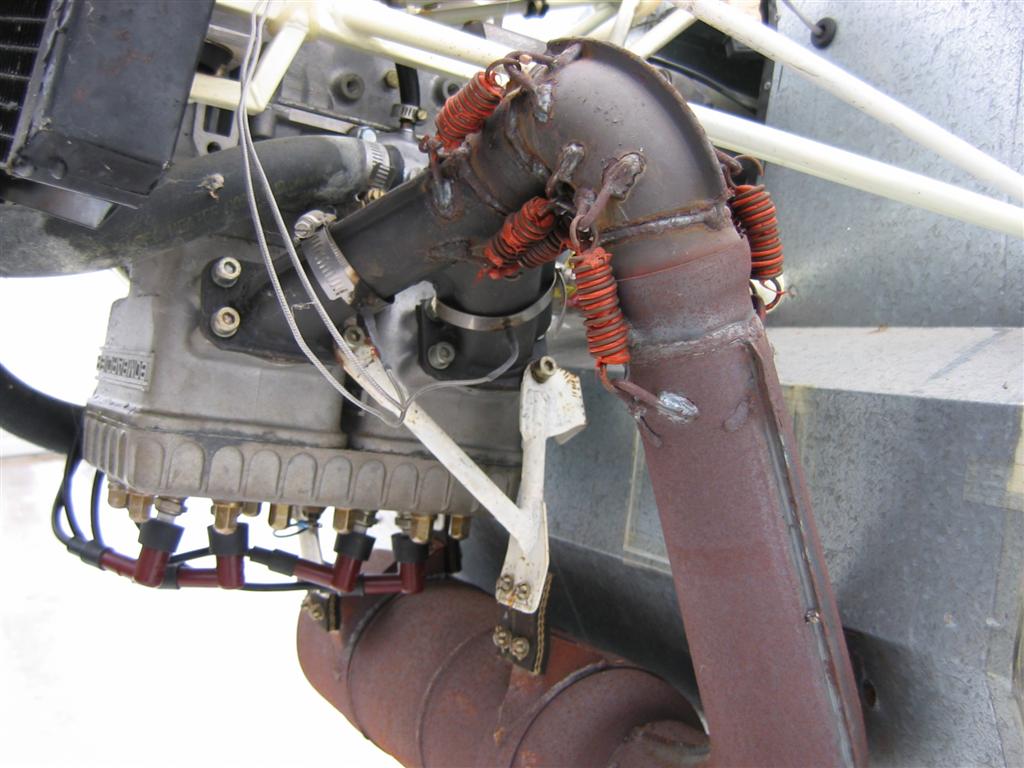
Here are a few pics of my first MK IV right after I got it. What in particular were you wanting to see? I can get some of my latest MK IV later if you want. Take care, Jim Chuk
I can't find any pics of the MKIV FWF here at the house but I can take some of it if needed when I get out to the hangar (and if someone else doesn't send some first).
-
I glued in my vent tubes with some old Scotch Weld 2216 that came with my Kitfox project. I had bought a 5 lb kit of Hysol when I rebuilt my Avid MK IV, and the stuff went bad in about a year. The Scotch Weld is at least 20 years old and it still works fine. I wouldn't glue a structrual part with it, but I've glued all sorts of things and it just works fine. Even glued the side rails on a big truck radiator and it's still holding. It doesn't seem to be affected by the gas either. I never had any fuel come out of my vents, but the bottom of the stem just barely goes through the cap. If that end isn't into the fuel how can it suck the fuel up. Also I thought that the idea of the vent tubes facing forward was so air could come into the tanks to give some positive pressure. Maybe I'm not understanding your question correctly??? Take care, Jim Chuk
PS wish the Scotch Weld wasn't mixed 2 parts to 3, it would be the perfect adhesive if it was 1-1
PSS should have mentioned, I have the original metal Avid caps.
I have plastic auto caps with the vent tubes JB welded in. They leak a little when I full tanks but not bad. The issue I have is if you overtighten the caps to the point they click the vent tube breaks loose. I have re glued them a ton of times. It works but far from ideal.
-
The Data tag I was refering to is the FAA aircraft name plate. Part # B4007 in the Wag-Aero catolog. It measures 3" X 4 1/4". Top of plate says Experimental Amateur Built Aircraft. Below that are where you list: Model, next line: Serial No Empty Wt, next line: Date of Mfg, Gross Wt next line Engine Hp. Then it says Built By then next line Name, next line Address, next line City and State. That plate comes with the kit I believe, and if not you can buy it for $5.00 Take care, Jim Chuk
Guess that about answers all my questions.
Thanks,
ED in MO
-
Couple of things pop out in my mind. You are required to carry a current weight and balance form in the airplane, and that should show gross weight. The other is the Data plate on the tail of the plane. That should show gross weight also. Then again, maybe I'm all wet! LOL Take care, Jim Chuk
Was reading some of the old comments about gross weight and paperwork in the Avid section posted last March -
If no gross weight listed, and it is not on the airworthiness certificate, then how do the ramp inspectors know that you are flying a "legal LSA" when you are flying as a LSP? Weigh the plane? I think I will label mine "LSA" some where in paint, or decals.
What if you had a one-of-a-kind that didnt fit the looks of an Avid or Kitfox or other kitplanes?
Then again, if one was not labeled, and loaded up to excede 1320 lbs, then it could still be flown by a private pilot as an experimental. Hmm, now that I have a 1550 landing gear.........
ED in MO
-
My first 3 Avids had the sling seat and this last MK IV has the fiberglass seat. Without extra padding, the fiberglass seat is a killer for the small of my back. I'm not tall, 5'8". I took a small foam pillow that is about 16" wide and 12" high and 3" thick and set it behind me on the seat. That makes it fine. The problem as I see it is this. It's like the seat goes forward just about at your waist level and then goes back again. It puts a bend in my back that's not supposed to be there. The sling seats were okey on my back. I'm thinking about making a foam pillow that will got full width across the back of the seat. Forgot to mention, this Avid has the factory bubbles on the roof for added headroom. I don't need it but toom much room is better than not enough. Take care, Jim Chuk


Show me your throttle setup
in Avidfoxflyers General Hangar
Posted · Edited by Jim Chuk
Glad I could help! Should be fairly easy to come up with most of the parts. Sounds like the second poster in this thread (birdog) might even have them. I think my system was standard on the MK IV. Someone going to a 912 would probably go with the dual cable approach that the link in birddog's post shows as the carbs are on oposite sides of the engine. My system of course has all 3 cables (2 carbs pluss oil injection) routed to the right side of the plane. Take care, Jim Chuk