Luked
Contributing Member-
Content count
356 -
Joined
-
Last visited
Posts posted by Luked
-
-
Awesome news. Looking forward to video. Congratulations!
-
... It seems like this one is in your area, that's worth something compared to going clear to the other side of the country for one.
I agree with everything Jim said, but especially this point. Not saying you should go for this one, but distance to a project can be a real pain. First you have to travel to check it out. Then you have to arrange transportation, and avoid damaging the project in between.
Oh, and Joey is right too. You never know what you are getting into when you buy an old plane to restore. On the other hand, plenty of people buy flying planes with no idea of how much corrosion of other hidden issues are lurking where they can't see. At least if you tear it down and rebuild it, you know what you've got. It's just more work than buying a kit that hasn't been built yet. You pays your money, and takes your chances...
Edit: some other things to think about (since I've been doing the same thinking on my project). I've never covered a plane, but friends tell me it will be about $2500 or so (on the low side maybe). I think paint will be in addition to that. If the engine needs going over, Rotax Rick charges about $2500 for a rebuild. If you have to rebuild the wings, that could be ???. These are really rough numbers. Just food for thought when considering what you might have into this thing to get it flying. I'm sure other can provide more accurate numbers, but you get the idea.
Also, I personally wouldn't try to make it something it's not already. I'd leave the 582 in it, get it flying, have some fun. Then sell it down the road, and buy one with the stretch already done if that's what you want. I have a regular fuse, and a stretched one, and I can tell you from looking at it that doing the stretch is definitely doable, but may be a bigger project than it seems at first. I'd hate to see you cut up the fuse and then get stuck on the project. There's enough on these things that can slow you down on these. Only you know what you can bite off though. Good luck!
1 person likes this -
If you are just going with one layer of glass on the outside it may be to flexable to hold its shape with the foam removed from the back side. So one thing you can do is put the micro slurry on the outside a good 1/4" thick as per the article and then wait to finish it after the inside layers are in place.
Excellent idea. I'll have to go back and read through that whole article.
-
Hey KD, good to hear from you. I hope you can make a full recovery quickly. From the pictures it looks like it could have been a lot worse. I know I love to fly, but can't say what I would do in a situation until I've been in it myself. Good luck what ever you decide to do. I'm glad you're still around to tell about it!
Luke D.
2 people like this -
Hey Joey, not to tell you how to do things, but just some thoughts. When you get down to final shaping, I've found that a paint stir stick (from HD or paint store) or something similar with sand paper glued to it works good for mild curves like that. You want something that will flex around the curves, and not make waves. You can sand across it in multiple directions to avoid waves. You also want to get a balance between how stiff your sanding board is, how course your sanding paper is, and how easily your foam sands. A stir stick might be too stiff for sanding the foam. It may put too much pressure down. Finer sand paper may help too if that's the case. Looking good.
Edit, also moving the sanding stick 45 degrees to the stick itself (in both directions) helps avoid waves.
-
Composites are fun! You'll soon be addicted
")
-
Ed, I think there might be a little bit of a compound curve in that part of the cowl. If so, I think I would try the foam. It it's flat though, some cardboard with packing tape would probably work good.
-
I didn't think it was necessary to go up onto my wing tip 3 full inches. Now all I gotta do is a little epoxy fillet to make them look like they flow into the wing tip. It looked like a simpler way of doing it.
You also left a little weight off the plane. It's not much, but an ounce here and there, and soon you've saved another pound. Looks good. You sure are moving along on this thing.
-
Hi Ed, I'm not planning to us KF ribs on my current project. I will on the MK4, but that's on the back burner for now. I was just passing info along for anyone that is interested in the KF airfoil.
-
Yes use the Kitfox flapperon hangers! The avid /early Kitfox design of exposed rib tails sux!
If you have some skill, or better, know a water jet house, buy one Kitfox rib and copy it. I have never found any online drawings, so if you reverse engineer them, I'd love to know the details.
Work Out the price. You may wind up better to just buy a wing kit, or partial kit, from Kitfox.
Hey Larry, check this thread. Post #14.
I downloaded it sometime in the past. I'm pretty sure this is the one I downloaded. I opened it in Solidworks, scaled it to full size, and printed it out. Laid a KF rib on it, and it fit perfectly. It's a Riblett GA30U-613.5. I have Ribletts airfoil book, but the coordinates for this one are not in there. I plotted the closest one GA30-612 or something like that, and it was a fair amount different even after conpensating for the slight thickness change. Not sure what the U in the name does.
-
Welcome Ironman. I'm looking forward to pictures too. Good luck with your project.
-
I'm using a backup electric pump which I haven't really needed yet other than to fill the carb bowls after maintenance. I also have a fuel pressure gauge (1" UMA) with a Mallory Fuel Pressure Isolator so I'm not running a pressurized fuel line into the cockpit. Wish I had a good fuel flow meter, but it's not worth hundreds to me.
Sed, you must have one like this? UMA 1-1/4 MECHANICAL FUEL PRESSURE GAUGES NON-TSO If fuel pressure gauge has been enough for others, I'll probably just do that too. The flow gauges are pretty expensive. I have a friend with a carbureted RV-9A, and he just has a pressure gauge.
He used this gauge: Van's Series Fuel Pressure Gauge
-
No, I've got an uncut MK4 cowl, and a wrecked one. Thought I might modify one of those.
I don't mind a little extra drag if I can trade it for a simpler system. The other thing I want to think about is easy access for preflight stuff and occasional maintenance. I'm guessing I need to be able to check coolant level, check plugs. What else? I was thinking of a small hinged door.
-
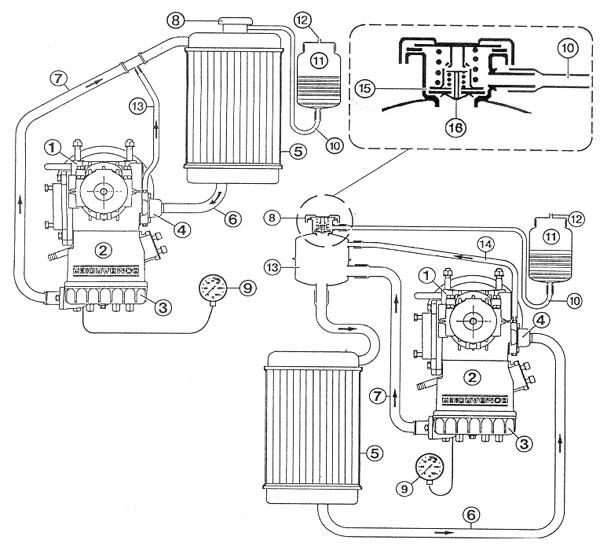
While I'm working on my wings, I sometimes start to think ahead to the engine. Since I'm new to Rotax 2 stokes I've been digging around for information to educate myself. My wrecked project came with the MK4 style cheek radiators. One of them is a bit damaged though, so I'll have to have it repaired or find a new one. The bottom cowl is destroyed, so that will need to be fixed.
I came across this article though, and it got me thinking:
Avid_Speedwing_Mk_4_Flyer__G-LORT_02-11_accident_report.pdf
It seems to me after reading the report that the single radiator down low like the earlier Avids might be less prone to overheating if you loose a little coolant. The earlier style also seems closer to what Rotax suggests for a layout:
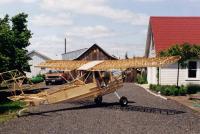
I really like to looks of this setup:
What do you guys think?
-
Oh, acid brushes. I know what you mean now.
-
Hey Joey, I tried replying to your PM last week. Not sure if it is working though. Just let me know if you would like me to make a trace of the rudder for you.
-
Oh yeah Ed, good point I forgot to mention. If you use the cheap paint brushes from HD, cut the bristles about half their length so they are stiffer like you mention.
The method you described works just fine. Not saying my method works better. The reason I like the plastic is that it is the poor mans way to get a very accurate resin to cloth ratio to keep weight down. It especially seems to help beginners. You can even put the cloth between two pieces of plastic and it works almost like vacuum infusing. Just dump a pile of resin in the middle, and you can dry squeegee the whole piece of cloth in seconds. Either way works fine though. Just depends on your preference.
-
I like to use a couple coats of wax and then some PVA if you are using a mold with some compound curves. If it's a fairly simple shape though without a lot of compound curves the packing tape works great. I've done repairs like Joey's cowl patch with just some stiff card stock and packing tape. Just feather the edges around the area to patch a little.
I've found that the biggest thing for getting good results with fiberglass is good planning and preparation before you ever start mixing the resin. Everything has to be planned out and in it's place ready to go before you start. The right tools help a lot too. I like these rollers (especially the little one) to remove air bubbles.
http://www.fibreglast.com/product/Barrel_Rollers_1151/Supplies_Tools_Rollers_Squeegees
If you don't have the rollers, some cheap paint brushes from Home Depot can work too. Just buy a bunch since you just through them away. The flexible squeegees in the auto body section are good too.
One other trick I found helpful when I was starting out was to use a thin piece of clear plastic to wet out each later of cloth. cut the plastic a few inches bigger than the cloth piece all around. Lay the cloth on top of the plastic, but reversed from the way it will go onto the layup area. Wet out the cloth on the plastic, and squeegee any excess resin off the side. Then flip the whole thing onto the layup area. You can use a clean squeegee to work the cloth into the previous layer. Then just peel the plastic off.
After the last layer, a layer of peel ply helps with the finish too. Wet the peel ply just enough that it is completely wetted, but just barely. Fiberglass is a lot of fun once you get comfortable with it.
-
Was it expensive? The least expensive fuel flow setup I can find on ACS looks like about $311 (UMA stand alone gauge with EI transducer). Fuel pressure gauge is about $77 for gauge and transducer (Vans).
-
Interesting conversation. Leni, you mentioned fuel flow dropping. I'm wondering if most people are using a fuel pressure gauge, or fuel flow meter, or both to keep tabs on this while flying.
1 person likes this -
Hi William. I'm in Oregon. I doubt I'll have my plane flying by then, but if this happens again when I get my plane flying I would like to do it. Have fun, and take pictures to show us.
-
+1 on the packing tape. I've used it many times. It's perfect for quick one off jobs like this.
1 person likes this -
Looks like a good time to invest in the Just Aircraft spar inserts at about $75 for 2 of them - Lots cheaper than Kitfox inserts, and a lot longer and stronger than the Avid plywood inserts.
Did you get .065 or .083 wall spars?
EDMO
Sorry Ed, I forgot to answer this. I got .065".
-
Joey, I'll let you know how the spar replacement goes. I've already removed the old spars. That went okay I guess. At least I managed to avoid damaging the rest of the structure.
Ed, since this is a budget project and the wings will only have 12' spars, I'm just going to make up some of the 1/4 ply inserts (I'll use top quality aircraft grade). seems like they've been sufficient in a lot of Avids so far. On my other project with the longer KF wings, I'll go with the extruded inserts for sure though.
1 person likes this

Amphibian project resurrection & modifications
in Avid Catalina
Posted
I don't know about others, but I can tell you that my model C with the 582 has a very obvious amount of "left rudder" build in to the vertical fin. Where the forward tube of the fin intersects the cross tube it's definitely not in the middle. On my mark 4 I think it's pretty much neutral, but I could be remembering wrong on that one. I haven't looked at that one in a while.