High Country
Members-
Content count
479 -
Joined
-
Last visited
Posts posted by High Country
-
-
just to give a different option you could make as small bushing weld it to the steel reinforcement plates, enlarge the hole in the aluminum preferably with a file keeping it a nice tight fit for the bushing to go through and put it all back together. I hope this made since??? please see attached crappy picture for reference

-
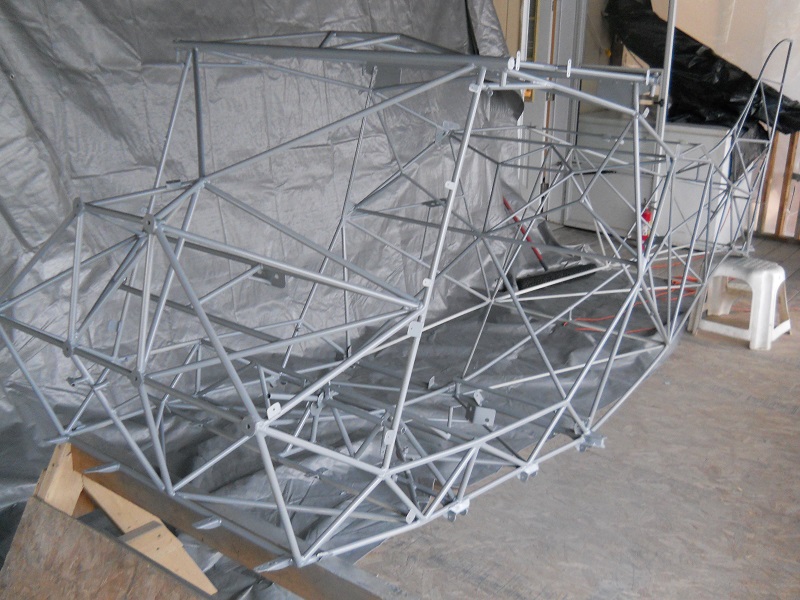
here is a pic I found of my airframe you can see the four small tabs in the lower front foot well. My original firewall was executed right at the tips of the longest two my new fire wall extends about 2.5" in front of them. Hope this helps

-
I haven't had a chance to look for the pedals yet as I've been out of town for a while maybe Joey will beat me to it? as for your firewall concerns which airframe are you working with? does the lower front execute with a piece of tubing going nicely from left to right down at the feet or do you just have the four small tabs sticking out front that the rudder pedals bolt onto? Mine is the older one with just the four tabs so when I bent my firewall a couple weeks ago I made the lower end stick out about 2.5" in front of these tabs giving me just a little more foot room and a better place to mount my master cylinders. If you have the flat bottom than you already have the more forward mounting position in which case you can just make it go right straight into it. I hope this makes since I will try and get some pics of my new firewall in the next couple days so you can see what I'm talking about in
-Robert-
-
just for the record as I have no clue what you all are talking about could someone put up a picture of the dynavibe mount? I have the original C mount and it seems fine just curious what the difference is
-
Joey, I think they are exactly the same until they went to hydraulic.
I will still have to look for mine but will not be home until some time after the first of the week. I will get some photos up and if track welder can get some use out of them I will send them to you
-
I think I still have my originals laying around somewhere, if you're still looking I will try and dig them up the first of the week when I get back home and you can have them if you pick up the freight, I don't imagine it would be more than 10 bucks at best. let me know
-Robert-
-
or in other words if the "soup" doesn't make your head spin everything else will

good luck and congrats on continuing your aviation education I'm hoping to get started on my IFR training this fall
 we shall see
 -
I would definitely re seal it! You can get a complete gasket kit for around 50 bucks.

50 bucks where? best I have found is $100.00 http://www.powersportsupply.co/products/Rotax-532-Engine-full-gasket-seal-set-ultralight-aircraft-engine.html plus 40 bucks for the ceramic water pump seal http://www.ebay.com/itm/ROTAX-582-BLUEHEAD-CERAMIC-WATER-PUMP-SEAL-/310652854218?pt=Motors_Aviation_Parts_Gear&hash=item48545a5fca&vxp=mtr which i think any machine shop should be able to fit up for me.
-
I found that I had a few pics of the factory throttel set up for the 582 on my latest Avid MK IV. My first MK IV was like this as well. It seems to work just fine as far as I can see. Smooth operation and all. Take care, Jim Chuk
does anyone happen to have a length or even a part number for this throttle cable setup by chance? I want to upgrade to this system soon and am not around my airframe to get any measurements at the moment and was hoping to put in an order today.
Thanks Robert
EDIT: just to be clear I'm referring to the one with the bell crank being located under the instrument panel.
-
I never had a problem with RV seals after I learned about silica free antifreeze and distilled water so I never did the ceramic seals myself.
Not to steal this post but what "about silica free antifreeze and distilled water" ? I have an old 0 time 532 that I'm planning to use soon until the budget allows for a 582 and it has the old style seal. what should I do to make it most reliable? It has never been run before but has sat for 25+ years should I tear it down and replace the gaskets/ seals anyway? what about the seal. I don't want to put more than I have to into it because I would like to replace it anyways but I do want it to be safe though and this post caught my attention.
-Robert-
-
I contacted a local radiator shop yesterday to see if they could fab one up hope to hear back today about pricing.
-
I had this trailer built by local dealer, 25' X 8.5". Through the door 98". inside 100" Has elect. brakes, LED lights, side door interior lights, and roof vent.
Works great with the elect. winch I installed
Russ,
if you get a chance could measure what the spacing is on the wall studs (24"?) and in the roof, and also what size tubing was used in your trailer. I started building mine last fall its currently just a flat frame waiting for walls. I hope to be needing it in by early summer. yours looks exactly what I had in mind. I'm thinking of making the walls with Styrofoam glued between the studs and into the roof with some vents. also want to put a small man door in the front and a wall separating a small room up front that I can keep tools, parts, etc in. what do you guys think anything else I'm forgetting?
-Robert-
-
Just checking in to see if we ever came up with the consensus on where the best bang for the buck is on radiators. Im looking to buy one soon as I'm planning to finally be in the air in the next couple months

-Robert-
-
Luke, thanks for the info I never though about using glass to lay up against this sounds like it may be a good route I will have to look around and see what I can come up with. I could take my mold apart and put the glass between the two pieces. see thats why I love this place so much never fails that someone will have an idea that I never thought of.
EDIT: a scrap piece of Lexan should work just as well right? it would be less likely to brake when the mold is in storage in case someone else wants to use it later on.
-
so should I paint the mold or just put primer on it and sand the primer. what paint/ primer should I use for the best smoothest results
-
My kit came with the nose fuel tank and tiny panel that accompanied it so no i don't currently have a panel to use for a mold. I'm mostly wanting to use CF to keep it light not so much for the look although I do like it. I also already have all of the carbon fiber and resins to go with it so cost at this point is marginal probably even cheaper than buying a piece of aluminum. I remember someone on here a couple years ago did this only using fiber glass but the mold was the same concept I have already cut a mold out of 1" particle board and sanded it so it is already real smooth and will give me a nice 1" deep parameter around the panel. from what little i have found so far it seems that 4 coats of mold release wax and a layer of PVA before doing the layup should? give me a nice smooth finish as the wax should fill in any minor blemishes. does this sound correct to any fiber glass guys... Ed I know you always have some good wisdom to share. thanks for the input
-Robert-
-
so after taking the last several months off from working on the avid I'm finally back to it again, scheduled to be in paint the first of the month
I'm ready to make my instrument panel and am wanting to use carbon fiber but have no experience with anything like it. from what I've read and the videos it looks to be pretty easy but the part i'm still not sure of is the mold. I was hoping to just cut out the shape I want into a piece of wood attach it to another piece of uncut wood for a backing and use it as a mold, will this work or am I looking at problems. do I paint the wood before applying the wax or just put wax the raw wood?what I'm thinking so far is wood mold- couple coats of wax mold release- PVA - resin - carbon fiber - resin - carbon fiber etc - 4 to 5 coats worth.... does this sound correct?
hope to be flying by May
-Robert-
-
Robert,
Rod just told me - look at "fng post" in Introduce Yourself - that the STOL tanks wont work with the speedwing ribs because of the TOP profile?
 WELL - If yours worked, why not others?
If memory serves me - we talked about adding another layer of rib caps on top, but you did some grinding and got them to work without adding any caps like I did.
EDMO
Ed,
sorry it took me so long to reply i must of missed this. anyways what I did was to just get two more of the transitional root ribs (they have the high arch of the HH wing on top and the flat bottom of the speed wing) I used these for the #1 AND #4 ribs the #2 & #3 ribs are omitted to make room for the tank then I just ran false rib cap strips along the bottom of the tank for #2& #3 to make it flat like the rest of the wing. this gave me the room to fit the HH tanks into my speed wing. it just tapers down to rib #5 into the speed wing profile. I used aluminum for the stinger to set the nose ribs on so it was bent up to make the transition smooth. it came out real nice hope to see how it actually flys in a couple months. I will look for some pics and put them up for you.
-Robert-
-
Thanks.
p.s. can you guys in the States get hold of replacement (behind instrument panel) fuel tanks? Do they ever come up for sale? Or I heard something about a retro-fit tank mod that can be fitted to the wings near the wing roots like in later models. Where can these be purchased from please? Cheers.
If you're interested I have a new poly behind the instrument panel fuel tank with a new uncut fiberglass instrument panel to attach to it. I went with new wing tanks so didn't use it. that seems to be what most do anymore but if you don't want to cut into your wings it is an option. If you're interested let me know I will try and get some pics of it for you. also have the original fill neck and cap for it as well.
-Robert-
:edit: so I don't have any pics here with me at the moment but I have some posted here http://boise.craigslist.org/rvs/4348016472.html you can look at
-
here's a crappy drawing to try and give you a visual, I'm sure others have different opinions and they will share as well

-
you will need 3 fittings coming in to the top and one out from bottom side of your header tank (another out of the very bottom for a drain) - in the top fittings 1 hose goes to each tank and the 3rd goes to your vent. the lower goes to the engine. I'm guessing you have two in the top at this time correct? one going to the outlet in the tank the other to the top of the tank for a vent. if this is the case you could remove your header tank drill and tap for one more fitting and just plumb it to your new wing tank. if you don't have enough room to add another fitting you could just put a tee into the line that is already coming from your current tank and hook up the new tank to the side of the tee. keep the tee as close to the header tank as you can, we have another Avid MK IV here in our club that is plumbed this way and he has never had any trouble with it.
-Robert-
-
I got some U shaped molding for mine you might look at ACS http://www.aircraftspruce.com/catalog/appages/uchannel.php?clickkey=19812 and see if they have what you are looking for
-Robert-
-
Joey, I have upgraded both my rudder and elevator to the MKIV tail feathers. they are currently covered and waiting for paint. what exactly are you looking for? measurements? traced templates? ...
they would be a piece of cake to fab from scratch and wouldn't cost too much either. let me know what you are looking for and I will do what I can to help. you can easily just cut everything off of your current torque tubes and weld the smaller tubing coming off it into whatever shape/size you want. I also have the elevator trim added to mine. nice upgrade.-Robert-
-
looks like it worked but you have to follow the link for the 3rd video for some reason
-Robert-


Model A cable brake rudder pedals
in For Sale and wanted, you got it, I want it
Posted
the firewall is flat against the top two motor mounts going down the the next four mounts from there about the bottom of that tube going from left to right it bends forward aprox 5" then back again sloping back into the foot wells. if you make it stick out in front of the current tabs 1-3" it will give you a nice place later to mount the lower end of the master cylinders to. If you have a pull starter you will also have to cut a hold in the center and make a box for it.
-Robert-