Yamma-Fox
Moderators-
Content count
712 -
Joined
-
Last visited
Posts posted by Yamma-Fox
-
-
Just an update here on feedback from people who have bought direct from Nick in Romania (see early posts in this topic for order process):
Everyone I have talked with has had a good experience and a prop shipped promptly. The only small complaint I've heard is that, rarely, Nick can be a little slow on returning emails.
Today a friend called and told me that there was a slight defect (delamination) on the trailing edge of one of his blades. He had a buddy who spoke Russian and they called Nick up to ask how to repair that, but Nick told him that he would ship him 3 new blades that very day... and only asked that my friend ("Yooper Ed" here in the forum) send his three blades back to Nick.
Pretty dang good customer service report there!
I remember I was a little hesitant to send a money order blindly overseas, but so far it has worked out well for everyone.
1 person likes this -
Could not resist making a very short film: Changing prop...
Dang Fred... guess us guys over on this side of the "pond" haven't evolved into that "Star Trek" level of maintenance practice yet!!

I need you to bring some of that kinda magic over to help with my motor change!!
")
-
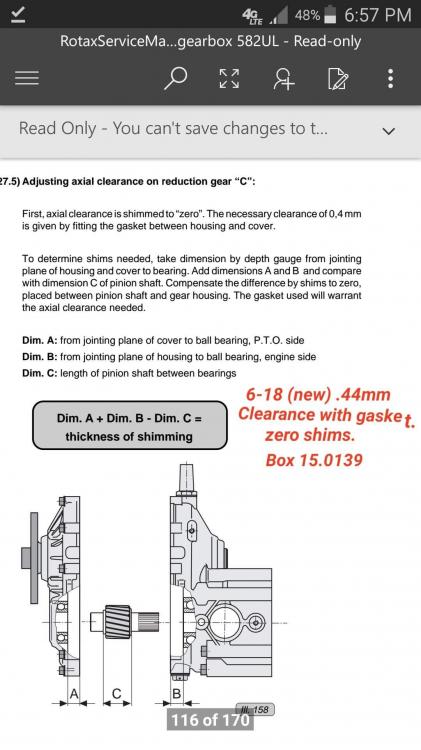
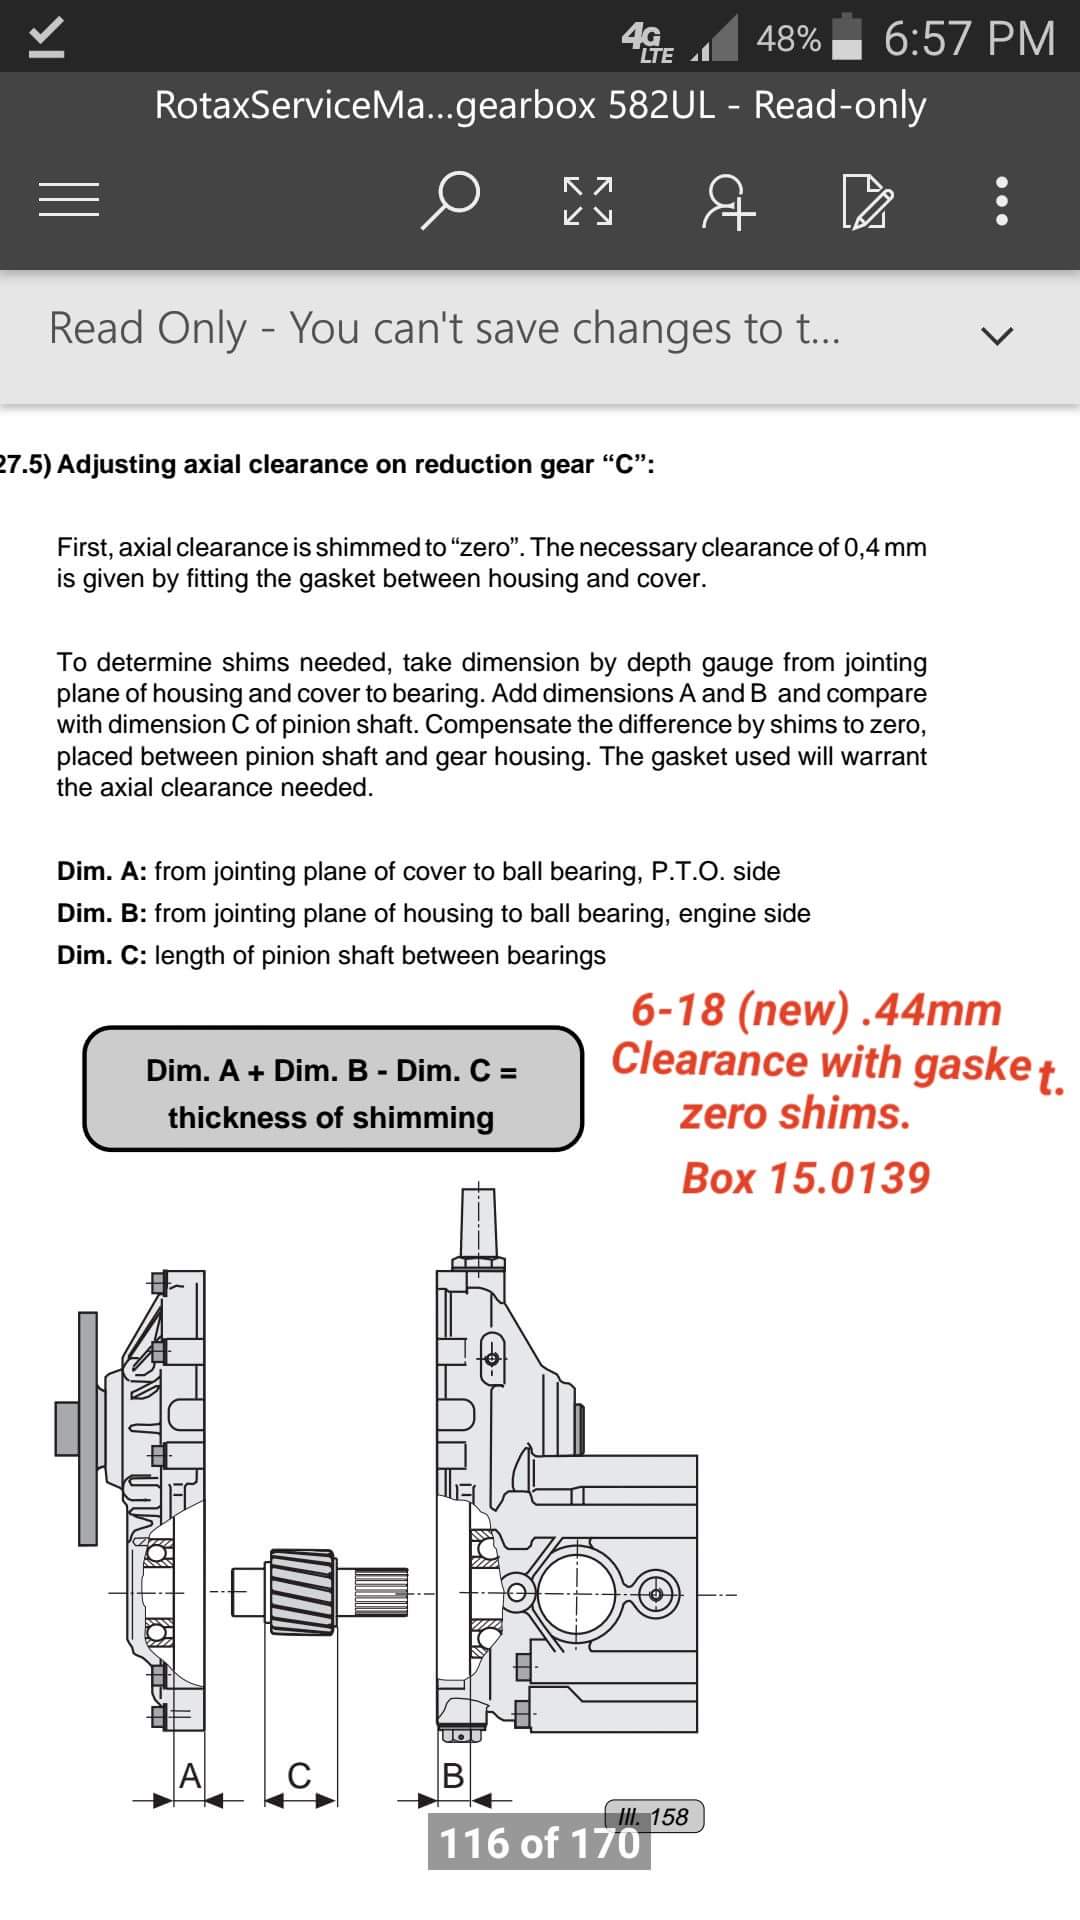
Reference post above, here is the axial clearance measurent screenshot from the manual, along with a description of how I found to do it in an easier way:
For anyone who wonders the procedure for checking Rotax C pinion shaft axial clearance, here is a copy, but I found it easier to simply add a number of shims (I put in like 4), install and torque pinion bolt, then set the case cover down (without gasket). The proper gap IS the .4mm gasket, so I measured the case cover gap without the gasket and removed a number of shims that measured the same (or slightly more) than the gap.
Then I double checked my measurement by doing it the way described in the manual. For my box I had a .44mm clearance with zero shims.
I also think it is important, during reassembly, to triple check that you don't have too many shims in by checking that the case cover actually still will contact (without the gasket) the case. This ensures that you didn't add too many shims and have a binding problem when you bolt the cover on.
I'll re-check that at about 30 hours after break-in and predict that I may need to add one shim at that time.
 1 person likes this
 -
Teal contacted me today with a report that a pinion shaft bearing began to fail on a (appox 200 hr) Skytrax RX-1 running an RK-400 centrifugal clutch.
This event is noteable because it is very similar to one other case where the same problem was encountered (also a Skytrax RX-1 w/ RK400, but with approx 110 hrs).
Other noteable facts include:
- Both failures suffered NO powerloss. The bearing began to give out but the rigidity of the RK-400 clutch (mounted on the PTO) helped keep the clutch drum and pinion shaft centered and the gears remained "meshed" and running. It appears likely that at least one of these two gearboxes ran for a number of hours in the partially failed bearing condition.
The problem (in both cases) was detected during a subsequent preflight by noting some side to side play in the clutch drum.
- Also noteable is that there are many other setups nearly identical to this one (centrifugal clutch with similar hrs of use) which have had NO problems, and also there have been no reported problems while running the rubber flex drive ("hardy disc").
******UPDATE****
Analysis is back from the Rotax service center on these two gearboxes. It was determined that the latest gearbox was assembled incorrectly during a gear set change (see pic 2 posts down), and that both gearboxes had the pinion bolt come loose during operation. (that bolt in the center of the pinion shaft, bolt head located in gearbox, going out through to the coupling that connects to the clutch drum / hary disk)
When that bolt came loose, the pinion shaft apparently "rode up" the gear teeth and rammed against the outer pinion bearing (in outer case), loading it axially which in time caused the bearing to fail. Also the gear wear pattern on the second (improperly assembled) gearbox had the large gear scraping the case cover and the pinion bearing race. Wear marks showed that the two gears in that one only had about 50% tooth alignment.
So it looks like the problems here have been isolated to improper assembly and also more noteably from the pinion bolt coming loose, so a couple unofficial recommendations are suggested from the shop to users of the c gearbox:
The pinion shaft bolt should be cleaned thoroughly and red loctite used during final assembly. (torque is 212 in-lbs)
When you have the gearbox apart to that point, the axial clearance of the pinion shaft should be checked. This clearance is critical to bearing life and gear engagement. In the post below I'll reference the service manual excerpt on how to make this check.
Additionally anyone running the Rotax gearbox can also make an easy preflight check to determine that the pinion bearings are in good condition. This is a simple procedure where you reach in the access / cooling hole and physically push on the drum / hardy disk. There should be no detectable side to side movement.
-
Thanks guys. Will do.
-
I use an oil base sculpting clay to build up the clearance on my cowling. It can be shaped and smoothed out to the exact shape desired. Lay one layer of glass over the the clay and lapped over onto the cowling about an 1", let cure, remove and completely clean the clay from the back side, lightly sand and apply two layers of glass on the back side and lap onto the existing cowling about an inch.
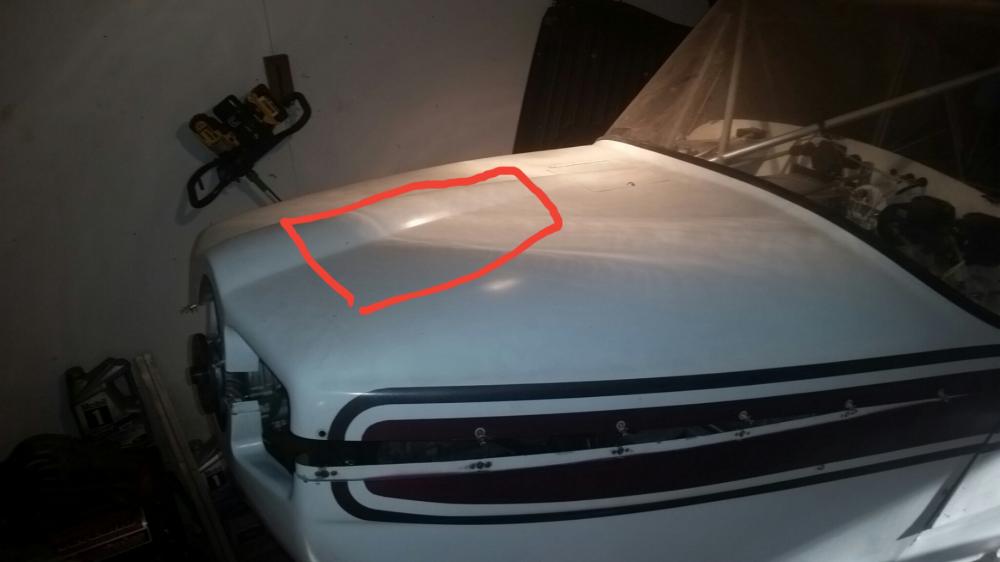
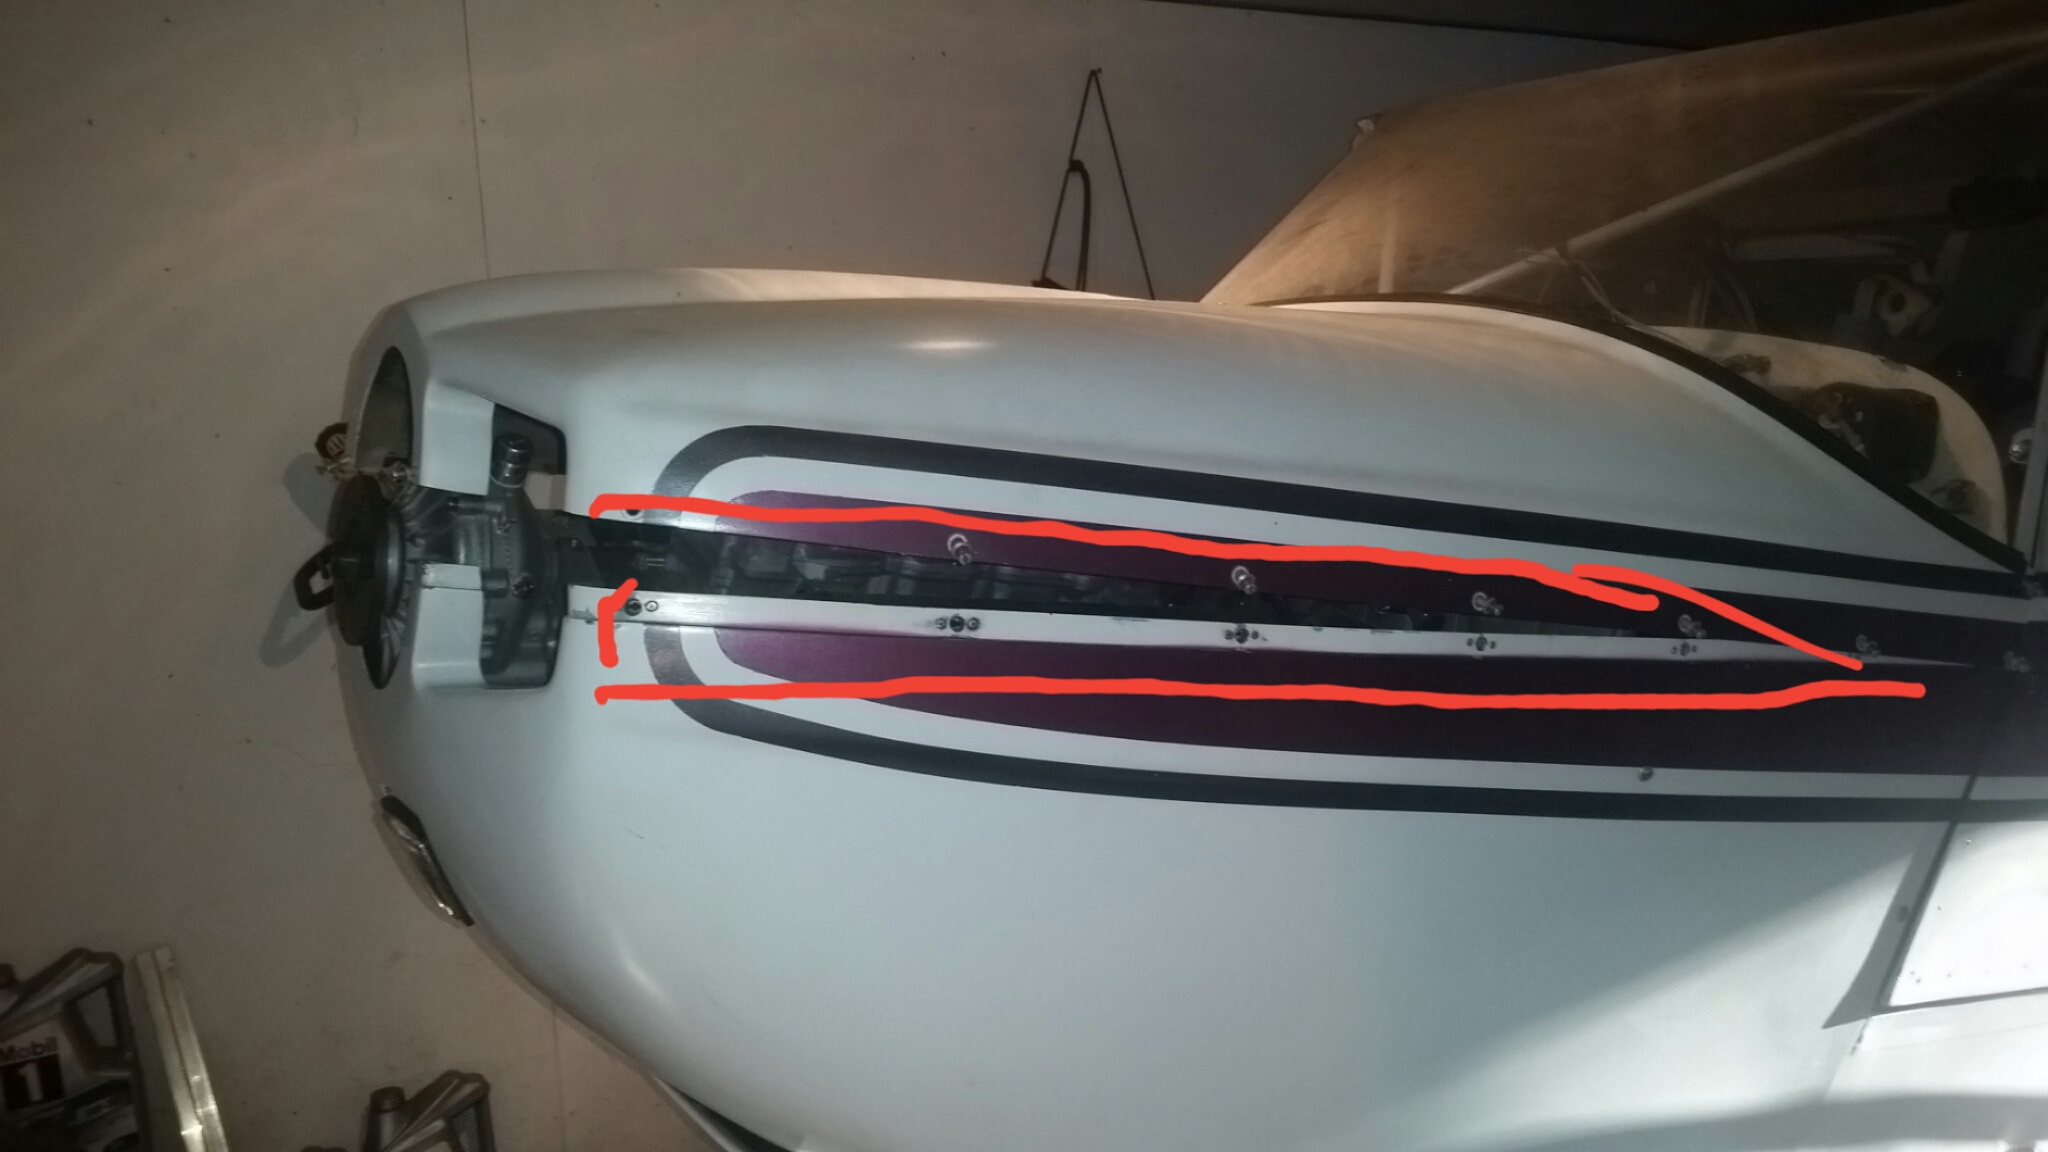
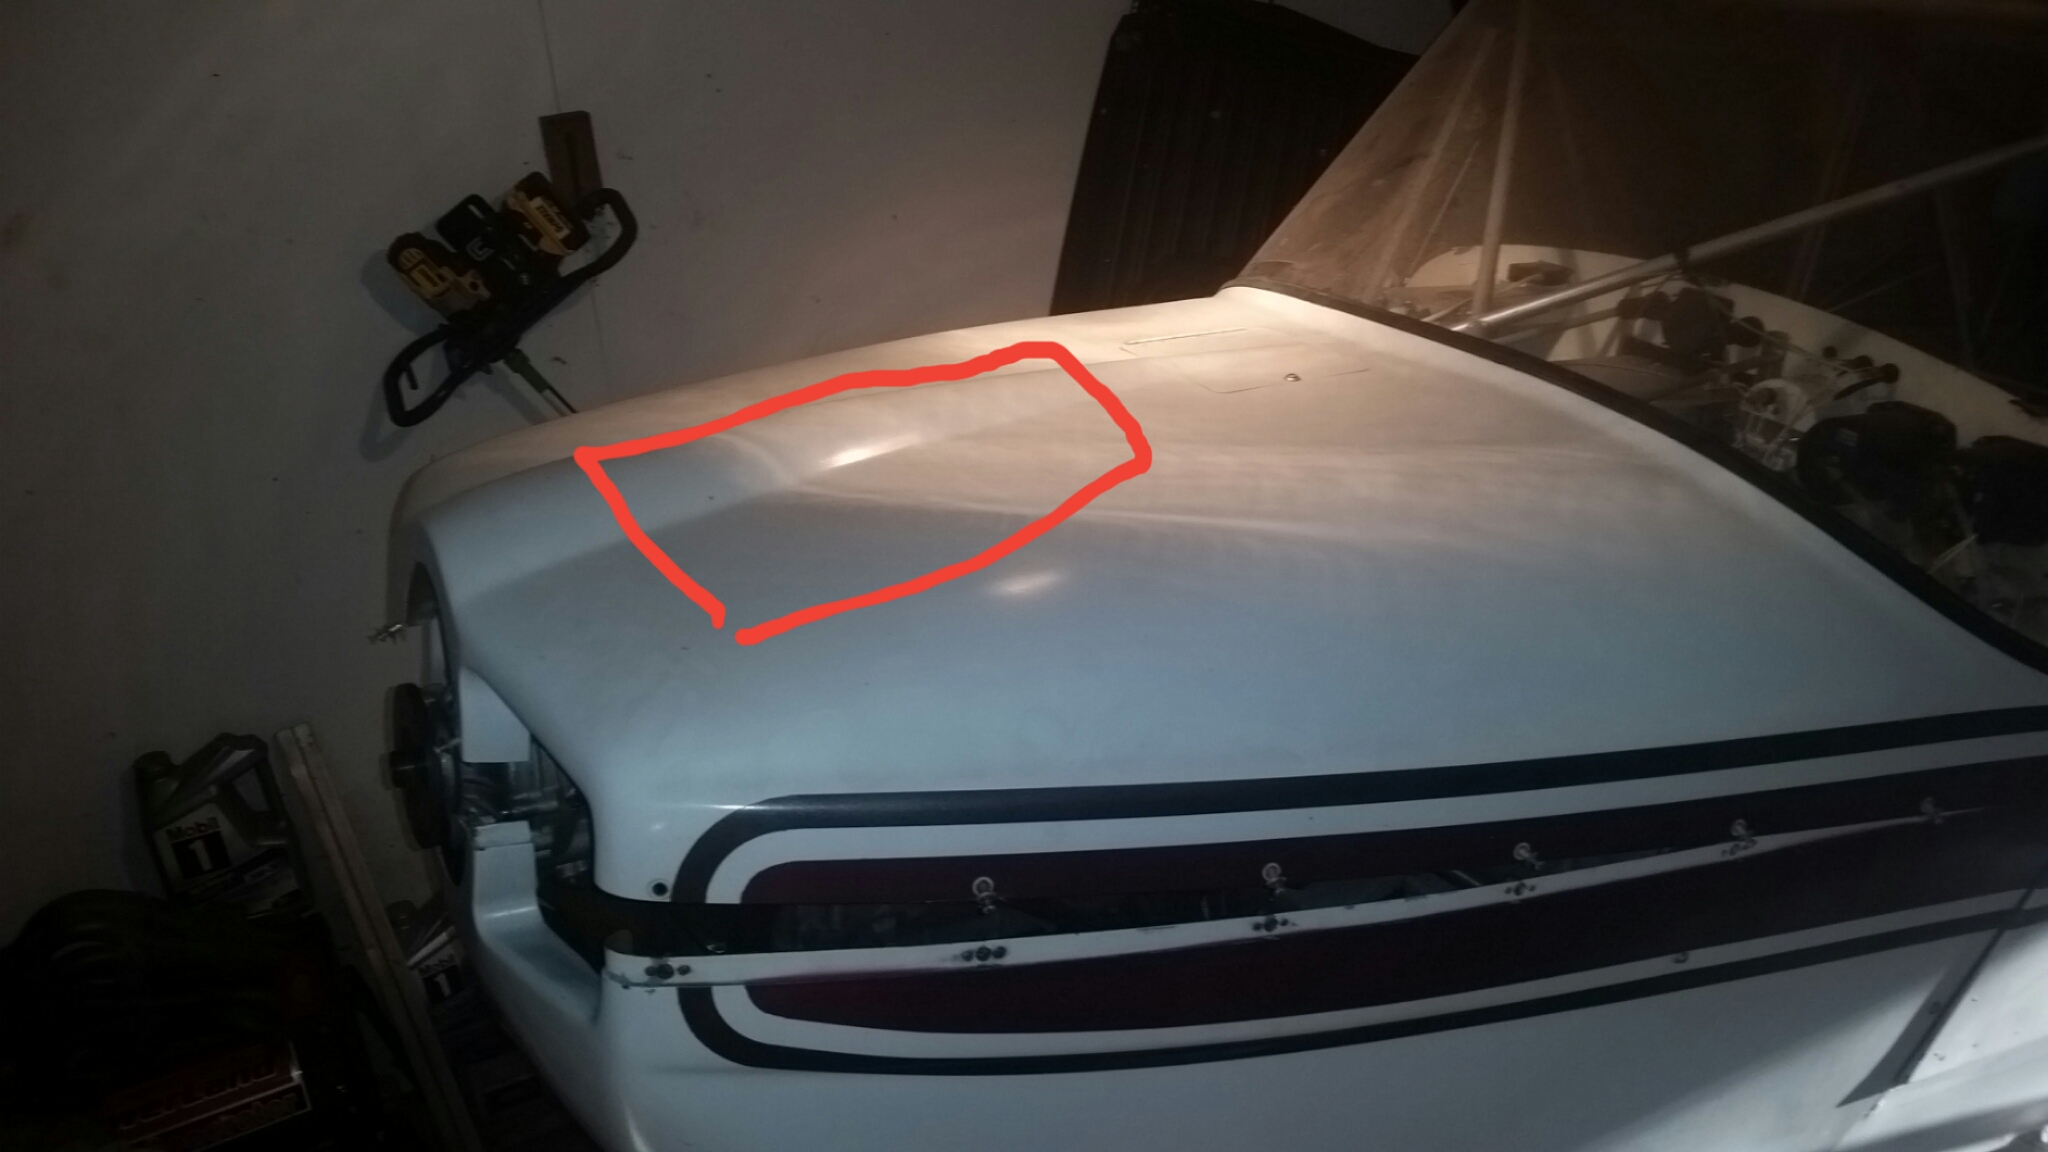
If I did the cutout up top, here is the my leading plan of attack
-
I kinda hijacked another post and thought I'd bring it over here to stop that.
The RX-1 is tall and skinny, the Subaru flat and wide. So I need about two inches up top front.
Two ways to approach it that I had in mind.... probably an even better one out there from one of you guys, throw it on the table
Option 1 is to save the cutout on the top of the cowl and build in "triangle slices" along the gap betweem the halves (red triangle in pic below). Then work out some extensions up front at the prop opening. Downside there is a goofy look around the spinner but maybe less work overall.
Pic 2 shows where I would have to cutout up top if I chose to drop the cowl halves together the way they are. Downside there is probably an uglier "cowl bump/bubble"
Votes?
Better ideas?

-
20 miles.....
I might even have a chance of getting in that strip and not going off the end.
2 people like this -
Thanks for the pics and ideas.
Yeah I was thinking about maybe cutting down a plastic bin (tote) or something for my top cowl mold.... but not quite... there's gotta be something better...
Mayne a faux hood scoop for a car...
-
Wish I could send you my top cowl half!
I need to do a cutout and "bubble" to allow more room for my new motor, but haven't figured out how to tackle the glass work yet.
-
On the oil temp discussion, i bet it also would make a huge difference where you measured it right?
In the tank or coming out the bottom must be a lot cooler than if you were taking it off a tapped sensor in the oil cooler bolt or at the oil test port above the #1 exhaust port.
-
I am running at 257F which is a little on the warm side.
Sorry.. forgot who I was talking to (someome already running a yamaha!)
I plan to run full synthetic Mobil 1 0w40 which can tolerate higher temps and avoid thermal breakdown of the oil. I wouldn't flinch at running 257F

-
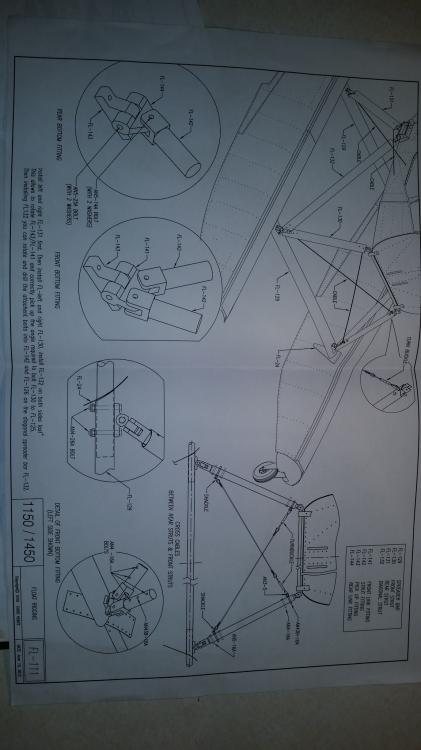
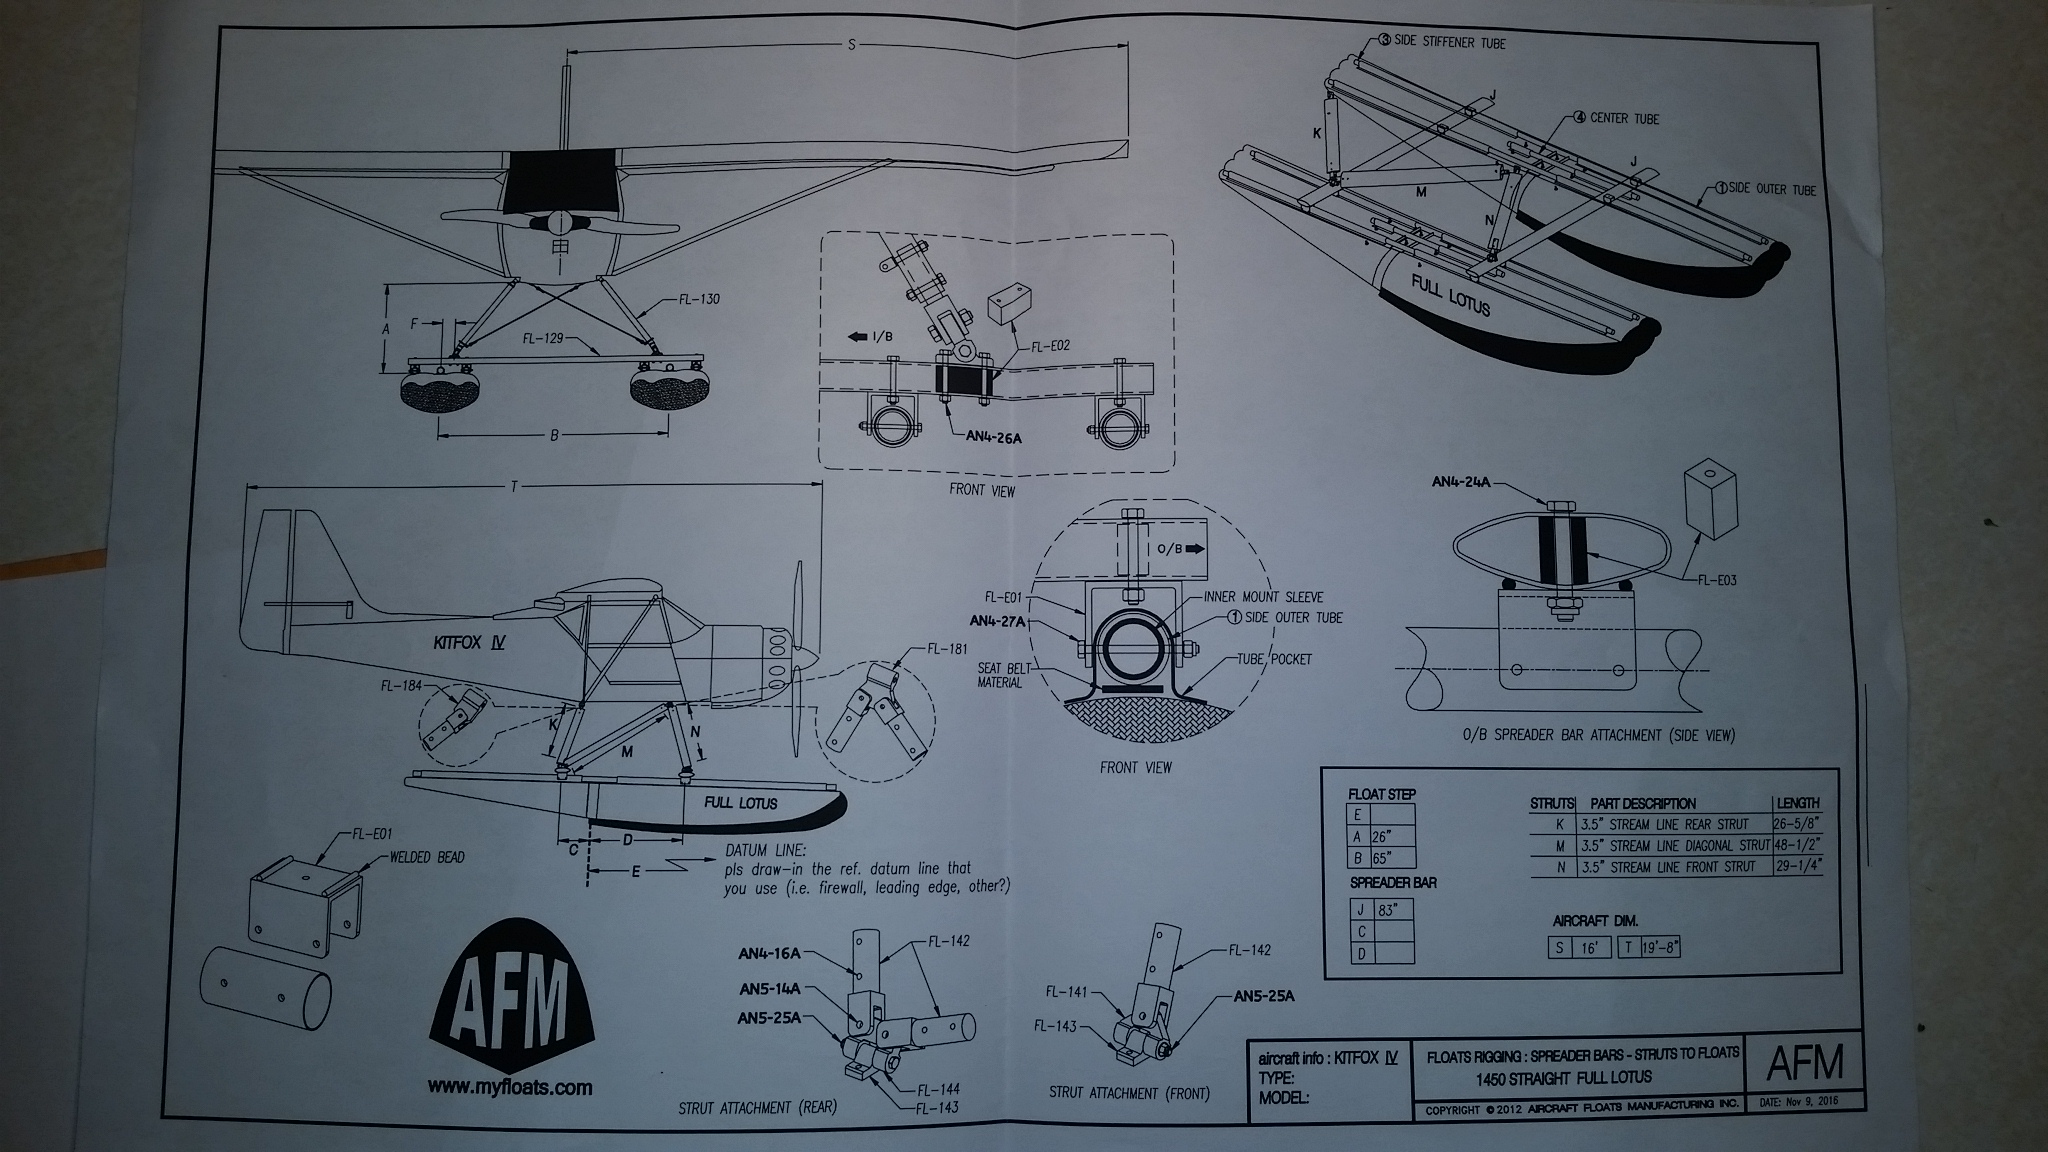
Also, my notes feom Leni for the FL are:
Foat step 6" behind cg, 4 degree AOA
-
Just some pics from my phone, but hope they help someone.
-
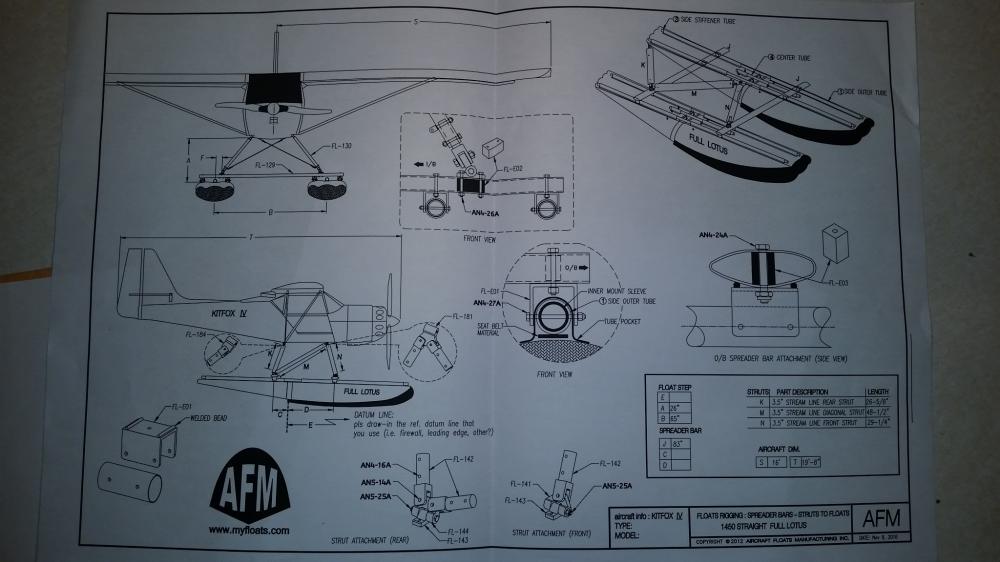
I'm soon facing the same project (with a KF going on Full Lotus).
I'll post a couple pics from their manual over in files and forms. I plan to make the AOA adjuatable on the rear struts.... somehow.
My notes from AKFlyer are:
Foat step 6" behind cg, 4 degree AOA
Note: The FL floats have a flatter bottom than aluminum / glass floats, so they require a little more preset AOA because you can't "rotate" as much at liftoff.
-
It has an oil cooler integrated on the engine, and also a big external tank (dry sump system).
I plan to mount the oil tank up front by the cowl Inlet holes so that it gets extra air flow. I have not yet heard of anyone who has had issues with high oil temp.
-
This sounds way cool!
But, with about 5k hrs in turboprop time, I wonder about a couple things.
Yeah there's the GPH downside, but at least in MN you could get "non road tax" diesel for $2.29 a gall (when non-ethanol gas is like $3.80)
But also don't forget the spool up problem, especially on a geared or direct drive turboprop. Planes with those motors generally require a very high drag setup and stabilized power during approach to force spool up and reasonable power response.
It'll be interesting to see how that issue is addressed.
-
I like Sea Foam for winterizing other toys and stuff and as a lazy ass carb cleaner. Works good for that, but I'm pretty anal about the plane and do a full teardown and cleaning on that.
Was thinking SF or MMO more as a valve cleaner because the previous snowmo owner had a little carbon buildup in there. Not bad though, probably from running a bit rich, so I think I'll try the old "run the hell out of it" technique first and see if I can blow it out.
Thanks Chris for your post and research on the topic.
Sure want to avoid leaky tanks!!
-
So I am told my tanks will leak if I run ethanol fuel in the wing tanks, but would it be OK to add Sea Foam?
I'd like to run a high dose through during test running of the Yamaha... to clean the entire system out good, top cyl, valves, ect.
Opinions ?
-
10 years ago when I bought my Kitfox 2, it was a "barn find". I thought I was doing well buying it at $10,300.
But, as in most project planes and those that have been sitting in the barn, there were "plenty too many" little issues that needed attention!
So to anyone out there who is shopping like I was back then... for a plane like this, all I can say is:
I wish I would have waited and bought a fully gone through "turn key and fly me" plane like this from an expert like Jim!!
2 people like this -
Yep, and Steve I'm thinking about possible high EGT's here as well (skirt scuff/sieze and or piston dome melting), and not so much the coolant temps.
You would likely see that damage through the exhaust port while cycling the piston past the port. Guess that'd be something I'd check.
Hopefully there is no problem but like Jim says it'd be something you would want to know about if it were.
1 person likes this -
Hey Chop, thanks for coming back man.
Just a thought here, if it was running lean enough to underperform that much it must have got kind of hot don't you think?
I'm not sure what I would do about that but maybe someone else here would have an idea what to check over before you put it back in the air.
I bring it up because I've seen sleds meltdown when the engine side carb boot has a cracks in it, and this scenario is kind of like that.
-
Tough to find new. Let me know if you locate an outlet.
Last I heard Rotax discontinued them (still making E boxes though)
And BTW I think cowlove had a 2.62 listed here for sale a few days ago.
-
Oh and I forgot another reason to have the sprag, especially with big (high MMOI) props. The Yamaha shuts down really fast and abrupt, with virtually none of the "coast down" that a 2 stroke has.
So without the sprag, when you shut down, the prop momentum is forced to stop abruptly as well, which also causes some shake and stresses with each fluctuation of deceleration from compression pulses.
With the sprag the motor shuts down how it likes and the prop just overrides and spins down like a free turbine turboprop.
Maybe teal can post up his vid of test run and shutdown with the sprag.


Luga / Kool / "NR" Propellers
in Avidfoxflyers General Hangar
Posted
I agree Leni, but like I've said before, I just want a VPP that goes to reverse so I can show off and back up on the water!")