Activity Stream
Activity Stream
-

racegunz added a post in a topic 40 hrs phase one is done!
Another inspection too? Will they issue another AW certificate afterwards? or update it to include this engine type as well as rotax?
-
0
-
-

akflyer added a post in a topic 40 hrs phase one is done!
My airworthiness is for any rotax engine. If I go to another manufacture, it is another inspection. Since it is not a proven engine / prop combo, they can put me back in phase I for XX hours as they see fit. I called the FSDO and talked to the inspector and he came up with the same thing..
-
0
-
-

dholly added a post in a topic KF III rigging
Well I found why mine were set as they were. The KitFox M-III Operator's Manual pg. 7 says to set flaperons at 0-23* degrees. I posted a copy of the OM in the Kitfox III forum.
-
0
-
-
racegunz added a post in a topic 40 hrs phase one is done!
Forgive my ignorance but how would they (I think they refers to the FAA?) know? Personally I think the 40 for a new experimental is a good idea now that I've been through it, but if I upgrade an engine or change type, is there paper work involved other than a log book entry, I was under the impression that it was more of an honor system with the testing.
-
0
-
-
Russ. added a post in a topic Johnson Creek or bust
Nice going guys. I have been tracking your flight on Spot. Time to party. Russ.
-
0
-
-

horsepower added a post in a topic Johnson Creek or bust
Joey, Dont know for sure but I may be flying in on Sunday.A friend of mine has a Super Cub and was talking about going Sunday morning as he missed the fly-in a couple weeks ago.He says it has a great big runway so it will be a piece of cake with your plane.If I go I will look you up.Can you run 100LL with the 582 or will you scrounge up pump gas? Have a great time. Randy
-
0
-
-

C5Engineer added a topic in Avidfoxflyers General Hangar
Johnson Creek or bustI'm taking off on the first leg of a 550NM Cross country as soon as the weather cools off. Spending the night with a buddy and then were blasting out in formation at daylight in the morning for 9500ft at gross weight crossing of the Sierra Mountains. After that it's a 300 mile cruise across the sage brush of Nevada and Oregon. After one more fuel stop and some lunch hopefully we'll be Idaho by early afternoon. After relaxing and waiting once again for the thermals to die were going to fly into Johnson Creek for the BackcountryPilot.org annual Fly-in. Here's a link to my spot page if anyone wants to track the progress tomorrow.
http://share.findmespot.com/shared/faces/viewspots.jsp?glId=0FpKLJrmMEs3TGFMoLCkqM7NvqdpbBW1i
- 3 replies
- 1,714 views
-
C5Engineer added a post in a topic Lost a friend to an accident yesterday
That looks very similiar to what Dean Wilson is building right now. We lost 5 people in 3 separate accidents within 100 miles of between last Sunday and yesterday. Seems like they always come in threes.
-
0
-
-
Jezz added a post in a topic 40 hrs phase one is done!
I'm with Leni
Congratulations to both of you!
Jezz
-
0
-
-
egp8111 added a post in a topic KF III rigging
thanks guys, that helps alot.
EG
-
0
-
-
akflyer added a post in a topic 40 hrs phase one is done!
Congrats to BOTH of you guys! I am dreading putting mine back into phase one when I get the new engine mounted cause I will have to go back to wheels. I am hoping they will let me slide at 20 hrs but will just have to see how it goes.
-
0
-
-
Russ. added a post in a topic 40 hrs phase one is done!
Congrats. on first phase compleation. I just passed my tailwheel endorcement, and will start first phase, and first flight soon. Russ.
-
0
-
-
Jezz added a post in a topic Lost a friend to an accident yesterday
I'm pleased to hear that Jim is on the mend, albeit slowly. What we do carries an inherent risk, and sometimes that risk exceeds our ability to manage it (for whatever reason). That is when we have no choice but to accept that the outcome is going to be down to luck and fate. For Jim it seems that fate has taken a positive turn, not so for Joey's friend.
As one single community, I think I can speak for us all when I say that our thoughts and prayers are always with those who's ability to manage the risks of flying has been outstripped and now in the hands of fate.
Jezz
-
0
-
-
dholly added a post in a topic KF III rigging
EG-
It sounds like we have the same M-III 'Manual', more like a mish-mosh of earlier manuals with lots of revisions and even 'final installments' of the M-IV manual. At first I thought it was an improvement over my sketchy Avid Mk-IV manual but, after going thru it all, I dunno...
In any event, you're right, CF-17 refers to left wing lift strut as non-adjustable. However, Step (24) pg. W-21 of the 1 Sept 90 M-III Manual says to install (4) rod ends etc. Also, the rigging info I have on pgs CF-17 and CF-18 are for Model "Kitfox" (with no model # designation), pg. CF-17 is noted Revision 2 and dtd 19 Nov 85, and pg. CF-18 has blank revision or date notations. If the pg just says Kitfox with no model designation, I assumed it was for earlier models. That does call into question the 'instructions' on pg. CF-18, as well as the continuation of Steps (71) and (72) on it's backside, pg. CF-19. Interestingly, my pg. CF-19 says Kitfox M-II, Spinner Assembly, Rev.3, 31 Aug 89 but contains only the flaperon rigging info.
Clearly, the manual is light on info but I agree with Leni's 15* degree suggestion. Most everything I've read leads to it. The original builder of my M-III penciled in copious notes and, on Fig. CF-12, he drew in flaperon down deflection of 0*-23* degrees from neutral but I intend to check deflection and reduce to 0*-15* degrees if necessary.
A couple other items to note:
- a short blurb in the attached Kitfox Owner Newsletter states: "The flaperons neutral position, as shown in Fig. CF-12 page CF-18 of the construction manual, can be safely set at 1-3/4" below the front spar. This may greatly facilitate the rest of the rigging procedure."
- when setting flaperons to neutral, the fuse leveling procedure is on pg. F-21 of the 01 Nov 90 M-III Manual, took me a while to find it and it is different than leveling procedure for later Kitfox models or the Avid.
- post by another M-III owner: "When I got my model III the flaperons were set so that a deflection of the ailerons would cause the flaperon setting to reduce to about half. I thought that was probably putting unnecessary stress on the mixing box so I adjusted the flaperon so it would just start to reduce the flaperon setting with full aileron deflection. The results of this adjustment were: the flaperons can now be used as a slight attitude adjuster... The nose goes up slightly with flaperons fully retracted. As for the use of the flaps I noticed no difference at all."
I saved some info when rigging my Avid Mk-IV. Because the KF-III and Avid have an almost identical mixer and flaperon setup, it may be helpful for you. Just keep in mind, part numbers are different but rigging procedure will be similar.
- post by another Avid owner: "Thinking it over, I dug out the destructions and there was an update! This plane and others with “flaperons†use a mechanical contraption to provide aileron control and flap, but in reality, they are “Trimerons†as using too much flap input reduces the effect of the aileron control and will cause control reversal with too much flap deflection. AVID warns not to use more than 15* degrees, but they also suggest starting with a negative 6* degrees to provide more trim effect, rather than use the elevator trim. The verbiage also said that this would make the aileron control HEAVY! AHAH..... back to the first set of blurb, and they say to use minus 3* degrees, which I reset them to. I also made certain I had just 13* degrees of travel, as the flaps don't work like conventional do."
The following is credited (with many thanks) to Graham Laucht:
"This is the text from a note I wrote for our locals builders several years ago to help identify the necessary steps in setting up the flight controls particularly the flaperons. The builder's manual never quite seemed to deal with the essentials.
Flaperon rigging
1.. Assemble the Control Column so each control stick (F16) is parallel with its neighbour. Adjust the length of the Connecting link F18 to arrive at this point.
2.. Check the angular movement of the control stick is equal each side of centre (+/-30 degrees). Trim any excess metal from the "doghouse" if necessary.
3.. Assemble the U joint assembly F47, F5, F39 etc and temporarily assembly the Front Bellcrank F5. Check that in the full range of the control stick the U joint remains free and is not bound up or in contact with the Control Column Housing F15. Re-assemble the link assemblies, change bolts to Clevis heads if this helps. Cutting off the port end of F15 at approximately 45 degrees helps eliminate a lot of foul ups with the moving parts. Placing packing beneath the half round wooden supports and the end pivot bracket might help in obtaining smooth motion. Adjust the vertical position of the front bellcrank with washers if necessary.
4.. Temporarily assemble the F19(A) Aileron push pull tube with the front rod end joint F40 and lay the tube so that the aft end is near the aft bellcrank but disconnected. Ensure the rod end bolt doesn't foul with the carpet or floorboards.
5.. Adjust the links F38 & F39 until the relative movements of the push pull tube are equal for control stick deflection.
6.. Assemble Bellcrank F6 to the Aileron push pull tube and with the control stick locked in the vertical position adjust the rod end fitting F40 until the bellcrank pivot bolt and output link forms a line parallel with the mixer pivot bolt.
7.. Hopefully by now the angular rotation of the F6 bellcrank is equal about this imaginary parallel line for deflections of the control stick. If not adjust the fitting either side of the front bellcrank until this is satisfied.
8.. Assemble the mixer pivot arm F1 and connect the male and female rod end fittings F39 and F38 adjusting them so that with the control stick vertical the mixer pivot arm is perfectly horizontal. Check that the angular rotation of the pivot arm is equal about the horizontal for deflections of the control stick.
9.. Now connect the Flaperon bell cranks F7 to the mixer arm with the male and female rod ends F37 and F38 from the flap bellcrank F8. Initially adjust them so that the Flaperon bell crank inboard arms are parallel with the mixer arm. Check with the control stick locked vertically that the Flaperon bell cranks are parallel by laying a straightedge across them. Adjust the rod end links from the flap bellcrank until this is true. Check the angular movement of each flaperon bell crank is equal for control stick deflection. That is to say that the amount of up travel matches that of the opposite arm and likewise the amount of down travel. Because of slight differential action here the amounts of up and down travel are unequal.
10.. Assemble the Flaperon push pull tubes F21 and temporarily fix the Vertical swivels F51 etc so that the Flaperons can be connected.
11.. With the stick locked in the middle the neutral angle of each flaperon must be equal. If not adjust the length of the push pull tube by adding AN4 washers between the push pull tube and the swivel. If gross errors are adjusted by altering the lengths of the threaded rods F37 then the mixer will be unbalanced.
12.. Check the angular movement of the flaperons is equal for deflection of the control stick. Again the movement up and down will differ due to a degree of differential action.
13.. Finally set the flap handle in the neutral position so the top end of the flap bellcrank is parallel with the mixer pivot bolt. Use the Flap push pull tube F10(A) F40 rod end to make this adjustment.
14.. Adjust the threaded links equally until the flaperons are set to zero degrees incidence and check the actual angles. Pull the flap handle until with the control stick locked vertical the flaperons droop by 15* degrees and adjust the stop bolt.
15.. Check the angular movement is equal for deflection of the control stick allowing for differences due to differential action.
16.. Fit the turtledecks and check that the movements are equal and not affected by excess friction from the nylon bearings.
17.. Eliminate any lost motion through slack or loose bolt assemblies and similarly remove any source of binding or excess friction from the system.
This is an ideal situation but takes no account of build errors particularly in locating the flaperon hinges on the wing ribs. Similarly inexact drilling of the
U joint blocks F2 can throw out the accuracy of the system. Sometimes compromises have to be made to ensure the wings fold properly.
- This text is from another missive on identifying potential problems:
Normal problems are generally a failure to assure the system is working symmetrically due to errors in the cockpit assemblies or in the mixer main arm. If this area is remedied then often the residual problems are soluble. One problem that is not easy to solve is due to dynamic changes to the rigging in flight. One example in particular trued out on the ground but was a nightmare when airborne. This turned out to be additional friction in the flaperon bearings and especially the turtledeck bearings which was developed asymmetrically in flight. Ground checks showed appropriate opposite flaperon deflection with stick input but airborne only one flaperon was downgoing on one side but upgoing on both. The result was very poor control harmony and a lethal turning stall characteristic where instead of the aircraft rolling out of the stalled wing it rolled in.
Another showed unusual pitch effects with roll control and was found due to gross errors in drilling the front spar carry through holes resulting in one
wing being swept back and the other swept forward. Simple test for imbalance, time the period between rolling from 30 degree bank left to right and the other way about. It should be the same. At approximately 70mph with the stick held central pull on the flap lever in stages and determine
which way the aircraft rolls. It should remain wings level and only pitch down. Yawing or rolling would imply imbalance.
Stall the aircraft clean and with flaps set. It should stall straight ahead or have similar benign characteristics at any setting. This assumes the port wing strut rod end bearing has been adjusted to eliminate any nasty wing dropping tendencies.
Stall the aircraft in gentle co-ordinated banked turns with various degrees of flaperon set and ensure it rolls level and does not have any tendency to "tuck in" to the turn.
Ensure that at maximum flap setting there is no tendency to control reversal or asymmetric stall. Experience has shown that this may occur above 15* degrees on some examples."
Graham Laucht
Hope that helps some.
[edit] wrong attachment
Kitfox_O_News_Sept1989.pdf
-
0
-
-
racegunz added a topic in Avidfoxflyers General Hangar
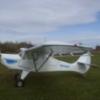
40 hrs phase one is done!Thanks in part to the members here helping me iron out my tach problem I have finished my phase one testing, I finished today with a 2 hour flight starting at dawn and power -on and off stalls and slow flight,(they do go hand in hand). I have a couple of quick clips on youtube under the same user name I have here if you want to take a look. Fly safe!
- 8 replies
- 1,845 views
-
dholly added a post in a topic Lost a friend to an accident yesterday
Thank you for any prayers and positive thoughts offered, I believe they are working. As of this a.m., Jim is now critical but stable. After another surgery Sun., doctors finally located and stopped the internal bleeding. His facial injuries are limited to lacerations, not facial fractures as originally assessed, and one leg is not broken. He must endure two more immediate orthopedic surgeries and will remain in an induced coma until sometime next week to help his body heal. He is not yet out of the woods but for the first time I sense optimism in the email updates from the hospital. Barring any complications, it sounded like he will be in the ICU for at least 3 more weeks then moved to a recovery room for another 3 weeks before starting rehabilitation therapy. It will be a long and difficult recovery but he is strong and fortunate to be a survivor at this point. I have absolutely no doubt he will be flying as soon as physically able. Again, thank you and please keep him in your thoughts.
-
0
-
-
akflyer added a post in a topic KF III rigging
Sounds like the manual you have is still talking about the model II where the left strut was fixed and you could only adjust the right wing. The initial twist in the wing is built in. Just make sure that you level the fuse and wings per the manual and make both sides match for initial flights (if you find that it wont fly level hands off you can adjust one wing or the other to get it perfect). As far as the flaperon action, you should set the flaps for a maximum of 15 degrees, and what ever you get for aileron action is what you get. It is easier to do all your adjusting now before the plane is covered than once it is done. I finished mine in the winter time and did not have room in the garage to put both wings on so I did the final after it was covered and it makes it a little tougher to get to some of the bolts, but not too bad if you pull the seat out.
-
0
-
-
egp8111 added a topic in KitFox General Forum
KF III riggingI'm working on the final rigging of a KF III rebuild project before I start covering. Seems the instructions in the builders manual are pretty skimpy or maybe it's just me. Is there any information on the amount of travel(in degrees) the flapperons should have when functioning as ailerons/flaps? Do you just set it up the way they say and get what you get? I'm also having trouble understanding why they say the left wing is non-adjustable it has the same rod ends as the right wing, do the mean you just adjust the right wing to match the left. Any ideas, suggestions ?
thanks
EG
- 5 replies
- 11,513 views
-
horsepower added a post in a topic Idaho less than a week away!
Awesome Joey, wish my plane was done and the 40 flown off and I was going with you.I have buddies here that fly down there quite a bit and they it is beautiful.Have a great flight and watch for elk and moose on the runway. Randy
-
0
-
-
dholly added a post in a topic Lost a friend to an accident yesterday
I hesitate to pile on this thread but have another pilot in desperate need. My friend is critical with multiple lacerations and internal injuries, shattered pelvis, broken bones, but most serious he was impaled by a bamboo longeron (the structure of the aircraft was made of bamboo) that left a puncture wound as large as a fist. After 24 hours, 2 surgeries and 60 units of blood the bleeding is still not controlled. Please offer a prayer for Jim and strength for his family. Thank you. News Pics
-
0
-
-
akflyer added a post in a topic Idaho less than a week away!
should be a great trip! good luck and keep us posted. The 180 sounds awesome. I love the fly by, sounds like a fighter coming at you! The only time I hate that sound is when I'm out on the river camping and some D.bag thinks he has to leave camp at 5 am
-
0
-
-
C5Engineer added a topic in Avidfoxflyers General Hangar
Idaho less than a week away!Next Wed I'm leaving on the my greatest flying adventure to date. A guy in a Rans S-7 and I are flying from the Bay Area here in California to Johnson Creek in Idaho. It's about 480NM each way plus whatever we put in while were there. We are planning on flying out to some of the gnarlier Idaho strips on Thur and Friday. Were hoping to make it all the way on Wednesday. It's about 9 hours enroute if we can keep 60kts groundspeed. I've been planning this trip for years and years. I can't believe it's finally here. The weather forcast is looking promising so far. Here is a link to the route and a video of the famous Mile Hi. Looking at it, it looks easy to land. The gotcha is the Density Altitude will be in the neighborhood of 8000ft up there. The old 582 is gonna be gasping.
Westover Field to Johnson Creek
Video of Mile Hi Love the sound of a 180 winding up
http://vimeo.com/7056374
A shot of the approach into Johnson Creek
- 2 replies
- 717 views
-
Jezz added a post in a topic Some cool old toys
Joey
Just stumbled across this thread while I am sitting on the ground waiting for a warm front to pass through ... i.e. killing today and hoping tomorrow will bring some good CAVOK.
Anyway, I recognize nearly all of these models and think I probably own a few of them. The London bus in particular looks really familiar.
I will be in the UK week after next, so if I get a few minutes free I will climb up into the attic and have a look.
I think you are probably on the money with dating them in the 80s. I picked up most of mine during my reprobate years through to about 88.
I will keep you posted and try to bring some pics back too.
Jezz
-
0
-
-
dholly added a post in a topic NE AvidFoxFlyer Skunk[y beer] Works
No, not related. However, if you just happen to spy a spankin' new 912 hanging on the Avid+ sometime soon you'll know why hehe...
-
0
-
-
akflyer added a post in a topic Buying my new Avid
to pull the tops off the carbs, you just take out the two screws on the top and pull the slide out. There is a spring that is inside the slide, you will have to pull the spring up, then push down on the cable to get the cable ferule out of the carb slide. Once you pull the slide you should be able to see how it goes very easily. The clip should be on the 3rd notch from the bottom. If you need to set it to the bottom notch, I would say you need more pitch in the prop if the jets are the correct size per the rotax chart.
I have the IVO 72" 3 blade ultralight prop with In flight adjust. If you dont want the extra expence, you can go with the ground adjust as they are the easiest prop to set the pitch on. No protractor just turn one adjustment screw and all 3 blades change pitch at the same time.
Max HP on the 582 is about 6200 and max tq is right at 6000, they both fall off pretty damn quick after those RPM figures. I have noted that much over 6300 RPM my climb falls off pretty quick, so I tend to load the prop pretty good. I need about 6250 or 6300 to get out on step with the floats at gross weight, but as the take off run progresses, I feed in more pitch to keep the RPM around 61-6200 It only takes a bump or two of the switch to keep the RPM right where I want it throughout the flight. If the EGTs are climbing, just a bump in pitch takes care of that.
-
0
-