NorthIdahoAvidflyer
Contributing Member-
Content count
687 -
Joined
-
Last visited
Posts posted by NorthIdahoAvidflyer
-
-
A jetting chart won’t do me any good here as I have to up size the main jet for with the Hac System installed which these charts do not account for. I think I’m currently running 165’s.
-
I also need to source the carburetor hose fitting needed for the vacuum port.
-
As close as I can tell I need to go from a 160 to a 180. I do have a good number set of drill bits.
-
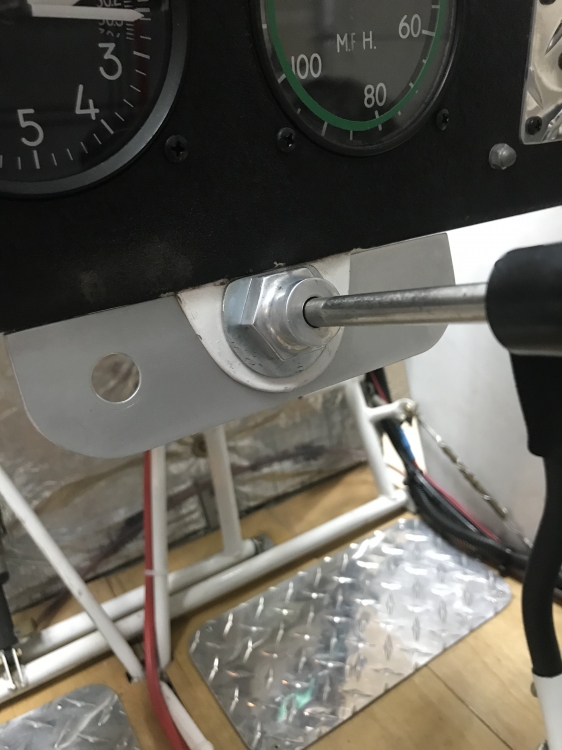
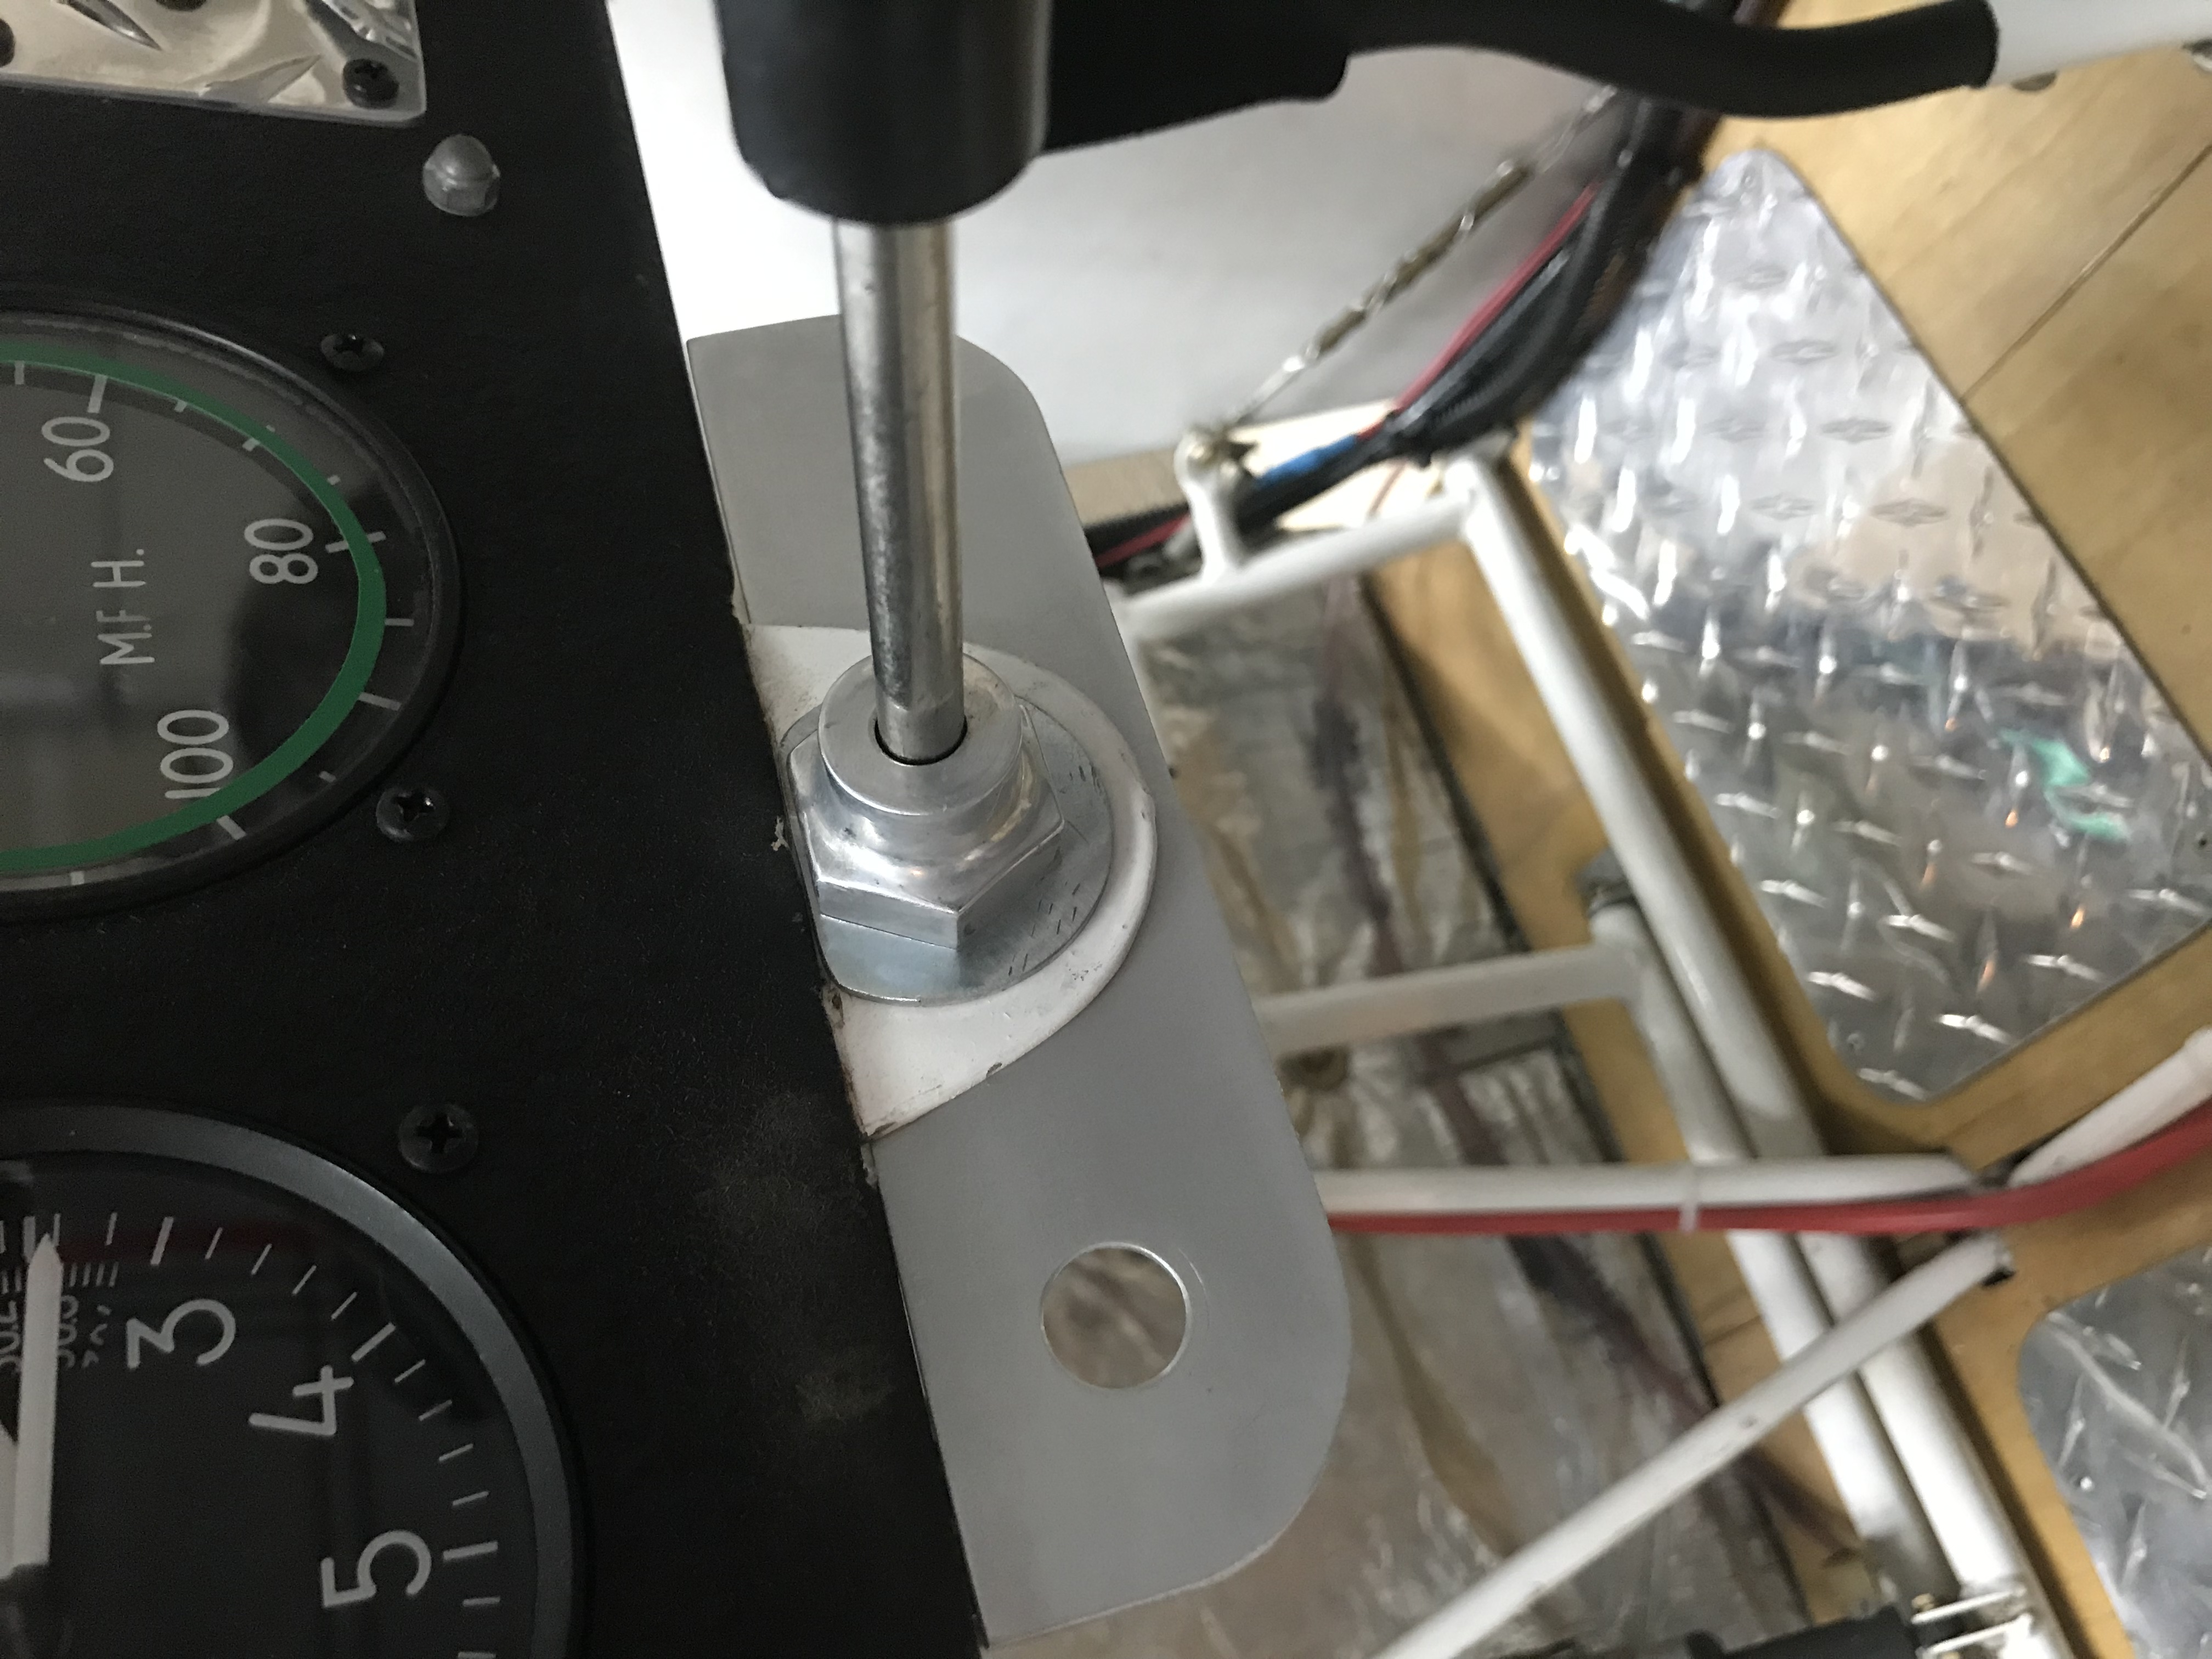
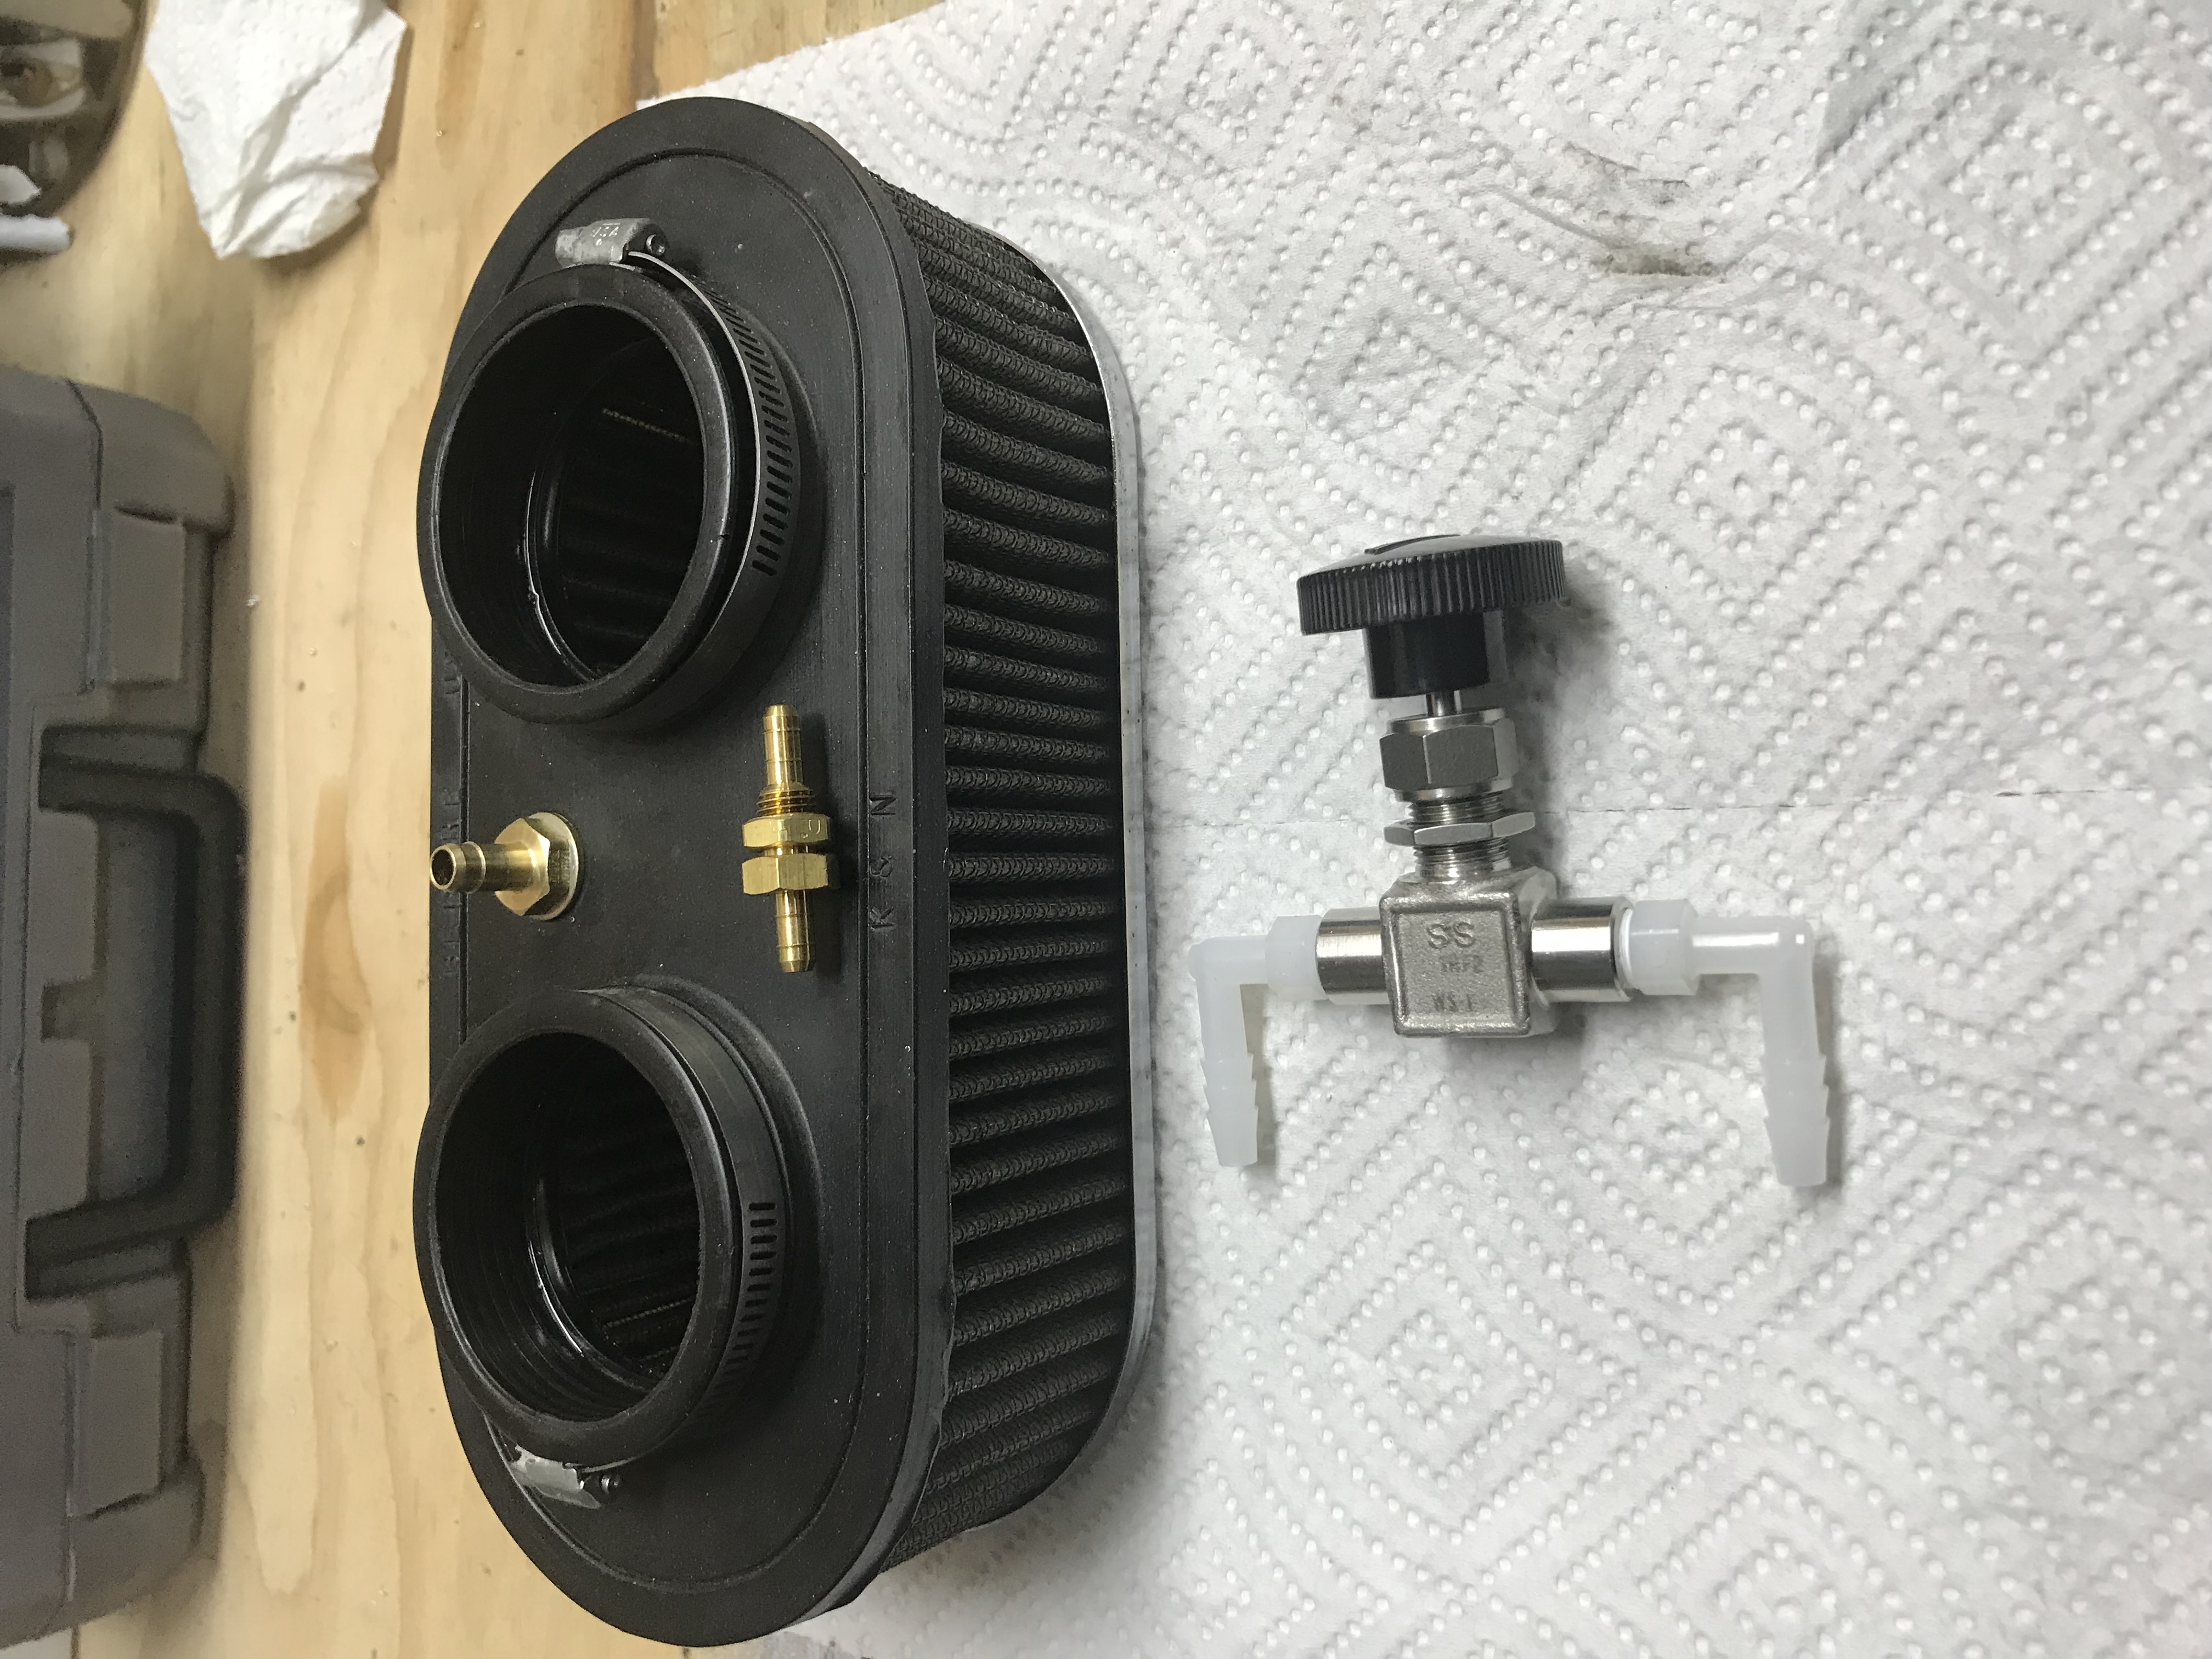
Since I have the Avid home for some maintenance I decided it’s time to install the hack system I’ve been planning. I have gathered everything but the main jets. I added a mount plate next to the throttle for the controller and have installed the air port into the air cleaner. Since I’m running the older carburetors I have to add a vacuum port per Chris B. directions. I hope to get that done tomorrow.
The directions call for 3/16 and 1/8 hose. I have 1/4 and 1/8. The 1/4 inch will be used from the air cleaner (clean air supply) and from the controller. The rest will be 1/8th. I plan to eliminate the two extra Tee’s and use a jumper hose between the carburetors like the Hackman system does. I’ll keep you posted on the progress and outcome.
Still trying to figure out how big of a main jet change I need to make. At $20 for two new jets I’d like to get close the first round. I have a few sets of jets laying around and wonder if the opening sizes were posted somewhere. Would it be feasible to try and take a number drill set and make your own jets?
-
Following. Great news Chris. My Dad loves his Magnum and I'm the first one on the list when he goes to sell it.
1 person likes this -
When I bought my plane the muffler was in sad looking shape. I was talked into coating it with some high temp powder coating product. Needless to say it started to come off immediately. I was skeptical about any product holding up to 1200 degrees that is applied and cured at 450 degrees.
I cleaned it off the other day and found a couple of pin holes in the main muffler body. The plan is to get the mig welder out and fix them to get me through the next flying season.
My question is has anyone else welded up holes in the muffler with any success and is there other options for replacing a muffler on a 582 besides the standard stuff sold by Aircraft Spruce or Leading edge?
-
Welcome Kent. I hope your Son takes interest in your project. I tried to get my Son involved but it was just not his thing. My Son does like to fly so I hope he will at least get into flying. Building your own plane is not for everyone for sure. A lot of time, focus and a huge learning curve. It's worth it I promise. Good luck on your build and if you need any help this is the right place for it. It's a honey hole of knowledge for Avids and Kitfox.
-
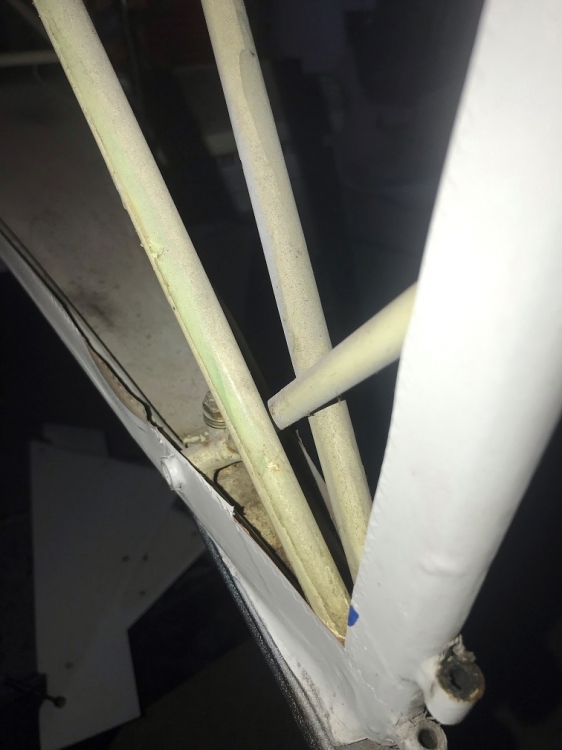
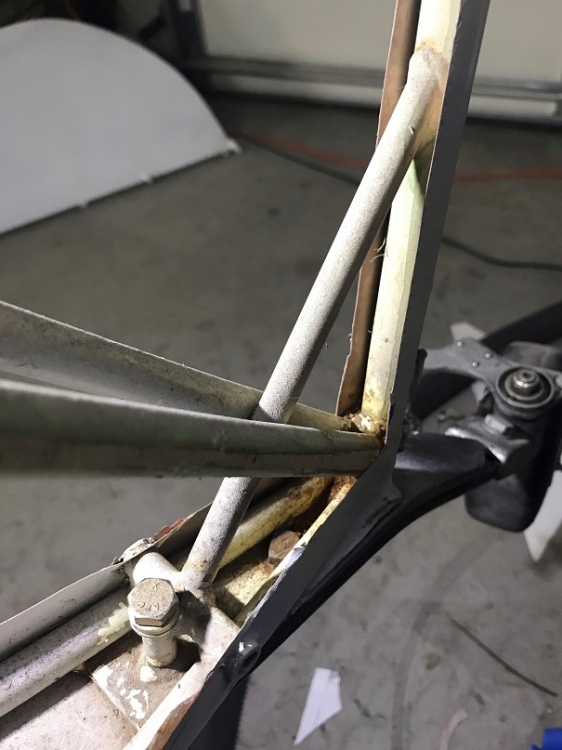
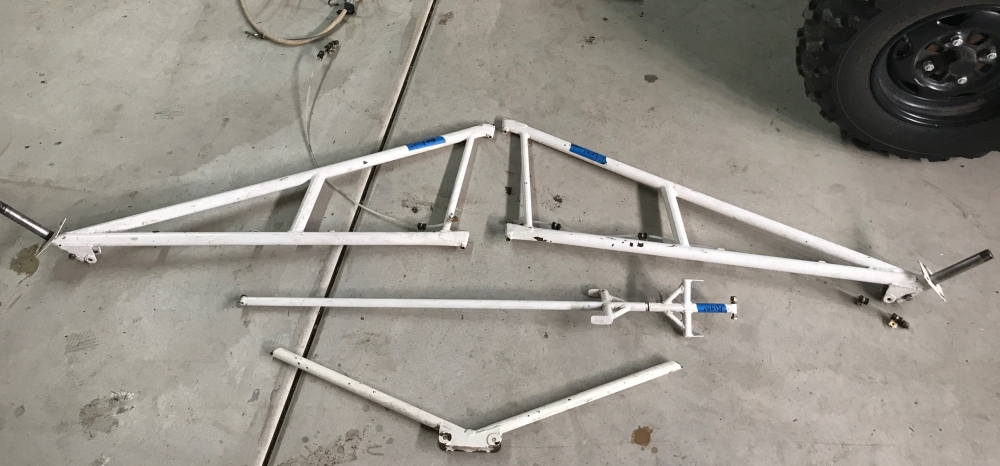
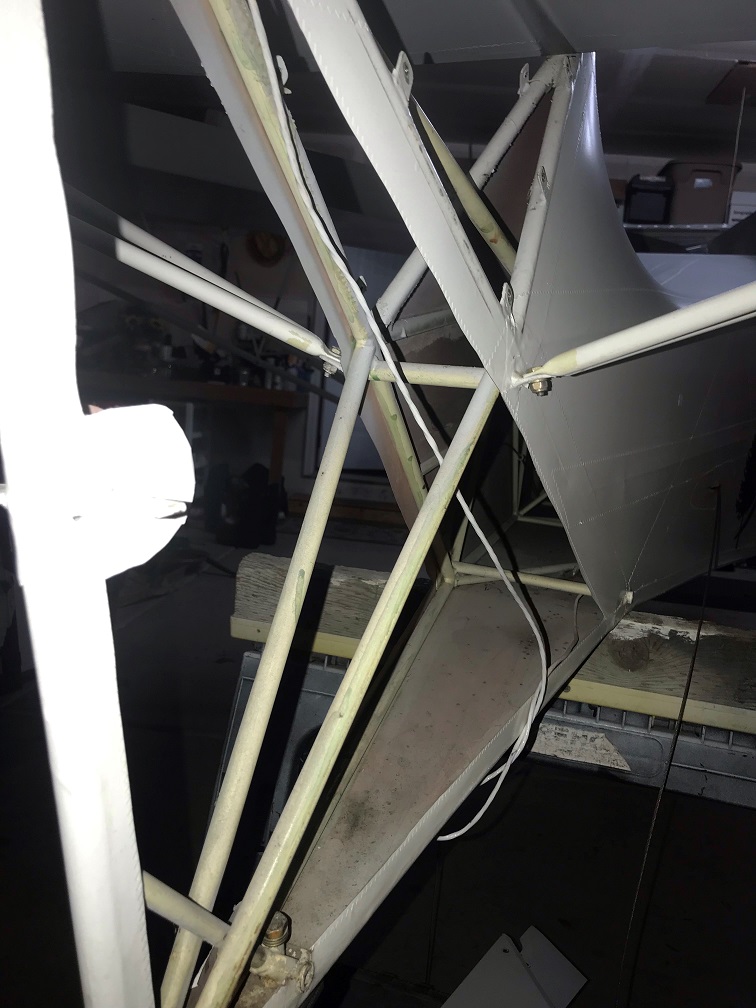
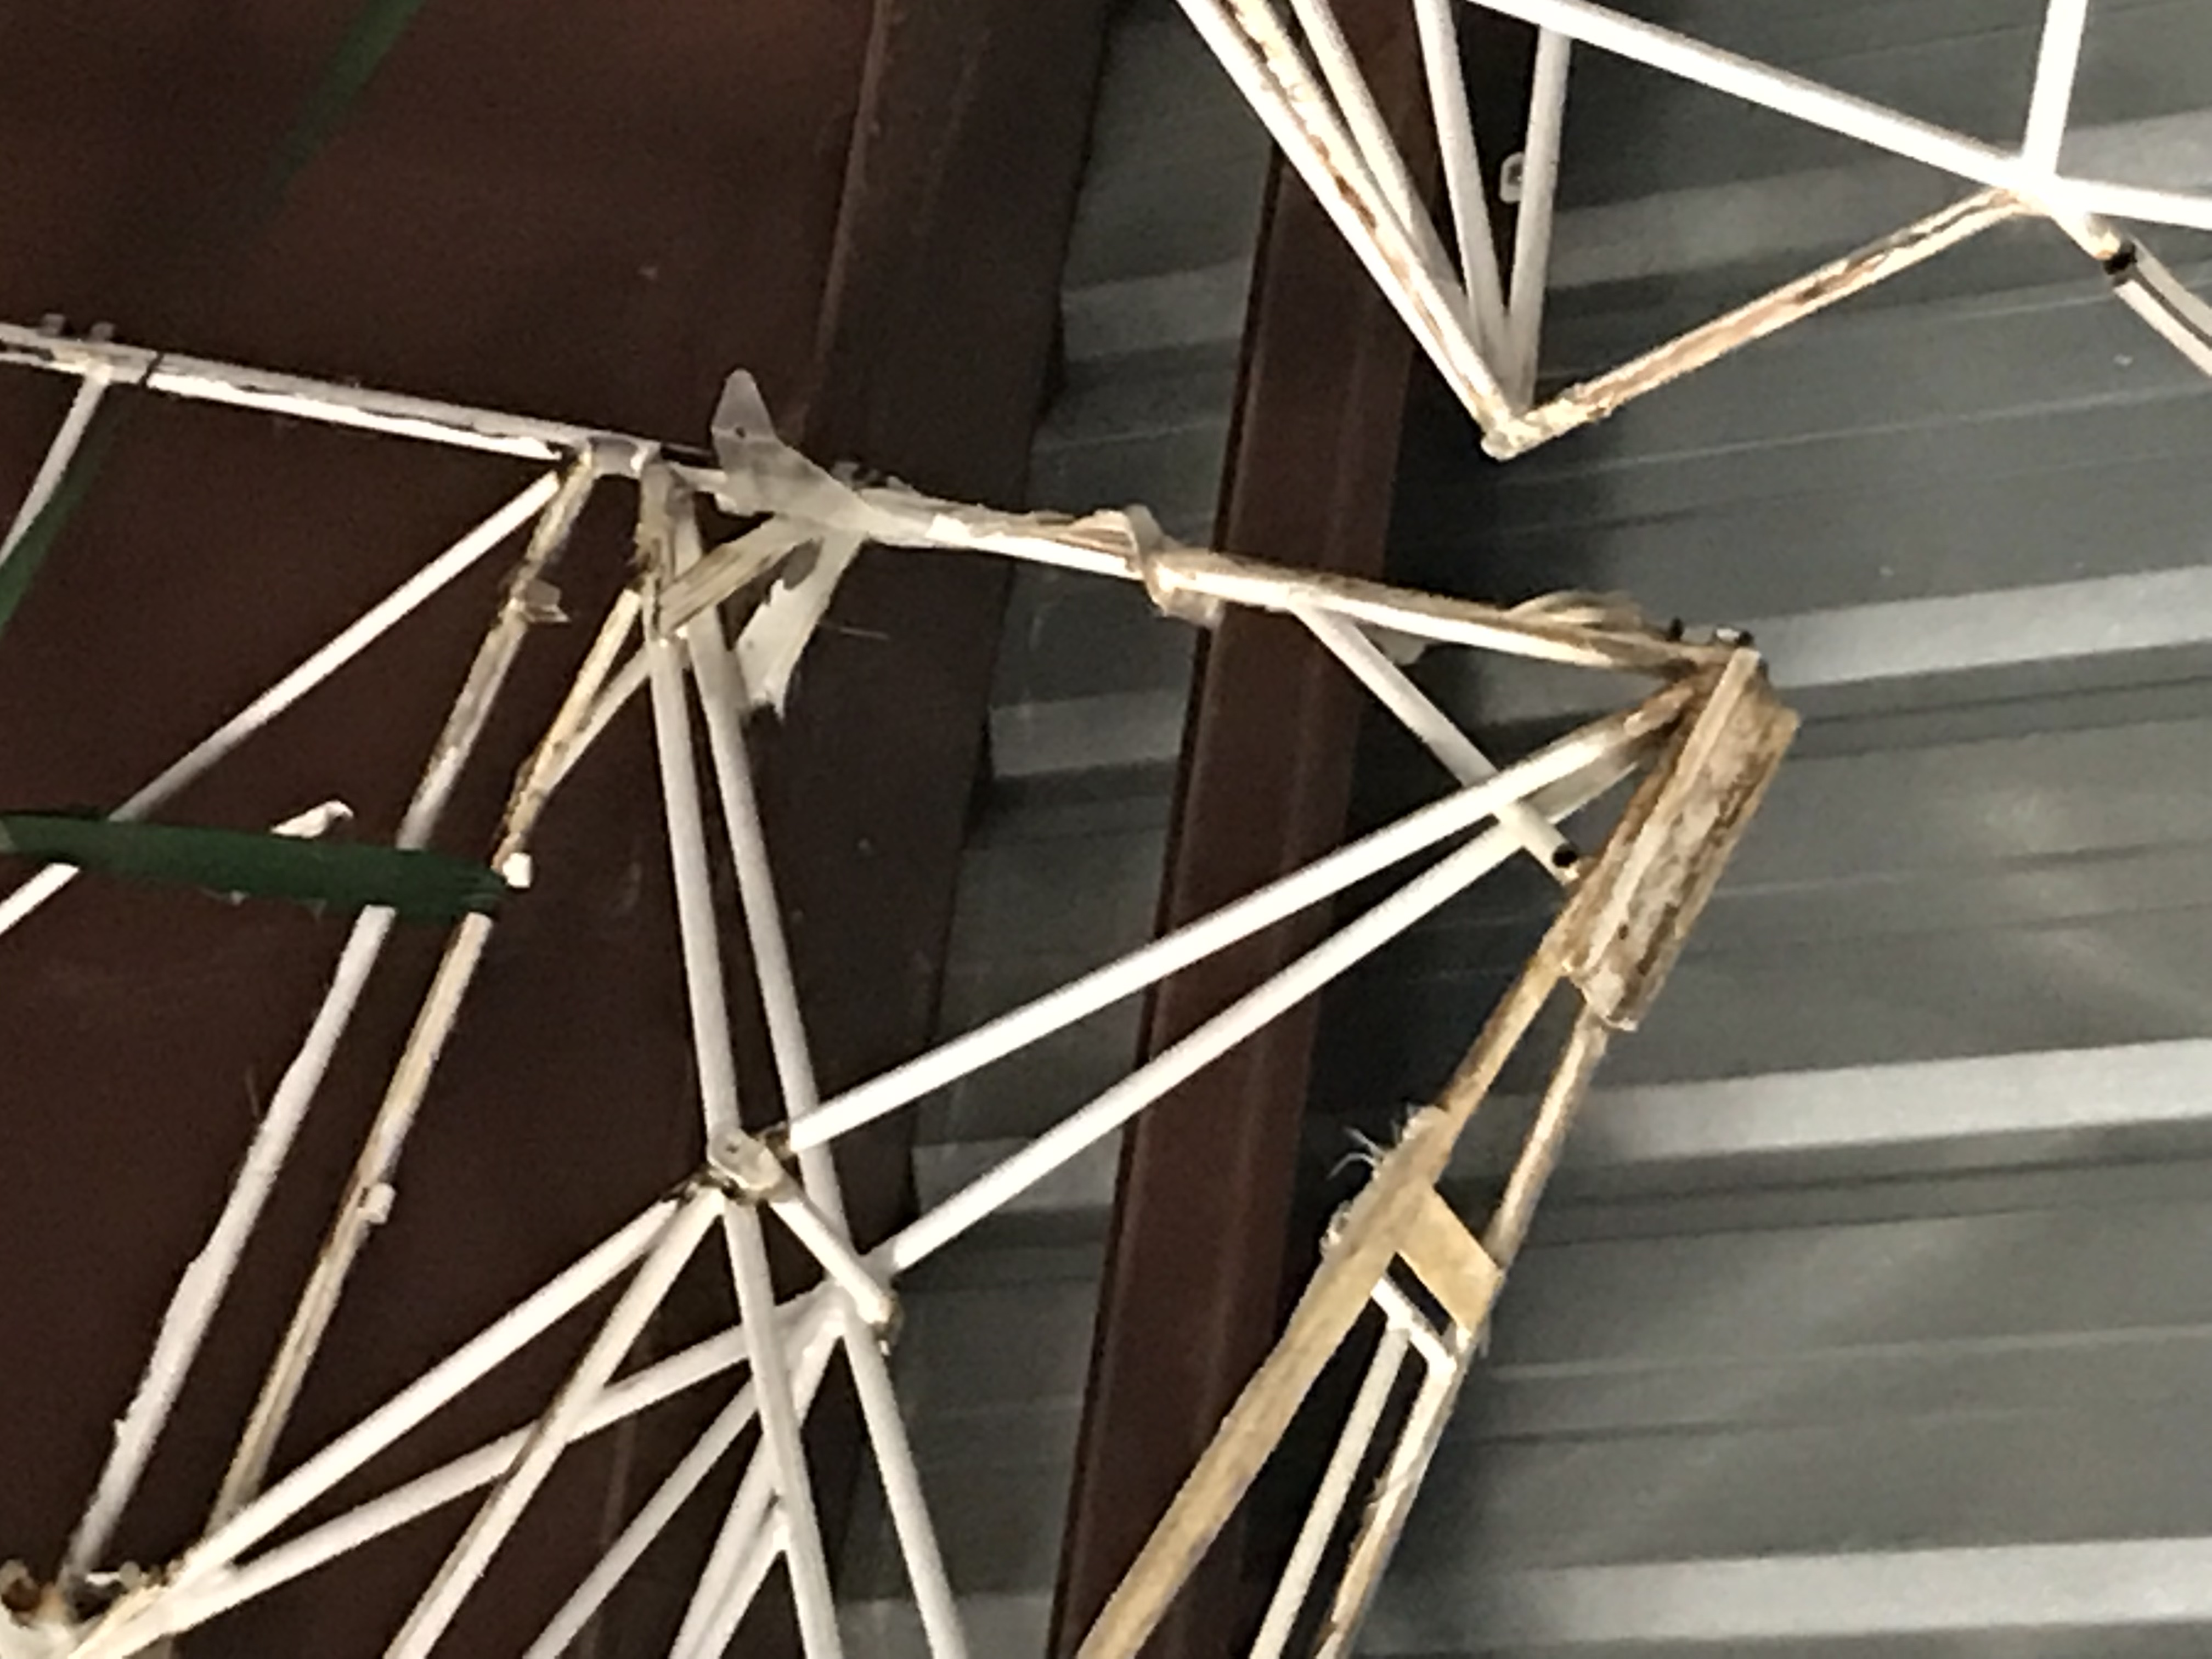
The more I look at this, pull on the various parts and look at the broken tube picture from Dusty it has become obvious that the tailwheel is causing a lever action on the rear rudder post. The little tube that runs up from the front of the rudder plate to the rudder post is carrying a majority the load/weight placed on the tailwheel. This lever action is pulling the rudder post forward and will eventually cause major issues. With two gussets and by triangulating the current structure from the lower horizontal strut carry through tube I believe it will better distribute the load through the whole structure.
-
Here are a few more angles.


-
I asked a similar question not long ago and was told the Dana-Smoother Mount was not worth the heavier weight for what little it dampens engine vibration over the stock mount. Not sure what the weight difference is. I was also told that the ears of the C box have to be ground off to fit inside the smoother mount.
-
Thank you Dusty!! That's a good picture. I will make sure to gusset this area. Much appreciated
")
-
Hey northidahoflyer,
could you edit the title please (rudder vs rubber) so that when we search for your post we'll find it in the future..
Thanks buckets
Good catch Flywise. The auto correct on my phone is still kicking my ass.

-
-
Dusty, like in this area?? See gray shaded area.
-
Oh and when can we expect a name change??
-
That is one badass looking plane. Does it derive from a Magnum??
-
Yes Congrats Larry!!!
-
That's not a bad idea. A person could pre-heat them in the car on the way to the airport. Worth a try. I also thought about a heated coat and pants.
-
It's your tail post bending from landing stress on the TW spring. On my original Avid I noticed that was happening not too long before my lower longeron tubes broke right in front of the TW spring channel. What I did was to cut the fabric in the triangle below the area you marked out, then wrap and glue it around those tubes to minimize your fabric repair area. Then straighten out the tubes and split a tube the next size larger, clam in over the weak tube areas and weld it on. Then add vertical tubes from the collector where your horizontal braces connect and truss it with a couple more tubes up and down back to the tail. And add another brace tube on the rudder post half way between the existing one and the hinge and tied back to where your first vertical tubes connect to the longerons.
SuberAvid, I believe you are correct. Before cutting the fabric off I was able to push up on the tail wheel and it would show movement in the tubing. I cut the fabric off and there is nothing that looks bad. I have a guy coming over this evening and we are going to make a plan on how to brace this up. Thanks for the input.

-
I can't imagine fabric tension bending the rudder post. Not 1.8 or 2.7 oz fabric. I have seen 3.8 oz bend some wood structure but not a steel tube. You could replace that piece of fabric with a panel. Would not affect anything. I would be curious to know why that piece of fabric keeps releasing tension. Possible fabric drumming, not to full tension (350 deg), or something evil.
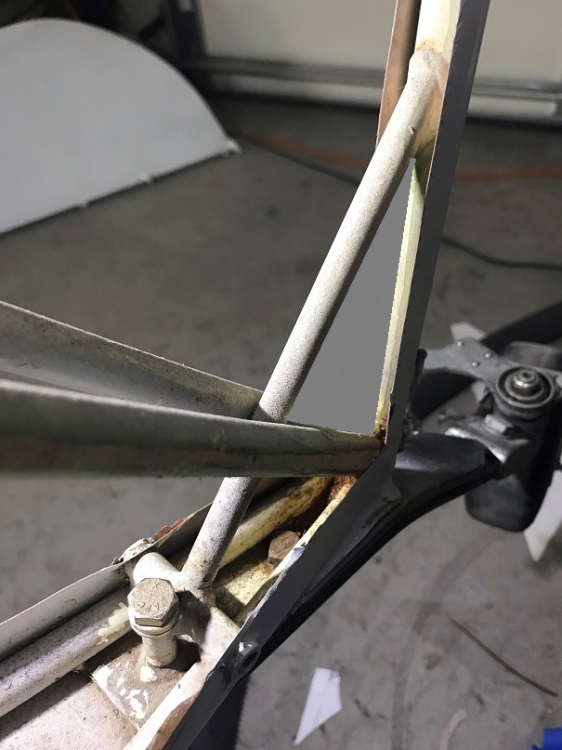
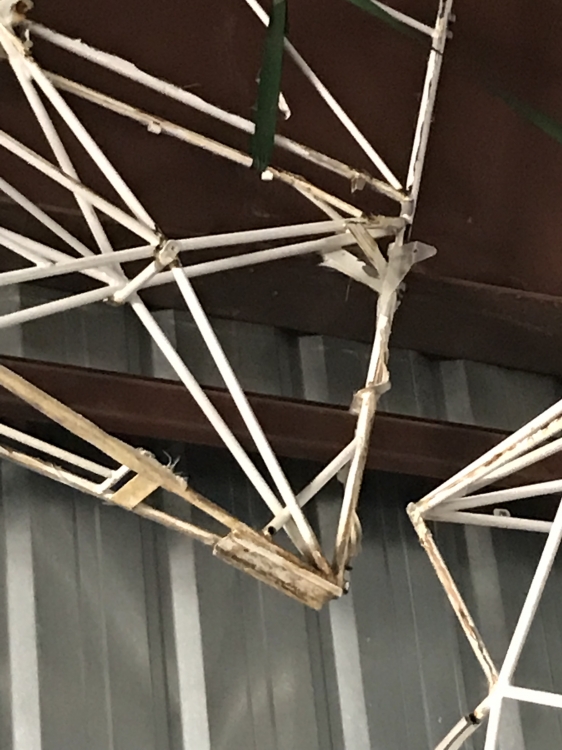
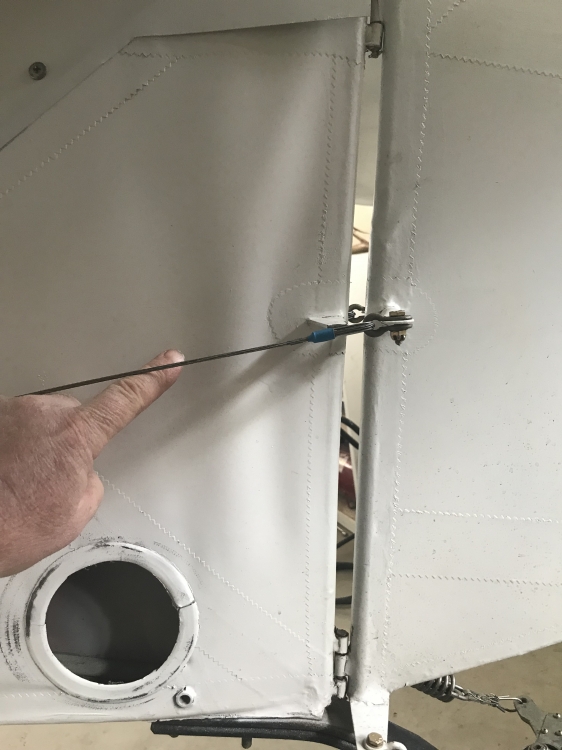
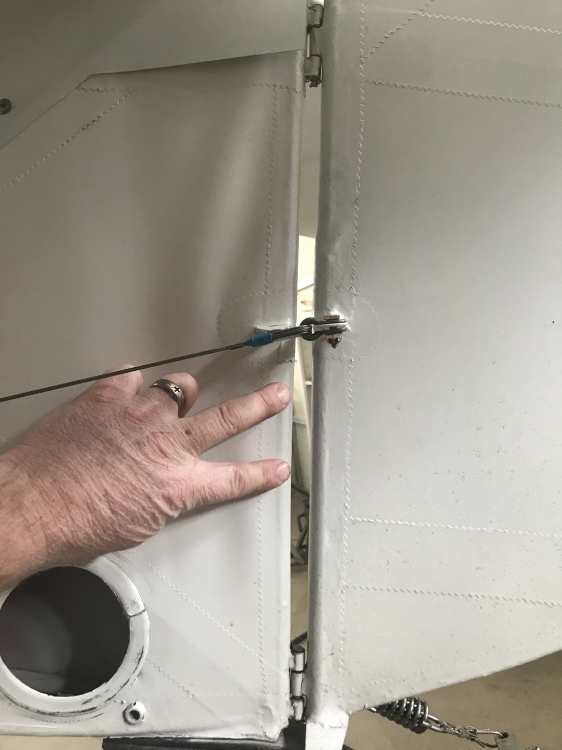
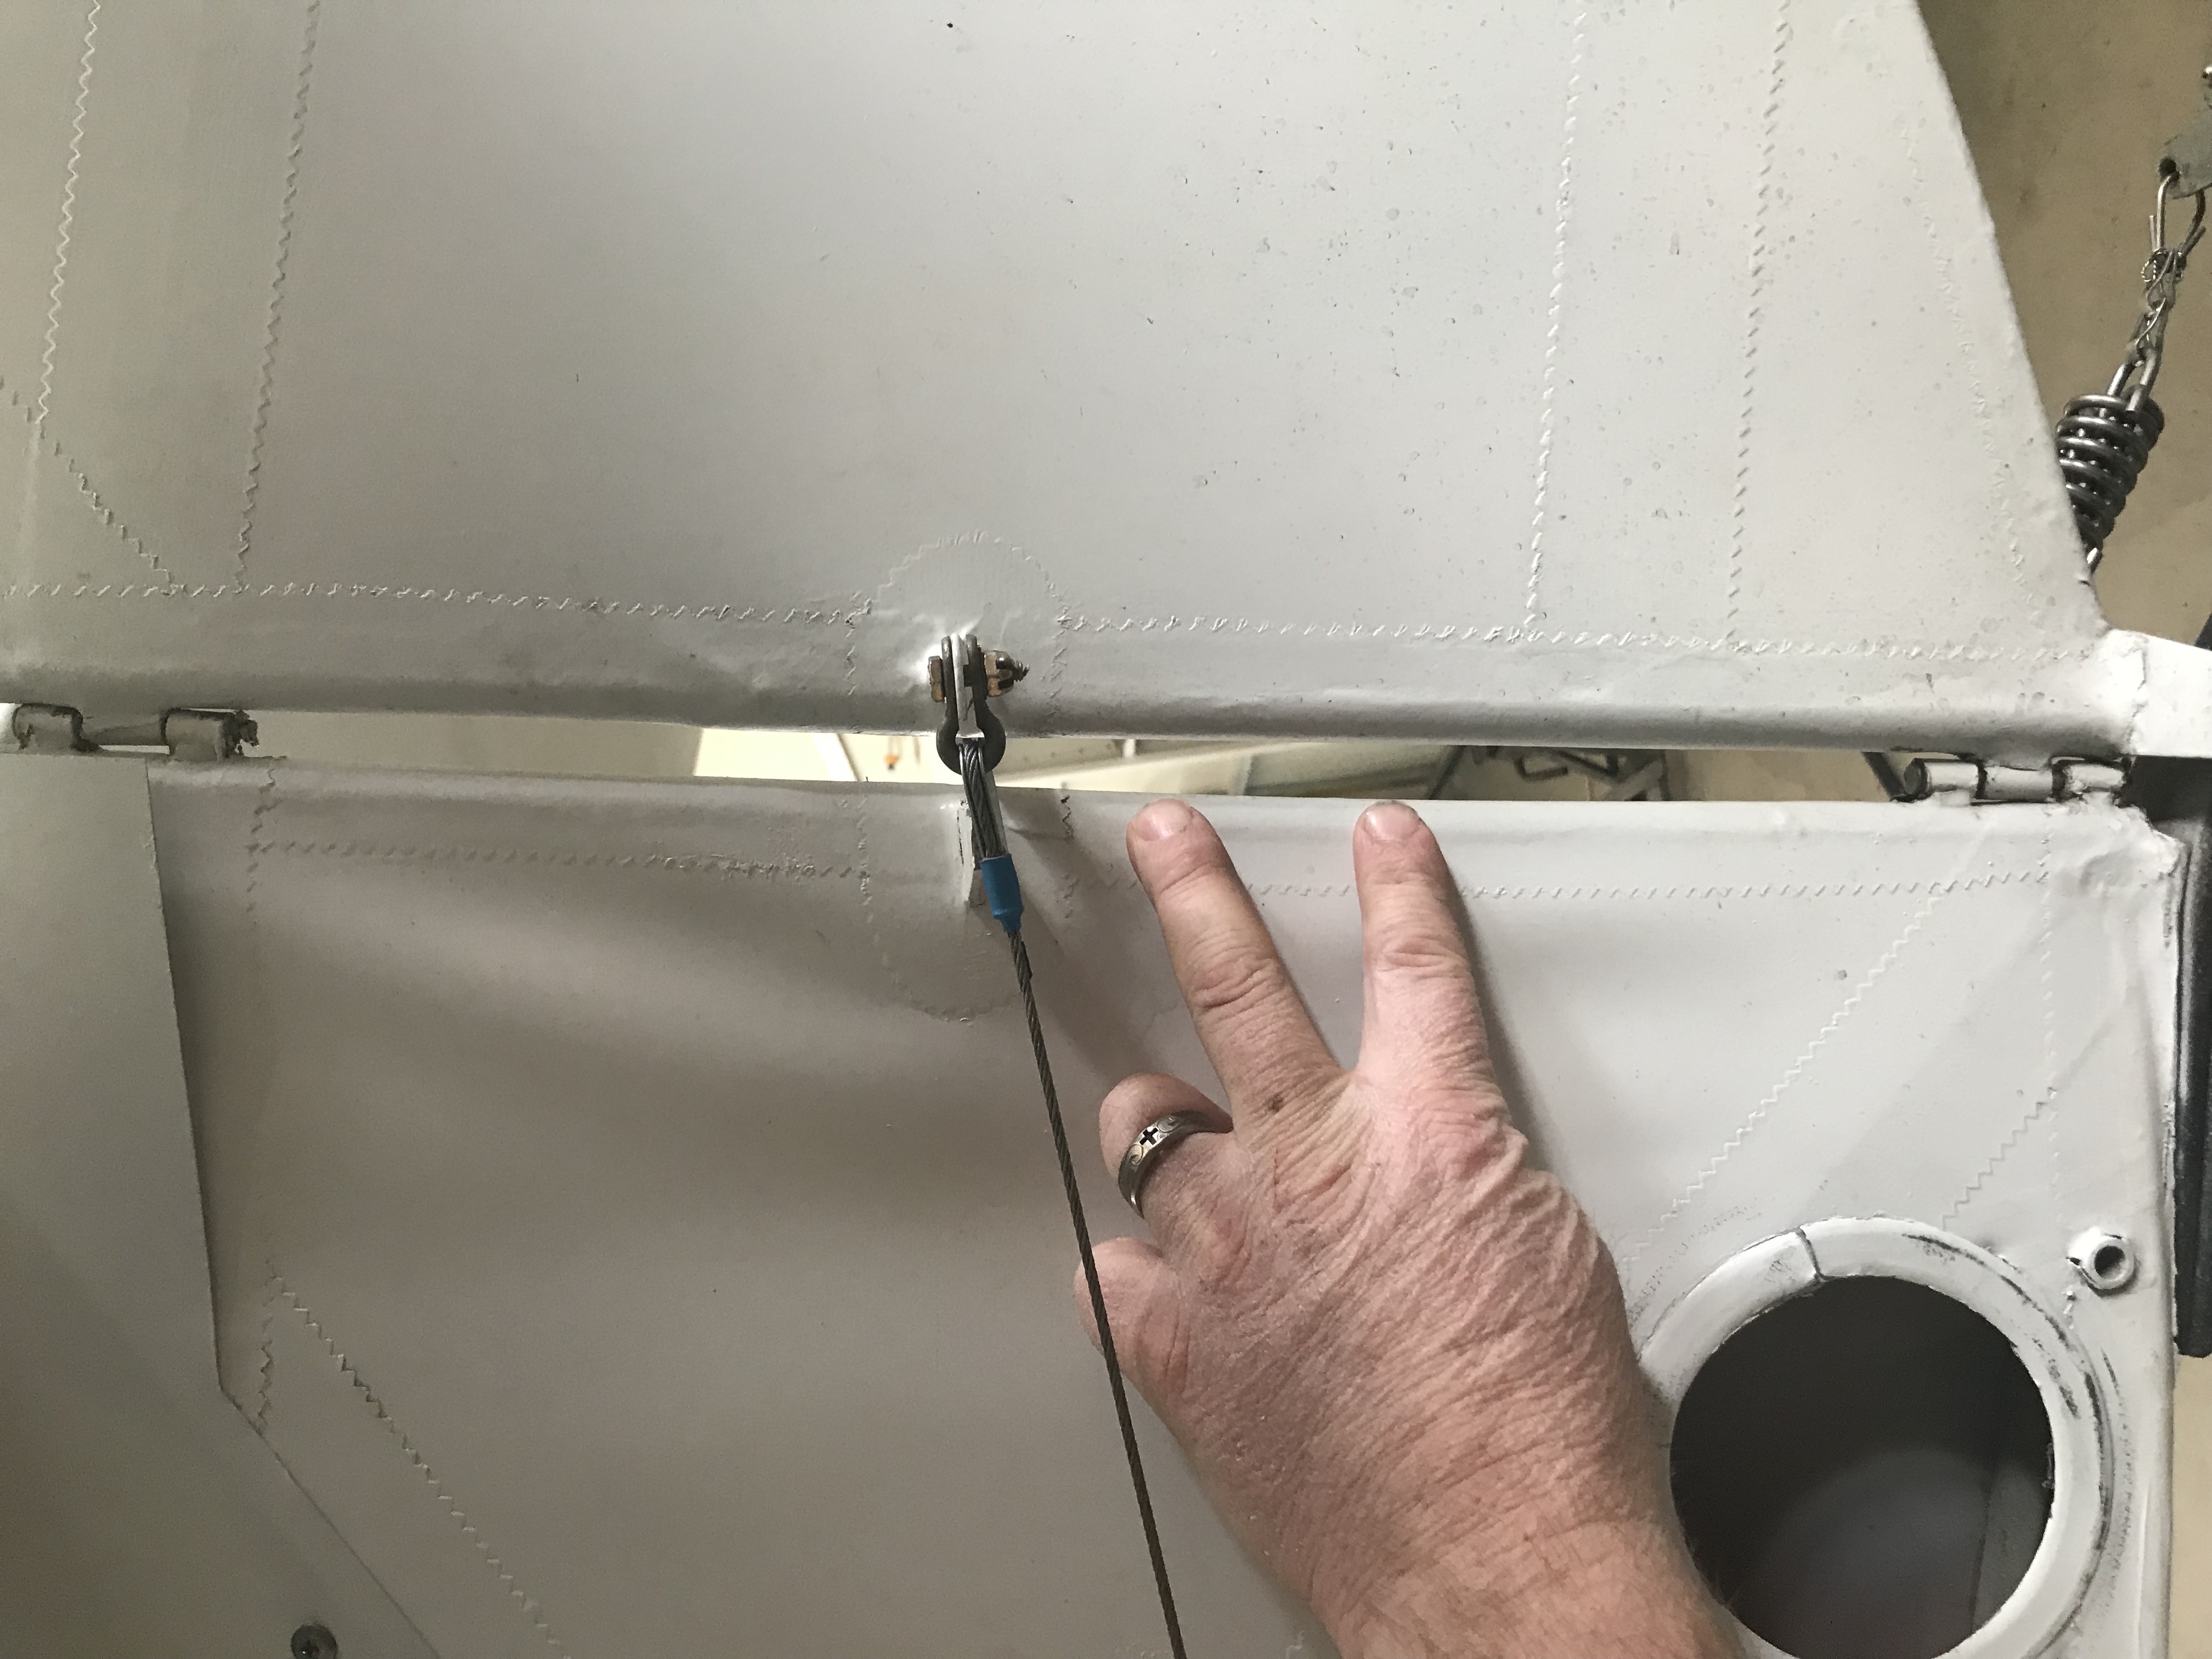
Allen, look at the photo with my two fingers pointing. The gap in this area is larger then in any other area between the rudder post and rudder. The rudder post is bending forward and releasing the tension on the fabric. Not sure why yet but I’m tearing into it to take a look. I will check for water inside the tubes, cracks or anything that does not look right. Maybe it needs some reinforcement in the area. As you can see from the picture of my spare frame there is not a lot of bracing in this area. I’d say there is probably some pretty good forces from the rudder controls in this area. Guess time will tell. I’ll be tearing it apart this week.
-
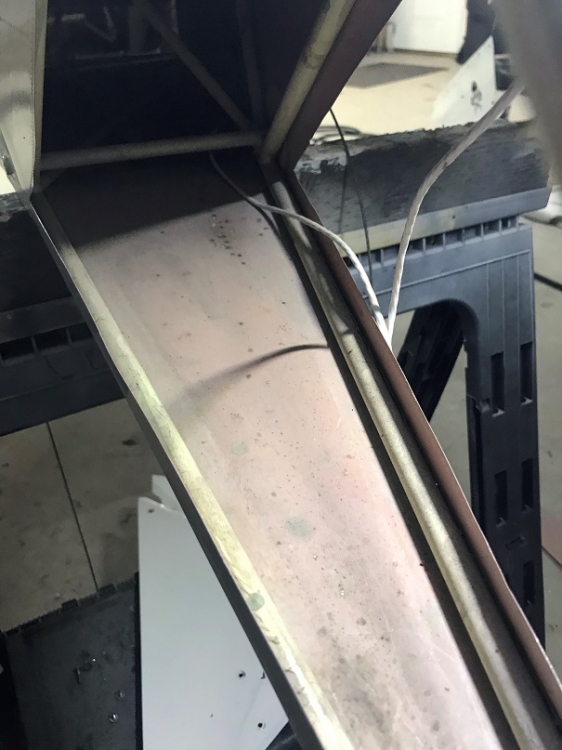
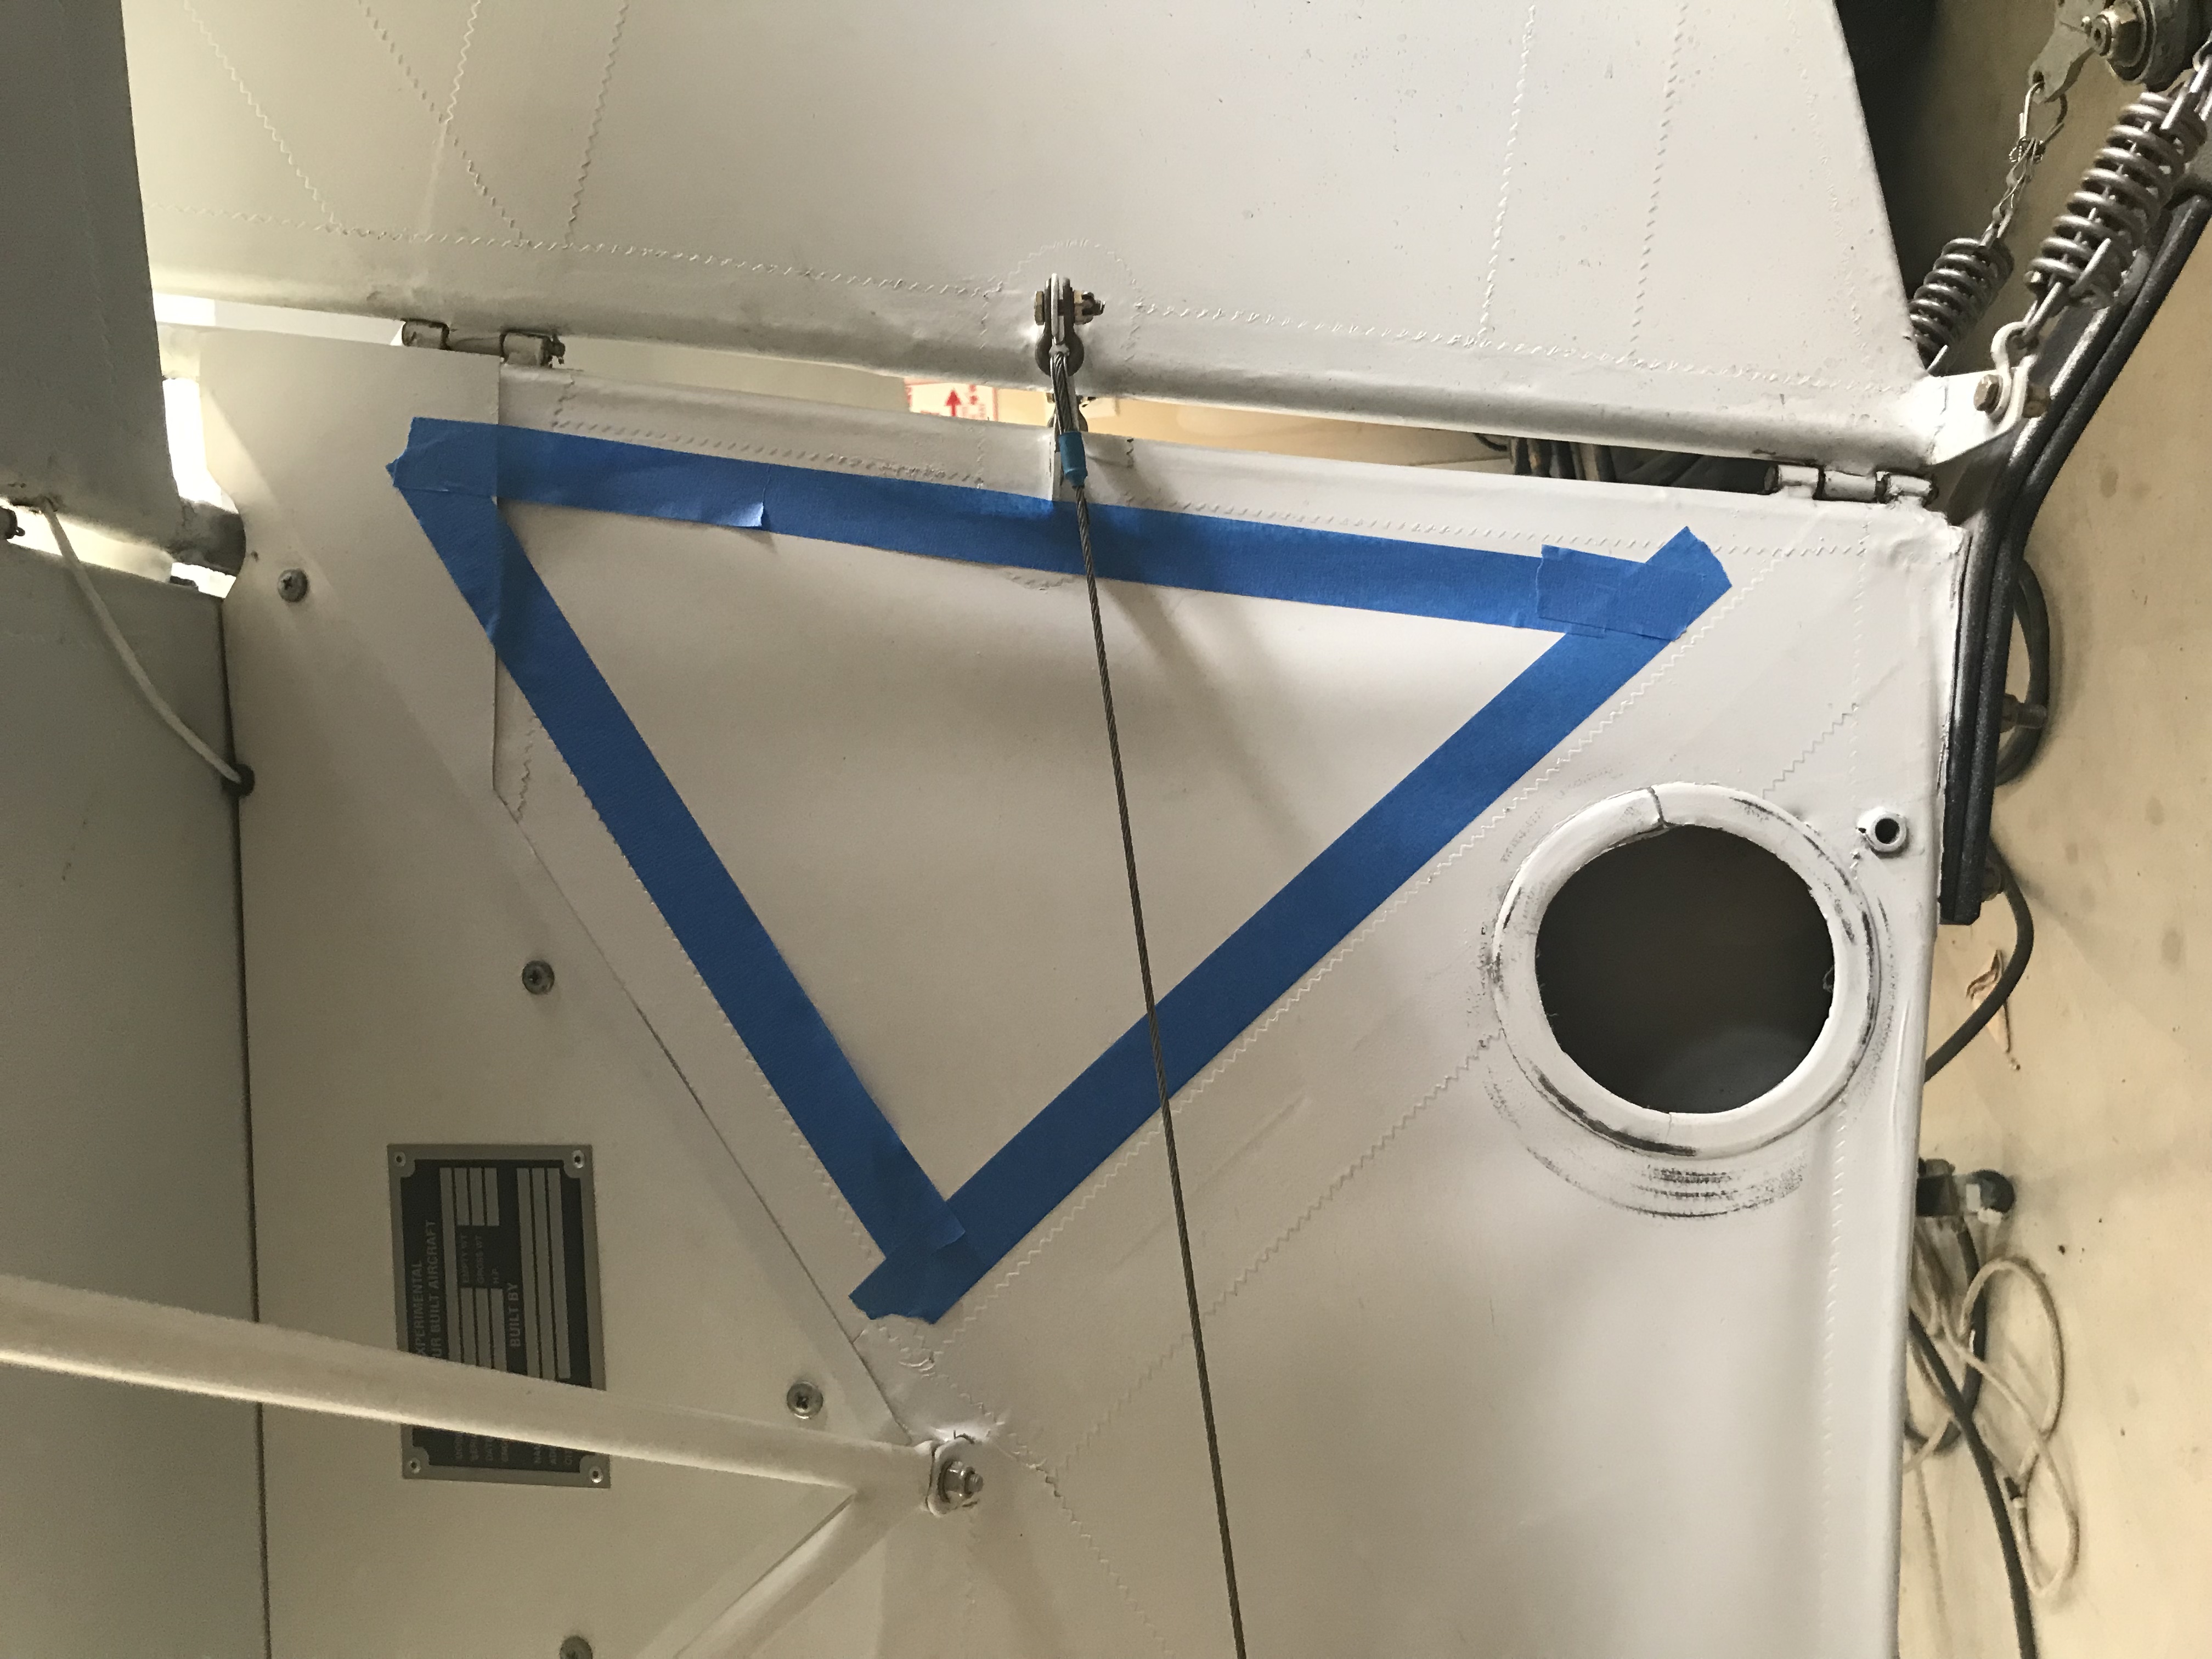
Just before I finished the plane I noticed thee fabric looking a little loose near the tail. I used a heat gun and heated it up very gently until it tightened. Just before the final inspection I noticed it again so I used the heat gun again. All seemed to be ok but after 50 hours of flying the fabric is odvious loose again and I can see the rubber post on the vertical Stab is deformed. I checked a spare Avid Mark IV airframe I have and there is little to no bracing in this area. Poor design.
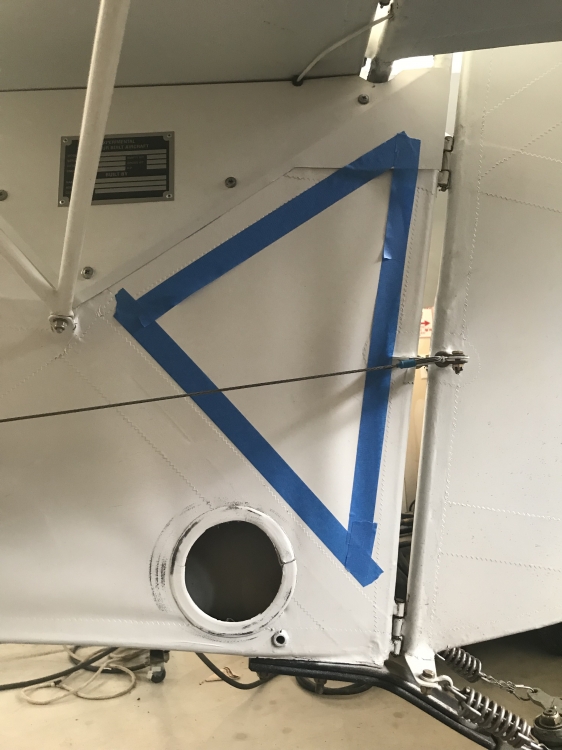
I need to get this figured out. It can’t go unchecked. I have though about removing the fabric ( see pic with blue tape) on both sides, reattaching it to forward tubes and make a cover to cover the area after repair.
Here are a few pictures. I’d be interested to hear what you all think.
-
I have a complete nose wheel assembly for an Avid Mark IV. Not sure if the main gear on the tri-gear Avid is diffferent than the TD main gear. I even have the whole front clip if someone wanted to convert a non nosewheel pane to a nose wheel. What’s it worth?
-
I do have my fuselage but would really like to not have my plane out of commission while I build them. I do have a spare fuse ties up in the hangar but it was involved in a trailering accident and I'm very sure its not plumb.
-
I want to copy these gear legs and wanted to seek possible knowledge from this fine group to see if anyone has done this before or has an idea on how one would go about it. I have the tools and have worked with metal most my life so that's not an issue. I'm looking for jigging options. Has anyone done this??
I need to rebuild the top crossbar on this set because someone cut the ends off both sides and don't include them.....grrrr.
Happy New Year!!!


Starting my Homemade Hackman
in Avidfoxflyers General Hangar
Posted
Thank you BryceKat. You are correct. I was modifying a few parts of the system based on things I already had. I re-evaluated the plans and orders the 3/16 line and fitting per the plans. Also, I figure I can take the main jet spread between the two systems I know are working and get pretty close on proper main jet application.