.jpg.4b33961872f0355d5e844f76433b74f3.jpg)
ChrisBolkan
Contributing Member-
Content count
702 -
Joined
-
Last visited
Posts posted by ChrisBolkan
-
-
You coming back for the Backcoutrypilot.org fly-in the following weekend? Keep your eyes peeled going in there it's one if the years busiest weekends. Last year there were over a 100 cubs on the ground. Have fun!
No, our local Richland Fly-in is next weekend and I will be helping out with that. Weather looks good for getting to Johnson Creek today (~180 mile flight) but looks like more of the same crap weather we've had all spring coming this weekend. We're hoping for the best. I don't like getting stuck. Well, getting stuck in paradise can be fun in and of itself, but I have to pay the piper when it comes to missed work!
 )
)Chris
-
Headed out myself tomorrow to Johnson Creek for the SuperCub Fly-in this weekend. We'll be drooling over the planes and doing a bit of flying around the vicinity before heading back Sunday. Should be fun! Have a great trip!
Chris Bolkan
-
That Matco Tailwheel looks sweet. I am running an 8 inch pneumatic tire on a 4 inch wheel, but like that tire much better. What make and size tire is it?
Chris Bolkan
-
Those tires look Sweet! What is the load rating per tire??
Chris Bolkan
-
Can't wait to hear how it goes. Would you mind posting a pic of what you modded? I do not have a good visual image.
Thanks!
Chris Bolkan
-
I would have repaired the existing tank in place on the plane it can be done much more easily than replacement. The wingtanks option will weigh considerably more. That's not meant to criticize your choice, but if it is not too late you might wan to re consider. It is pretty easy to fix tanks in place and make it look professional.
A friend is building a Flat Avid and using the wing tanks solution. I have helped him on the install. We did a lot of testing of the tanks in place in the wing but not mounted in. We did the little plastic pop in fittings and the right angle small size couplers. The second tank fills WAY too slowly. We ended up drilling much larger holes (about a half inch if I remember correctly) and prosealing in pieces of 1/2 inch thin wall Al tubing straight between the tanks.
We flame treated the polyethelyne (not so hot it melted or anything) in order to prepare the surface to bond to the proseal. We did many tests with and without flame treating the poly and it really makes a huge difference in how well the poly can be bonded to the tubing. It makes a wonderful leakproof ethanol proof flexible connection that you will never have to worry about the integrity of.
There are now three or four (can't remember exactly) 1/2 inch diameter pieces of tubing connecting the tanks directly together and the flow rate between them is like one solid tank.
This really worked well. I can try to provide you with more info or connect you up directly with my friend who did this. I think he took photos and could advise you if he would have done anything differently. He is very happy with the decision to improve the flow between the tanks.
Chris Bolkan
-
Do it! I am going to play with mine tomorrow if the wind lays down. I would love to have more flaps! Just be ready on the rudder and you should not have any big surprise.

That's what I'm thinking! Thanks!
Chris
-
Not ready to do it yet because of other projects, but I think I will remove the flap travel limit on my magnum and go up and do some mock approaches at high altitude and see if I can get the reversal thing to happen with greater flap deflection. I should also be able to see the effect on aileron authority with increased flap travel as well as if I can initiate reversal. Will report back to this thread once I do that. it may be a little while until I get to it, but it will be nice to know what exactly happens at what deflections.
I can't imagine this being a particularly dangerous experiment if done with adequate altitude fully expecting odd behavior. If anyone disagrees and believes this is an accident waiting to happen please speak up and say why!

Chris
-
Something I have been thinking about for a while now is the safe limit of flaperon travel. These make such a huge difference in the short field performance of our planes it is always tempting to push the limit to get the max little bit of performance. What I have been thinking about is how to safely increase the useable flaperon travel. I set up my flaperons with the plane level to have about 3 to5 degree reflex angle and 18 degree droop with flaps full on. The warning is that going beyond this could cause contol reversal. So yesterday I measured the maximum combined angle of the flaps with the stick full to the stop both ways. On my plane the mixer linkage makes the travel not exactly equal but they are as balanced as I was able to get them after many hours of adustments. The combined flap/aeleron angles for mine were 40 degrees one way and 46 degrees the other way. Based on this I am thinking that control reversal actually is happening when the flaperon angle exceeds the 40+ degrees. So to maximize the plane's performance safely, we could do this as long as we considered the circumstances and used this information accordingly.
I have to fabricate a better flap control mechanism this summer anyway so I am considering setting up my flap with detents; the first at 10 degrees, second at 18 degrees and a third at say 30 degrees. For any normal flying you would never use more than the 18 degree or the second detent; but in calm conditions when you didn't have to manuver, you could dump full 30 degrees of flaps right at rotation and then back off to 18 degrees as soon as you had airspeed. I have a hunch this could lower the min. take off speed significantly and with knowledgeable use, it could be done safely.
Thoughts?
Hi!
I too have wondered about this. How much down-flap is too much and why? I would really like to use as much as possible, because the landing performance just gets better with more.
Since your original question did not get answered in this thread I would like to ask it again and also ask the question "Exactly what is flapperon reversal anyway?"
Seems to me the only thing that could cause the ailerons to seem to "reverese" would be too high of an angle of attack causing a stall on the steepest deflected aileron, thereby making seem like reverse operation. Is that how everyone understands how "reversal" happens?
If that is the case, has anyone actually setup for greater deflection and tried it? When I am trying for my slowest landings, it is never in a lot of wind. I would be willing to live with pretty greatly reduced aileron control with maximum flap deflection as long as I understand what is going on so I can make intelligent decisions about how much flap to deploy in what situation.
Chris Bolkan
-
Have you tried this link? It's a very active link to ethanol free gas stations in the US and Canada.
I've found it most helpful. I learned about several stations in my area that are ethanol free. Still a good idea to test, but this list has proved 100% accurate for me so far!
I've also joined the ethanol free coalition. Just added my name to the voice, they don't ask for anything.
Chris Bolkan
OOPS! forgot the link: http://pure-gas.org/
Chris
-
Excellent information Chris; thanks for sharing it. I have not had any leaking in my tanks yet but it is probably just a matter of time. With the push for more alcohol in the fuel, and who knows how much longer avgas will be produced, I think the environazi's would love to have us all restricted to public transportation with travel limited to between a small apartment and a work cube, and no sticking your hand out the window to pretend that your flying.

Have you tried this link? It's a very active link to ethanol free gas stations in the US and Canada.
I've found it most helpful. I learned about several stations in my area that are ethanol free. Still a good idea to test, but this list has proved 100% accurate for me so far!
I've also joined the ethanol free coalition. Just added my name to the voice, they don't ask for anything.
Chris Bolkan
-
I'm at work so I need to keep this short, but we can fill in the blanks later.
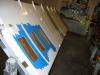
Repair/Leak patch: I used Hysol structural adhesive EA-9430 (aircraft spruce) and added a small amount of cotton flox with each small batch. This stuff is easy to work with, tough and strong while not being brittle and is resistant to almost everything anyone can put into fuel. After sanding and cleaning the internal seams and edges with MEK, just paint the stuff on with an acid brush. About a 30 minute working time and fully cures in 24 hours. Most likely your leak is along the rear spar. This can be checked by placing wing on edge and filling with AVgas up almost to the holes and checking for leaks after coating the seams.
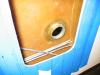
Sealant for covers: Chemseal/Flamemaster 3330 Access door sealant. Made for removable access doors. Still sticks like the dickens! Data sheet attached. This stuff is SICK, I mean amazing! Cleanup uncured sealant with MEK soaked rags....Lots of them. It is messy! Two hour working time. Full cure several days.
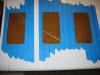
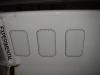
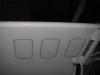
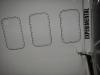
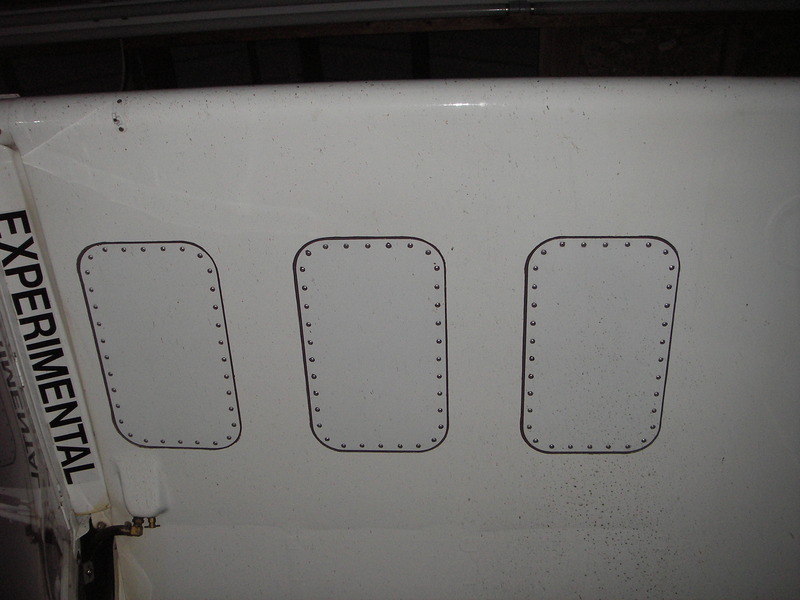
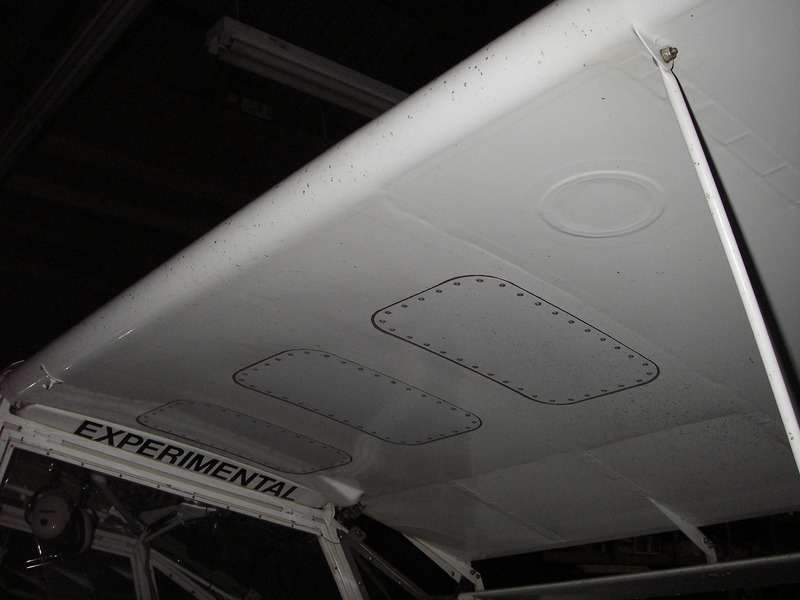
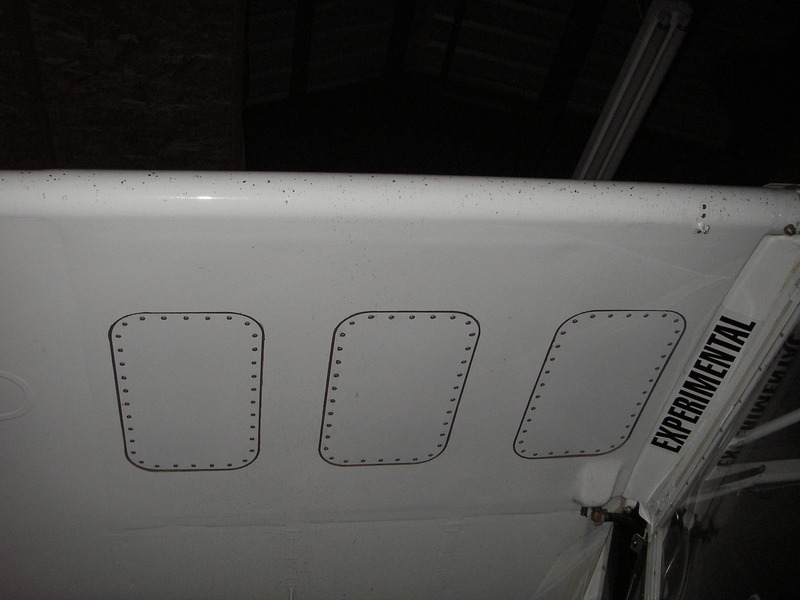
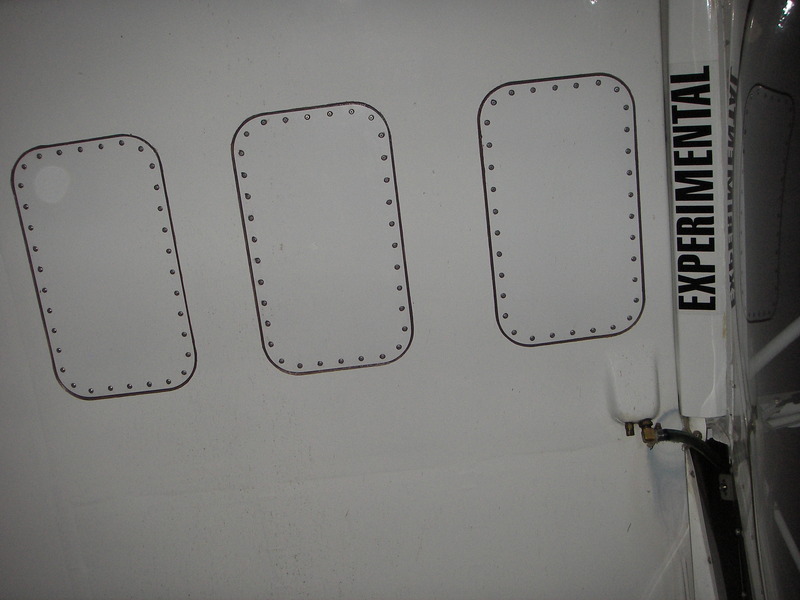
Dimensions of holes depend on the number of "bays" in your particular tanks. My Magnum has 3 bays. My MKIV had 4 bays. After you tap on the bottom of the empty tank you will easily figure out how many bays and how big you can make the holes. I made 3/4 inch flanges. If you look close you can see my marks on the blue tape for the flange.
It took a long time to do the whole process because I did a TON of research. With what I know now It would take a couple of weeks of evenings after work if I had all the supplies. A lot of how long it takes will depend on how you want the finished repair to look. It will take a lot longer if you really want it to look good. The devil is in the details. It wouldn't take that long at all if you didn't care how it looked and it would still be solid repair.
Hope this helps.
Chris Bolkan
Oh I forgot to say you want to by the 6 oz (I think) chemseal 3330 "kit" It comes in a tube (that looks like a small tube of calk) with both the sealant and activator in the tube. Super easy to mix because it is self contained. Just follow the instructions. Then you can put it in a calking gun to apply. You might have to modify a standard calking gun to work, but it is easy. One "kit" which costs about $20.00 will do all the covers on one wing if you are organized with a friend helping and can get all 3 or 4 covers riveted on within the hour and a half or so working life.
You also want to use all aluminium sealed rivets http://www.hansonrivet.com/w22.htm I used aluminium rivets with aluminium mandrels so they could be drilled out easily if I ever had to remove a cover.
Chris Bolkan
-
Chris,
For starters can you tell me what brand you used for the sealant and adhesive?
What are the dimensions of the holes and how much "flange" area did you use?
How long did you let it 'cure' before closing up?
How long did it take you to complete the whole process?
A parts list would be most appreciated.
Looks good!
I'm at work so I need to keep this short, but we can fill in the blanks later.
Repair/Leak patch: I used Hysol structural adhesive EA-9430 (aircraft spruce) and added a small amount of cotton flox with each small batch. This stuff is easy to work with, tough and strong while not being brittle and is resistant to almost everything anyone can put into fuel. After sanding and cleaning the internal seams and edges with MEK, just paint the stuff on with an acid brush. About a 30 minute working time and fully cures in 24 hours. Most likely your leak is along the rear spar. This can be checked by placing wing on edge and filling with AVgas up almost to the holes and checking for leaks after coating the seams.
Sealant for covers: Chemseal/Flamemaster 3330 Access door sealant. Made for removable access doors. Still sticks like the dickens! Data sheet attached. This stuff is SICK, I mean amazing! Cleanup uncured sealant with MEK soaked rags....Lots of them. It is messy! Two hour working time. Full cure several days.
Dimensions of holes depend on the number of "bays" in your particular tanks. My Magnum has 3 bays. My MKIV had 4 bays. After you tap on the bottom of the empty tank you will easily figure out how many bays and how big you can make the holes. I made 3/4 inch flanges. If you look close you can see my marks on the blue tape for the flange.
It took a long time to do the whole process because I did a TON of research. With what I know now It would take a couple of weeks of evenings after work if I had all the supplies. A lot of how long it takes will depend on how you want the finished repair to look. It will take a lot longer if you really want it to look good. The devil is in the details. It wouldn't take that long at all if you didn't care how it looked and it would still be solid repair.
Hope this helps.
Chris Bolkan
-
I see now how you did it. GREAT idea and I wish I would have seen this over on the yahoo site before I had a buddy order new tanks for his kitfox. This would have been a very easy fix for him. Oh well, whats another grand for new tanks when its not your money

As far as posting pics, you should not have to host them anywhere, they upload to the server for this site. I have it set to unlimited upload space but a max of 24 mb per pic or attachment. If you are getting some sort of error when you click the "click to attach files button" let me know what it is saying and I will see if I can track down the problem.
I'm trying to upload some pictures. Here goes. Any questions just ask!
Chris

 2 people like this
 -
Chris,
Do you have a link to the photos for the repair you did? I am certainly interested in doing it in that manner.
Sure do. Here is the link to them on the Yahoo Groups Avid site:
http://groups.yahoo.com/group/avid_flyer/photos/album/889359366/pic/list
Hopefully you are a member there. If not you should be, because it is similar to this site in that there is a lot of good Avid info there too.
I tried uploading them to this site, but I do not have any place to host photos. I can email them to you if you give me your address.
ChrisB
-
Welcome aboard Chris! I have read many of your posts on the yahoo groups and we all welcome your knowledge here! As with all things, the easiest repair may not be the best option you have available. Your repair method seems well thought out and executed. How many hours do you have on the tank now with the aluminum lids? I am just thinking about long term issues such as oil canning working those seams on the top of the tank.
I have about a year and 100 hours on the repairs so far and I fully expect them to last forever. Both tanks had slow leaks along the rear spar somewhere that leaked out near the rear spar carrythrough. The repair is very strong with no oilcanning. The undercamber of the wing puts some arc in the covers which makes them very strong. A person might have to use a bit thicker AL on the speedwing because the bottom is flat. Proseal is INCREDIBLY strong and flexible and would probably work all by itself not including the rivets, which I chose to space at about an inch and a quarter apart. There is no question in my mind that this is the best way to fix tanks correctly and permenantly. It's just a lot of work. The advantages are 1) you do not have to destroy the paint, covering or replace the tanks, 2) The weight stays the same, 3) You do not lose any fuel capacity, 3) you can go back inside easily (well relatively easily) for further work if need be. Even though this repair method is a lot of work, it cannot be 1/10th the work of replacing the tanks! And those plastic tanks are heavy, have their own potential leak scenarios, and you lose several gallons per side. Plus you have to uncover, re-cover and re-paint a significant portion of the wing. YUCK!
The things to make sure of doing the repair this way is to cut all holes the same size so you can make all the covers the same at one time. Also be sure and cut one hole per bay leaving enough "flange" to seal and rivet to. The holes are cut in the BOTTOM of the wing because the raw fiberglass tank bottom is just under the covering. On top there is usually a sheet of plywood, and depending on the model Avid, may have plumbing running around the inside top of the tank. Then be sure to remove covering and any filler in the flange area before sealing and riveting the covers on to the fiberglass. I painted the covers the same color as the wing and like I said, it turned out better than I imagined it would...like the plane was built with them originally.
ChrisB
-
OK My new Avid is great with one issue. The right wing tank has a slow leak in it. I talk to Brett at Airdale and he recommends the replacement tanks that he sells at wingtanks.com but I have heard there is a treatment that you can do to the tanks (not recommended by Brett). Does anyone know about the treatment and have a link for the product? I will be replacing the tanks at a later date but would like to do this short term if possible. I am going to go to the EAA Fabric Workshop when I get the chance as there is fabric work required for a tank replacement and I have never done it.
Hi! I'm brand new to this group and this is my first post. I frequent the Yahoo Avid group and just joined this site too after some lurking
)I would not recommend using a slosh sealer for all the obvious reasons (potential flaking, poor adhesion, unknown compatibility with fuel additives etc). The wingtanks.com solution is a lot of work and the second tank on each side fills slowly, although there is a good fix for that. I decided to cut a large hole in each bay of both tanks. Once inside it was easy to use structural adhesive (hysol) to paint all seams and edges in the tanks where leaks are most likely to occurr. I then made covers out of .030 Al and riveted the covers on using access cover proseal and all aluminium sealed pull rivets. This sounds messy, but the repair turned out very nice, like the plane was built that way. I have photos on the Avid yahoo site you can view there, or I might be able to upload them here. Doing the fix this way gives me a high degree of confidence in the repair, and I can always remove the covers if I should need to go inside again. This solution did not add any weight and did not take away any usable tank volume. Yes it was a lot of work, but MUCH less work than the wingtanks.com solution with no loss of fuel capacity. More work than sloshing, but you know you really wouldn't be comfortable with that and would always be worrying about the coating not sticking and causing an engine out.
Hope this helps,
Chris Bolkan


Tundra tires
in Avidfoxflyers General Hangar
Posted
Hi!
I found a set of very lightly used McCreary 850-6 4 plys for cheap and mounted them on my Avid. The looked great, but I did not like them. Too much unsprung weight. Seemed like they wanted to twist the plane when touching down on one tire first. Taxiing on rough ground was like a bronco. Don't know why, but it was rougher with the big tires that the 600's I was running. They just felt too heavy so I took them off and went to 800X6 4 ply McCreary's. The worked great. A bit larger, but not near the weight and handling issues of the 850's. The best compromise for an all 'round tire for me.
Still wanting bush size tires, I asked around and the folks I know that ran the AK wheels just loved them. I said what about all the weight? and told them about my experience with 850's. The all claimed the AK tires were the bomb and they didn't notice the stuff I did with the 850's. I finally gave into my desire and bought Airstreaks. Turns out they are the same weight as the 850's with tubes, but much larger and softer. I was skeptical and was afraid I was spending WAY too much money for a tire that was still going to give me problems.
Well, all I can say is they must make those thigs out of magic rubber or something. My first landing felt like one of the best I have ever done, and I just kept on having great landings. No bouncy unsprung weight problems, no twisting the airplane if one tire touches first. I have no idea why they work, but they do.
Problem now is I am afraid they won't last and I will wear them out quickly. I fly out of a grass strip, but still land a fair amount on pavement. While I love the tires, I have taken them off for the winter to help preserve them. They are about the coolest thing you can add to a plane, but they come (at least for me) with their own worries, not about landing but about huge cost and possibility they won't last long.
It's all tradeoffs I guess. All I can say is that from a performance perspective you cant go wrong with the bushwheels. Cost is another issue and I won't know till mine wear out if I got my money's worth.
Good luck what ever you end up doing!
Chris Bolkan