Yamma-Fox
Moderators-
Content count
712 -
Joined
-
Last visited
Posts posted by Yamma-Fox
-
-
Oh, and I just about missed this because the title of the topic.
Think ya should change it to something like:
"Hey Boys, Got some projects I'll be selling because I'll be a little busy coming up here KICKING CANCER'S ASS!"
2 people like this -
My wife has had a passion for studying alternative cancer treatments. In her briefing to me of what she has learned, I am convinced that there sure are many great avenues out there. So many in fact that it would be hard to choose a plan. I really do believe that some of those ideas are sound, and can tremendously supplement and increase the effectiveness of the big pharma / medical methods.
Please take some time to research those options, and I'll put a prayer in for ya... for healing yes, but even more a prayer that you will find your way to the plan of attack that will be the most effective.
Brett
1 person likes this -
Right on Vance!
That is NICE!!
-
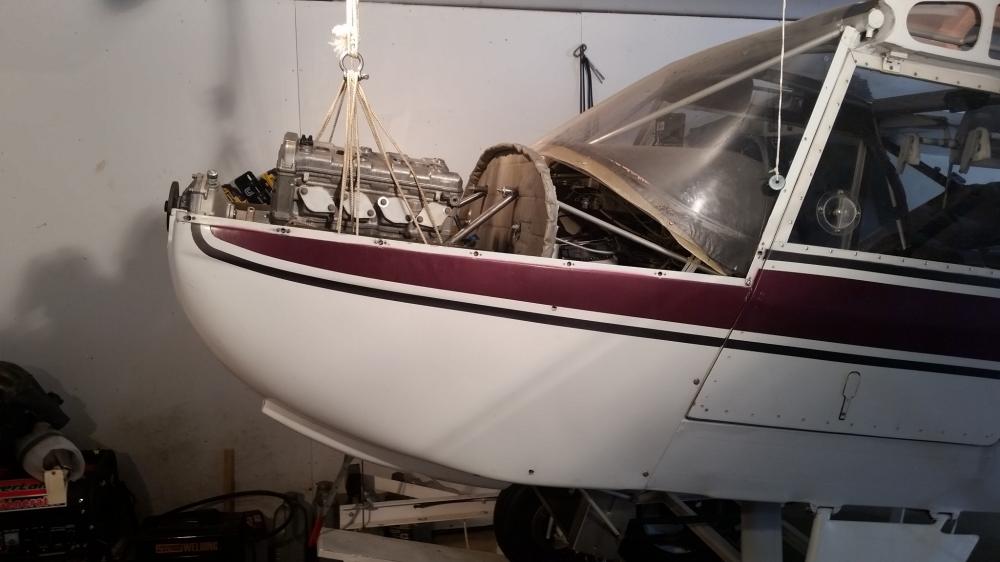
RX 1 ENGINE OVERVIEW AND PROJECT PROGRESS:
In my video (above) you see Teal's Skytrax adapter mounted with a Rotax C box. Truly the work of a craftsman! This 2nd video is Teal with the install instructions for the adapter, C box, and clutch / hardy disk.
4 people like this -
Before you paint, I would suggest taking with Leni directly about making a Jig off that mount. You may be able to sell the jig to him so he can go production...
That's a nice compliment to my first attempt at a motor mount. Thanks!
But like with Leni's new bush gear design, I would want to test this out a bit, prove it out, and look for possible improvements before considering having other people copy it.
There are a lot of KF 5-7s out there, and I think the 4 uses a very similar mount. I've also heard that the RX-1 and Apex use the same mount, so it is possible there may be some interest in it I guess.
2 people like this -
Nice job. What kind of door latch is that? How about a picture of lower mount area.
New plane for me, not real nuts about the door latch. Works great, but it is a little tough to get to and open from the cockpit in a hurry (egress). On the to-do list to modify.

 2 people like this
 -
X2 ^^^
Not answering your real question here, but here's the $14 one that I will use on the side to calibrate and keep a crosscheck on my main tach:
-
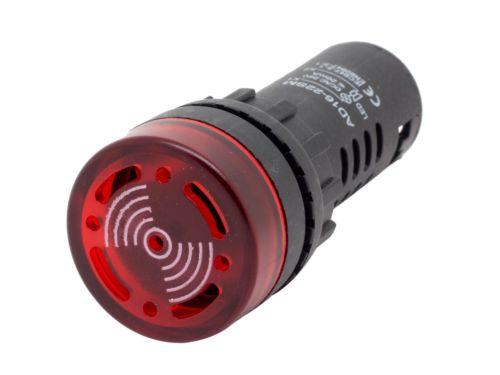
Found this while researching for an oil level low light.
Might be a nice upgrade to warning lights for critical items.
Flashing and buzzing would be good for me since I'm always looking out the window when I'm up flying!
")
 1 person likes this
 -
OIL LEVEL LOW WARNING LIGHT
I checked the oil dipstick in the yamaha oil tank. It has a float switch integrated in the dipstick that senses oil level. The two electrical leads to the dipstick have continuity when the oil is low, and are open when oil is adequate. Looks like it would be simple to wire up a panel indicator light for low oil.
1 person likes this -
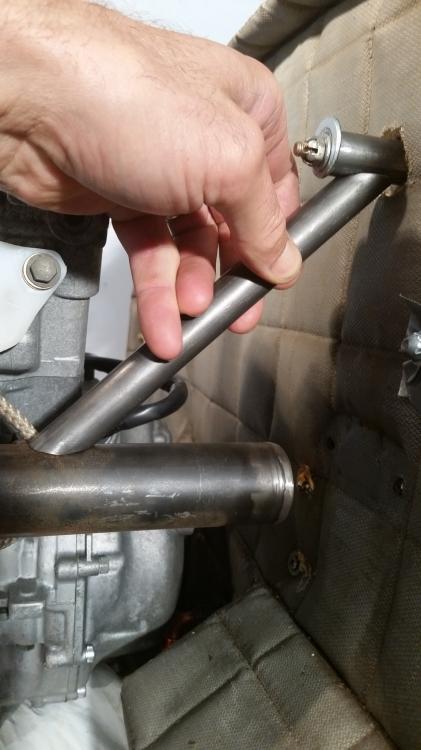
OK. The basic frame of the mount is all done and ready for the pro welder. It'll come back built enough to hang the motor and figure in addnl stucture and accessory mount points before it goes back for final welding and powder coat.
Also note that in building my mount using the firewall as my jig (and not a proper jig), I used oversize tube (3/4") at the FW mount points and am using brass bushings with an offset hole (not in middle of bushing) to allow for the small amount of warp that I anticipated the mount would undergo in welding. So far that plan has worked well and I only had about a third of an inch warp in the main weld-up of the mount.
Next will be some slow going while planning out and ordering all the little hardware and connections for oil and cooling systems.
 1 person likes this
 -
Post some pics of that puppy when ya get the graphics on!
-
For the archives:
(Also included is the Rotax C box service manual)
Carb Cleaning Tips and Procedure.pdf
1 person likes this -
Thanks everyone for tuning in here and watching over my work. I really do appreciate it and welcome the experienced oversight!
Most of my info is well known to the old pros on this site I'm sure, but hopefully I can contribute a little here and there sometimes to pay ya'll back for watching over the rookie.
And hopefully this "ordinary guy" build thread will inspire others that: "if THAT guy can do it.... I could do it!" LOL
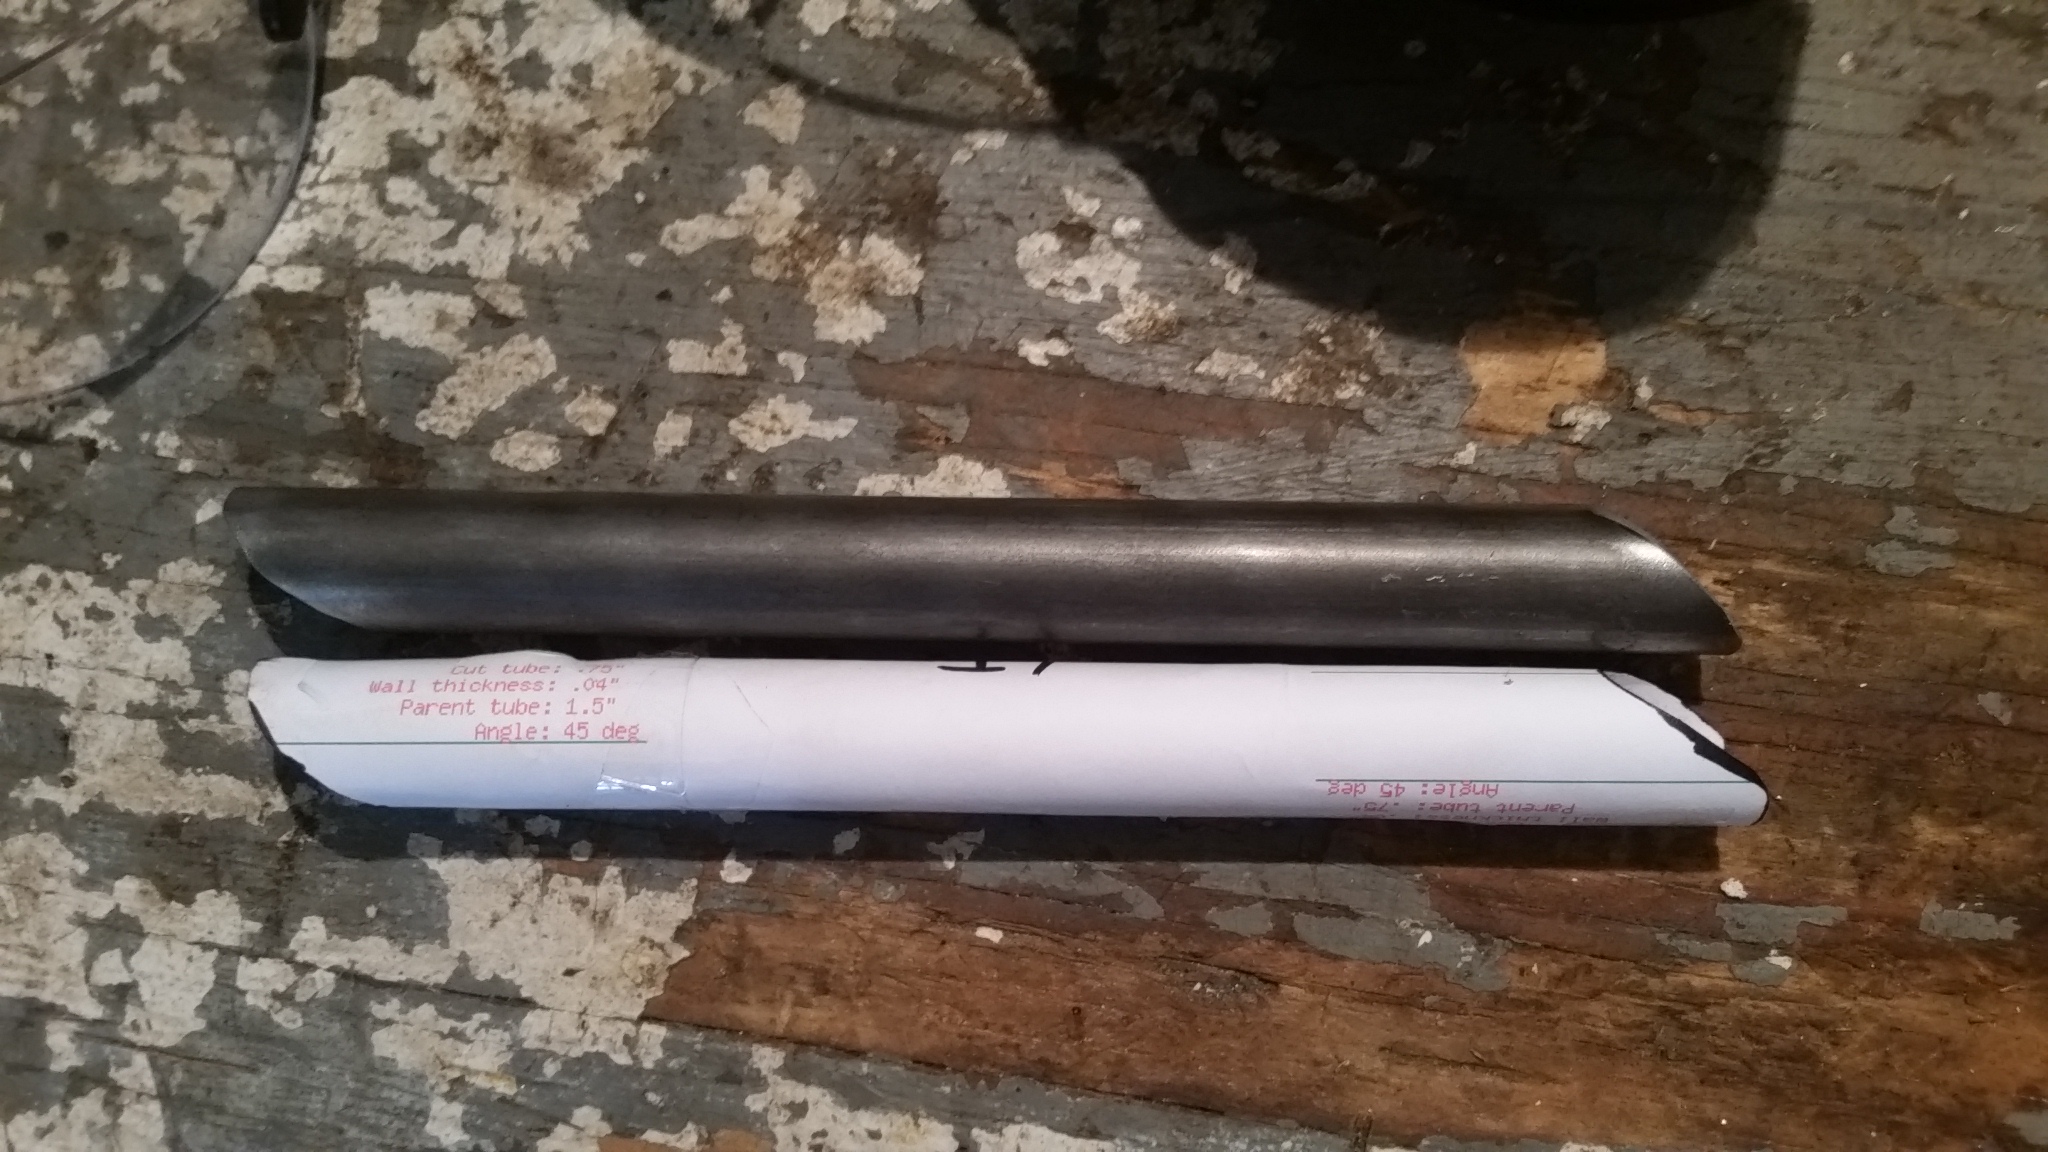
Here is a video I made of coping the tube:
2 people like this -
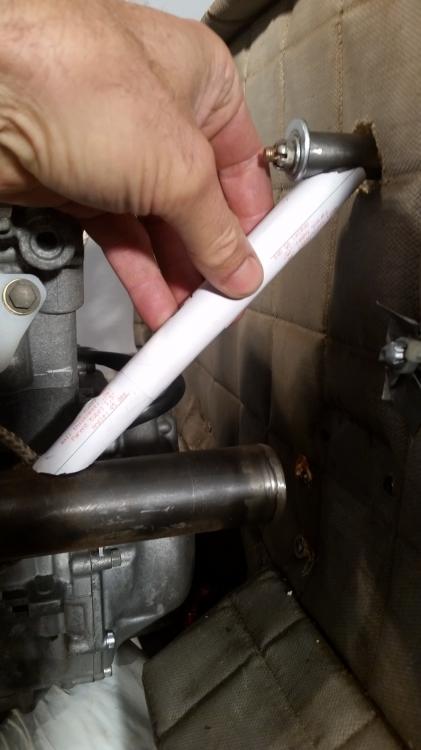
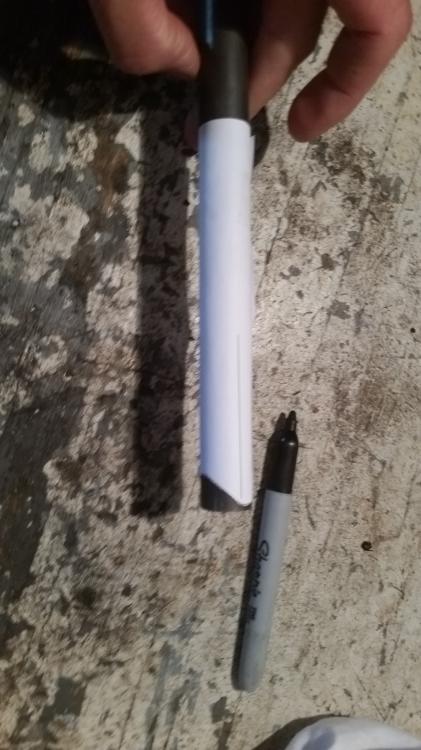
I'm a moron, but I was able to hit my very first fitup nuts on with the first grind!
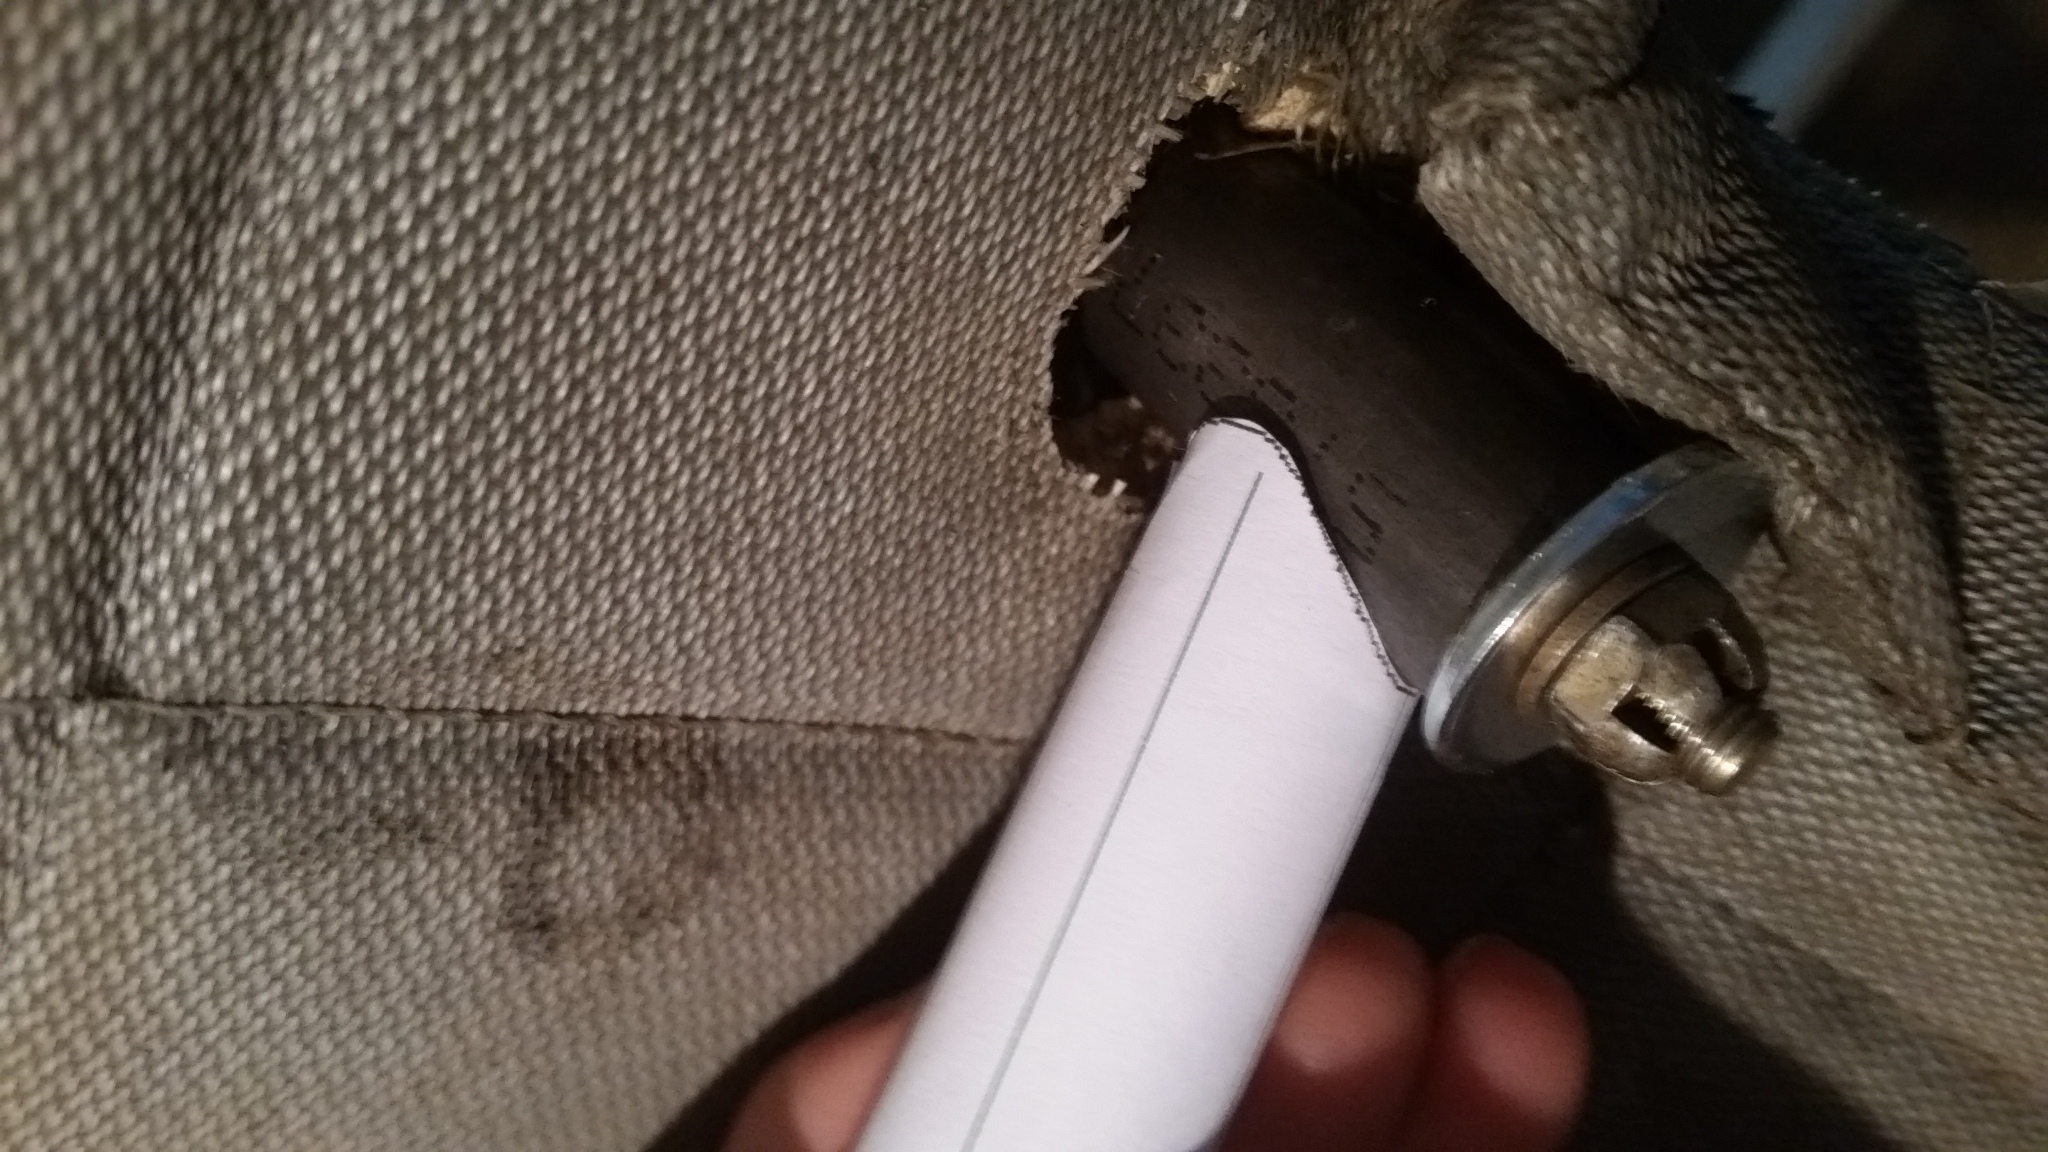
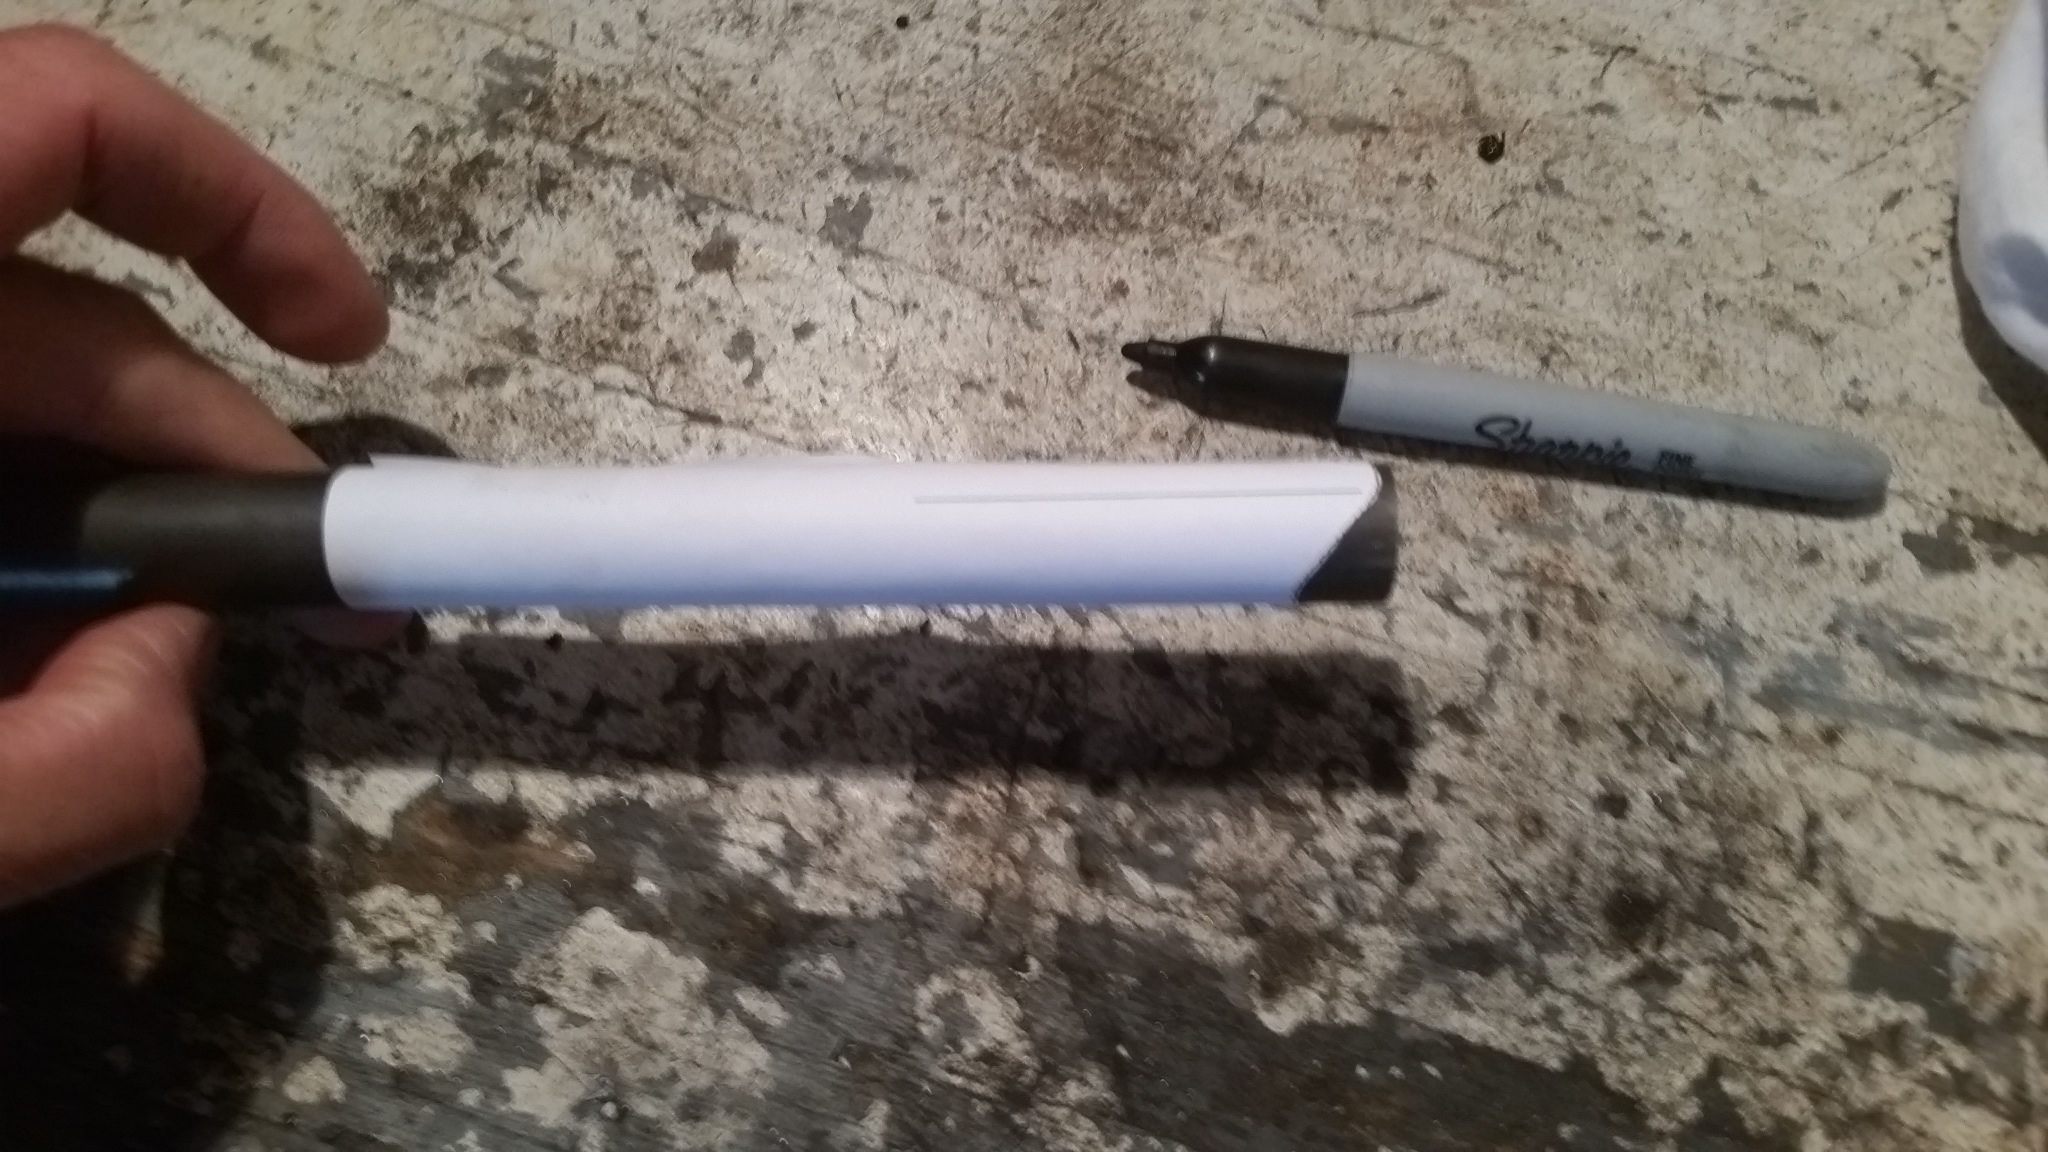
Trick #2 is to make templates for both ends of the tube, wrap them on the tube and tape them up so they will still slip off.
Next sleeve the two paper tubes together and fit them up on your work (paper tube only, see pic). Spin and slide them till they line up and contact perfectly, then tape the two halves of the paper tube together at that alignment and slide them on the raw tube.
Mark the tube with a sharpie and grind both ends perfectly in one shot.
For longer sections of tube, I made my paper tube template with an extra section of rolled paper between the cope templates.
 1 person likes this
 -
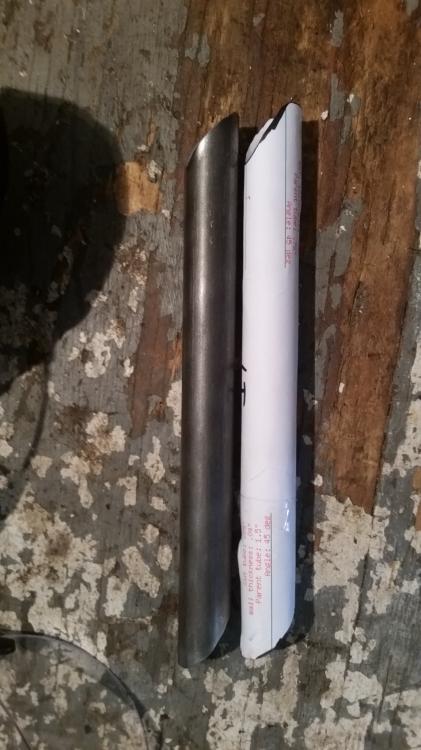
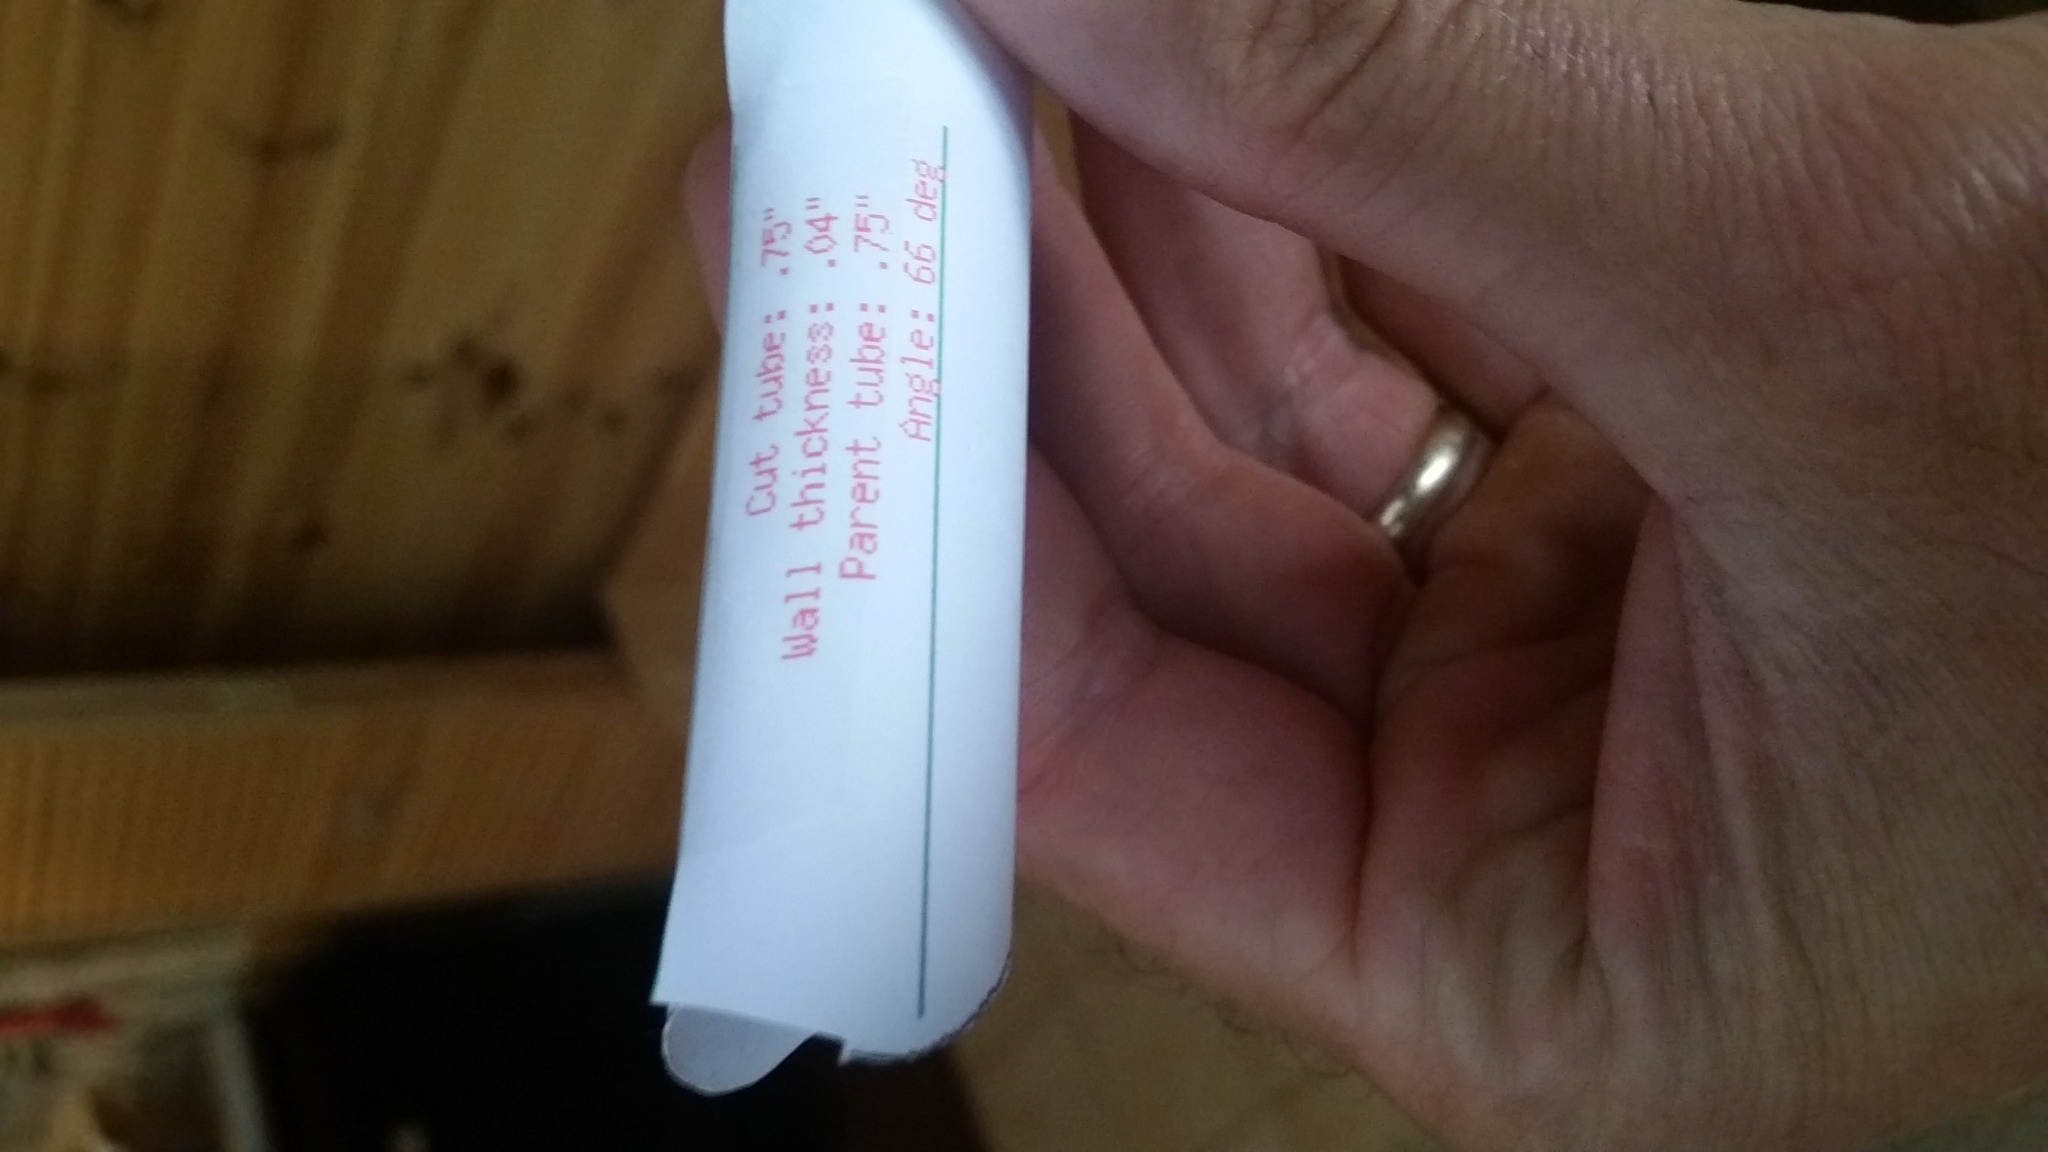
TUBE COPING / FISHMOUTH TEMPLATES
Starting in on the mount.
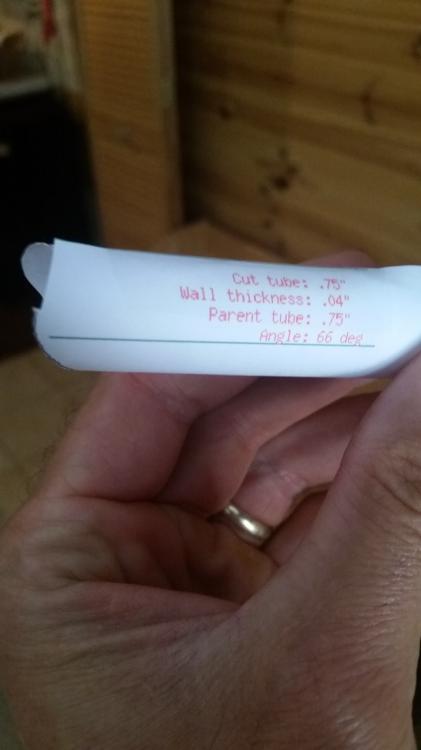
You smart guys already know about this, but for anyone like myself who didn't know:
Go to the site below and enter your tube dia, thickness, the angle of the joint, and the mating tube dia.
You get a printable template that you can trace to make a perfect grind on the first try. Way too cool!
http://www.metalgeek.com/static/cope.pcgi
(I happily threw this guy a few bucks donation to help keep the site going: https://www.dreamhost.com/donate.cgi?id=1797 )
(Oh yeah, and this guy too! http://www.avidfoxflyers.com/index.php?/topic/2202-contributions-to-keep-site-going/ )

 1 person likes this
 -
Wouldn't matter with your 4 I suppose, but fwiw my 5 came in at 680lbs witht the e81. Battery below turtledeck.
-
I got a great guy, see pics
-
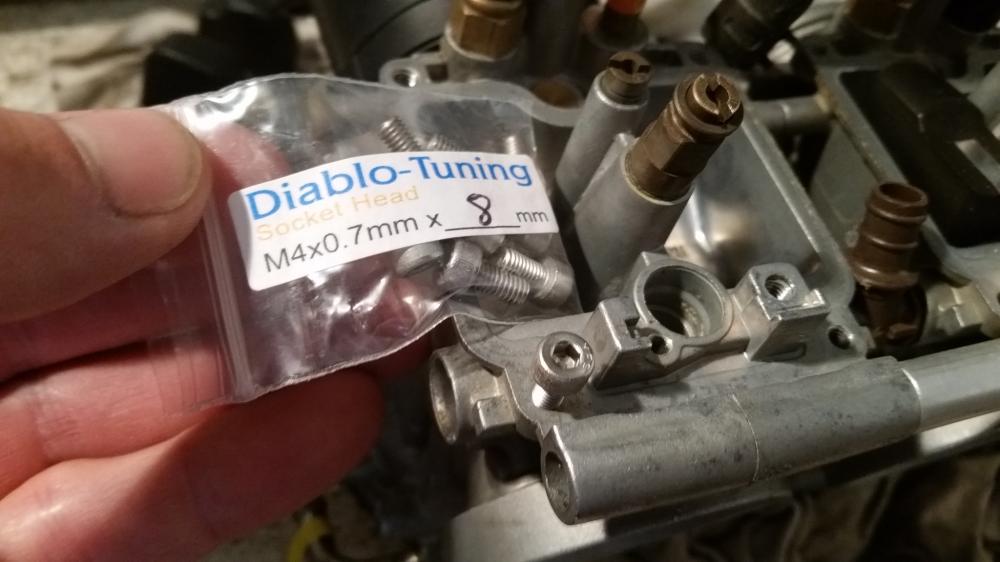
And another quick tip from the sled heads. Get sst socket head cap screws to replace the phillips heads holding float bowls on. The damn phillips ones round out waaay too easy.
Size is M4x8
-
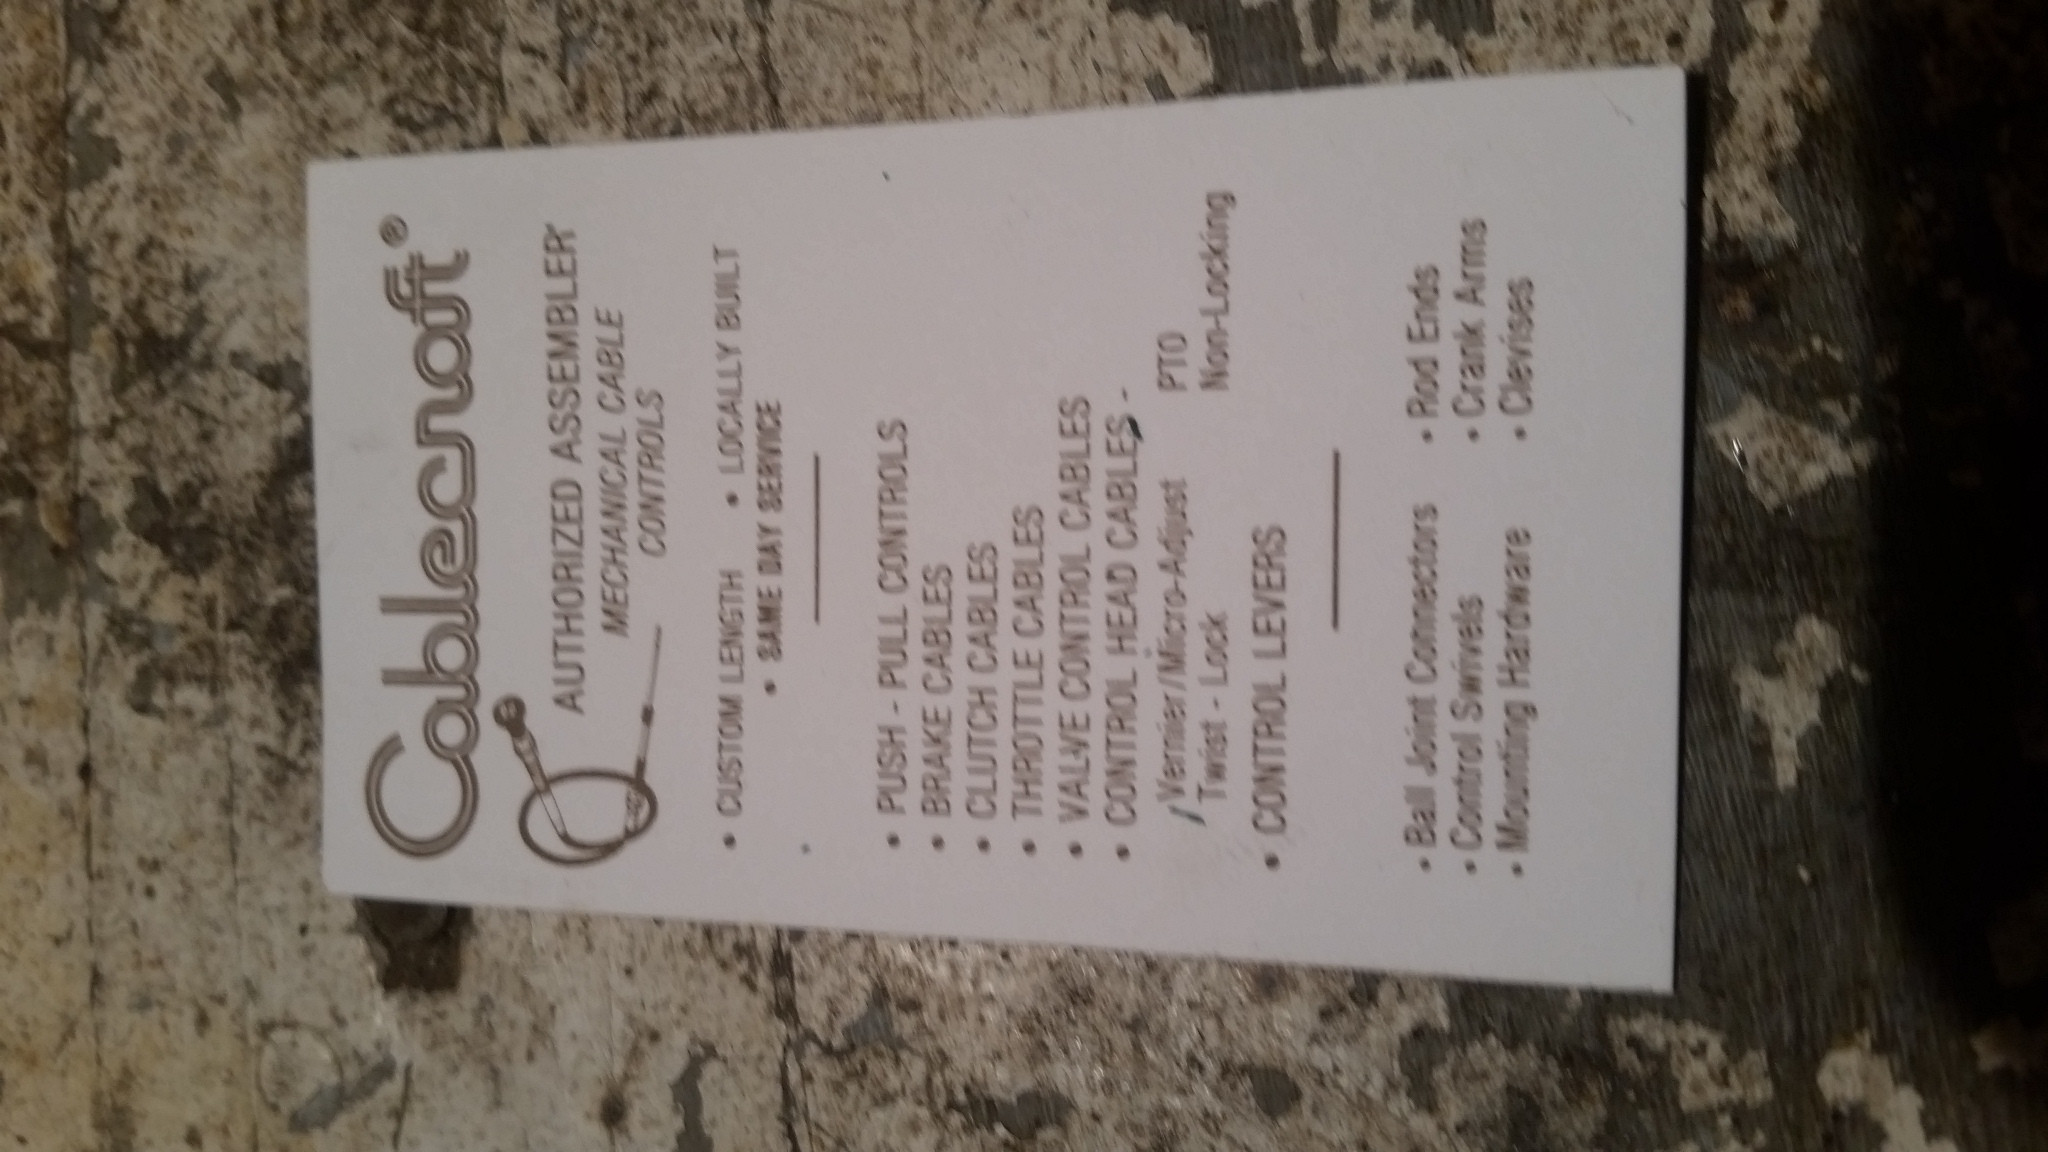
CARB CLEANING AND RX-1 SHOP MANUAL:
The most common question on the RX-1 snowmobile forum seems to be regarding rough running old sleds. The canned advice I see a lot is "clean your carbs and post us in the morning".
I posted a reprint from an expert in the snowmo forum on how to clean these carburetors. I also posted the RX-1 APEX and C Box service manuals here:
RVSimons did a beautiful job of cleaning up my carbs and supplying me with new orings for float bowl covers and main jet towers. Thanks Vance!
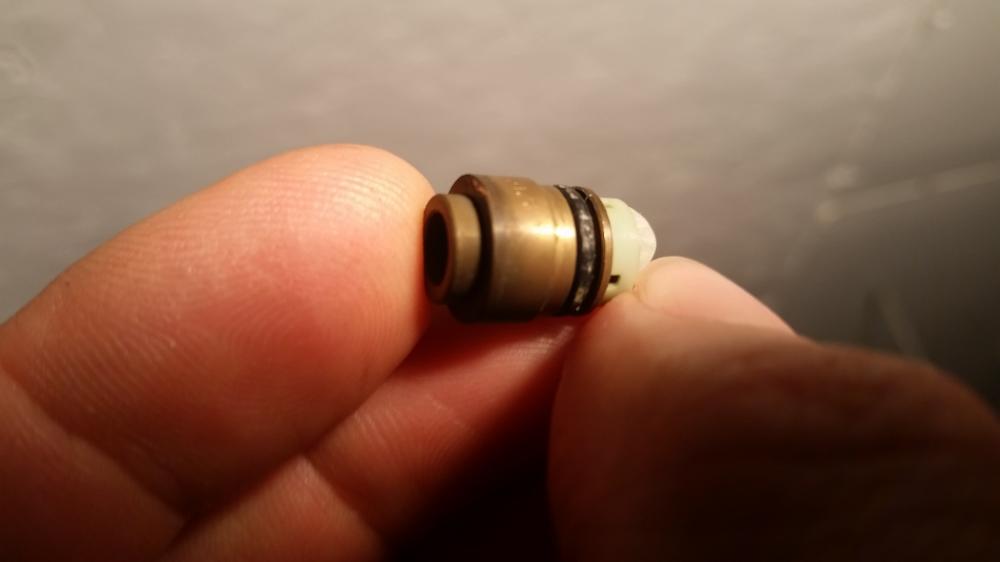
I decided to go totally new in there and also bought the needle and seat kits which includes orings on the back side of the seat. If they get crusty (see pic), pressurized fuel will leak around the seat and flood the carb. My sled had that trouble and I just cleaned em up. In the plane I want new.
-
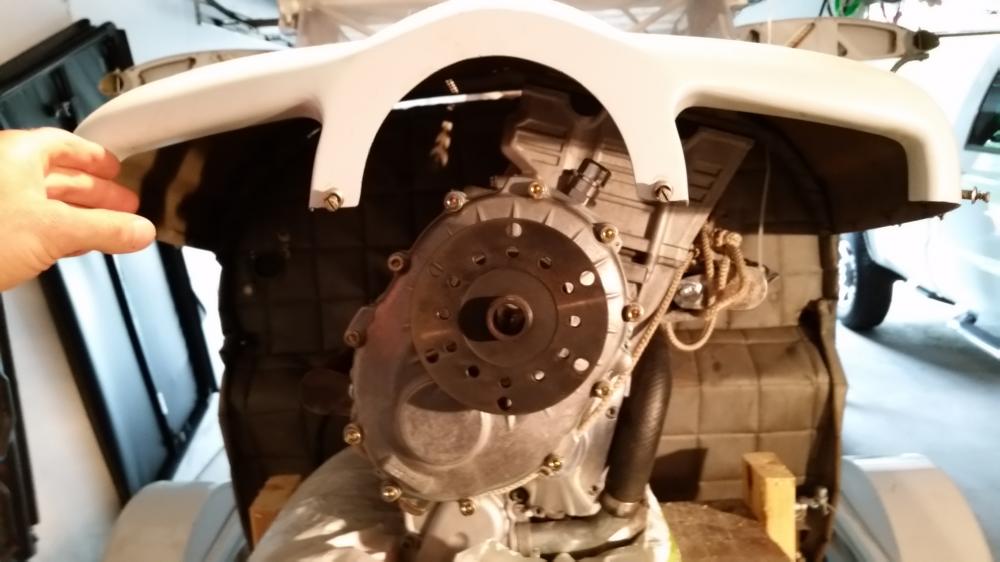
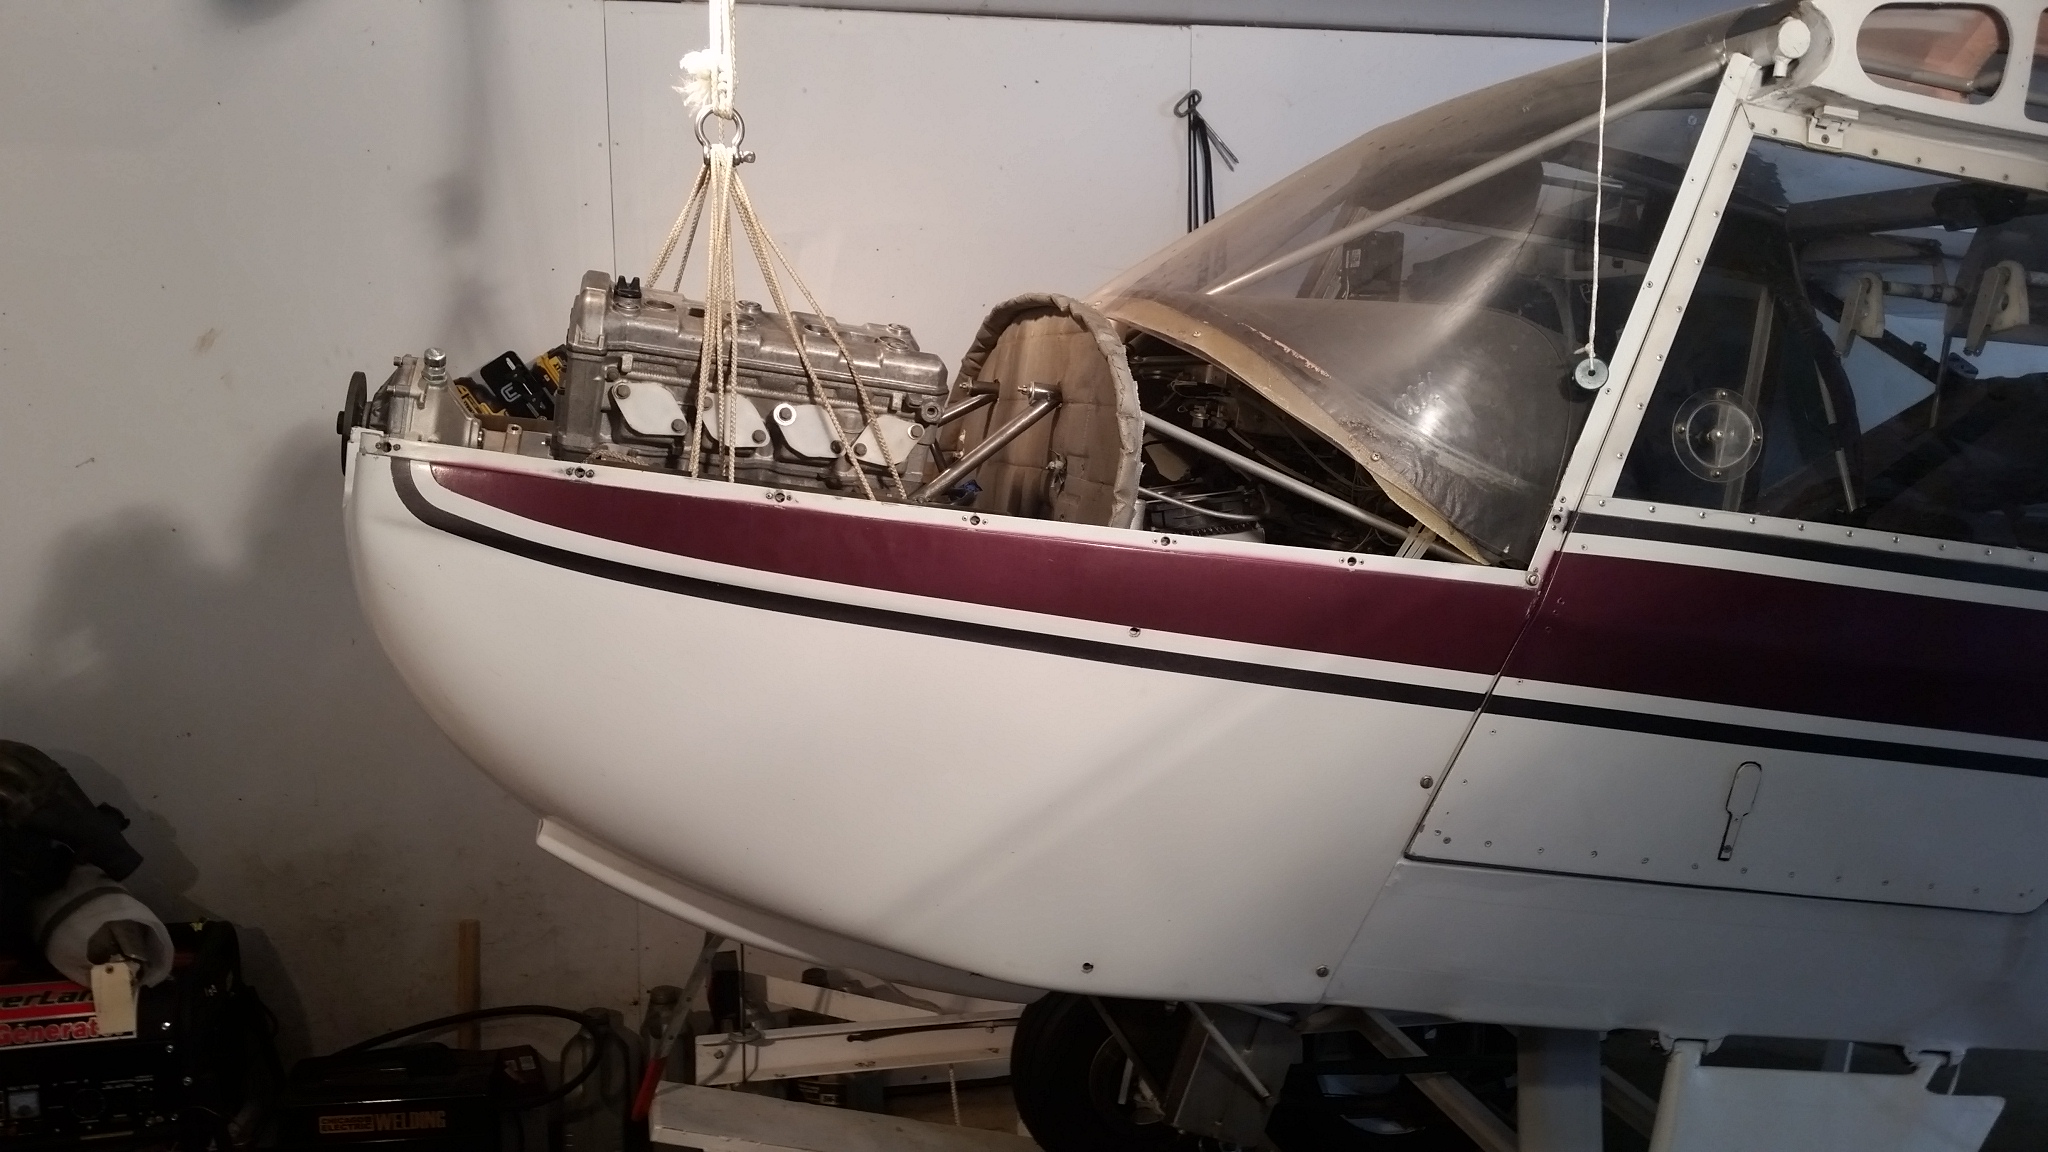
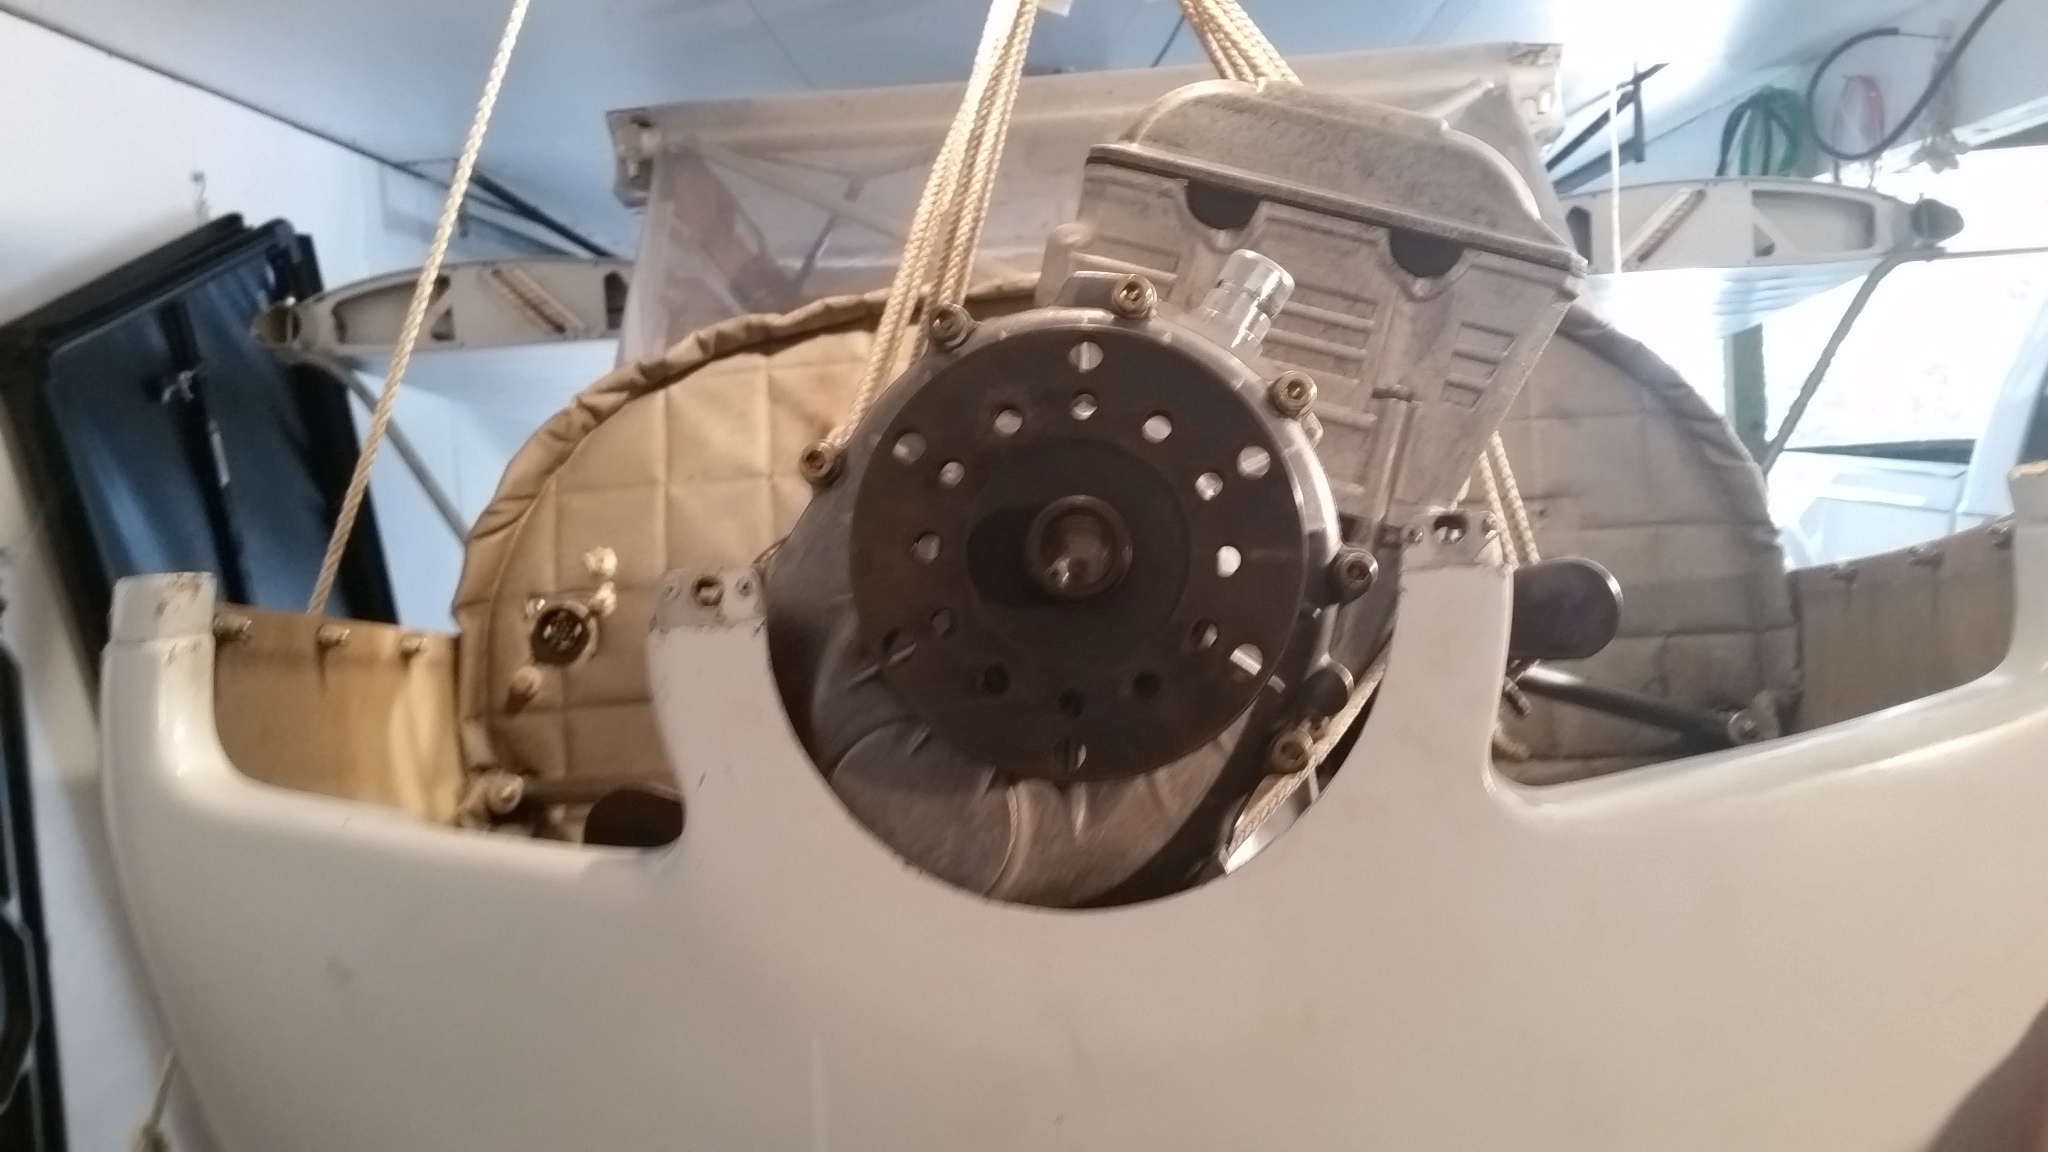
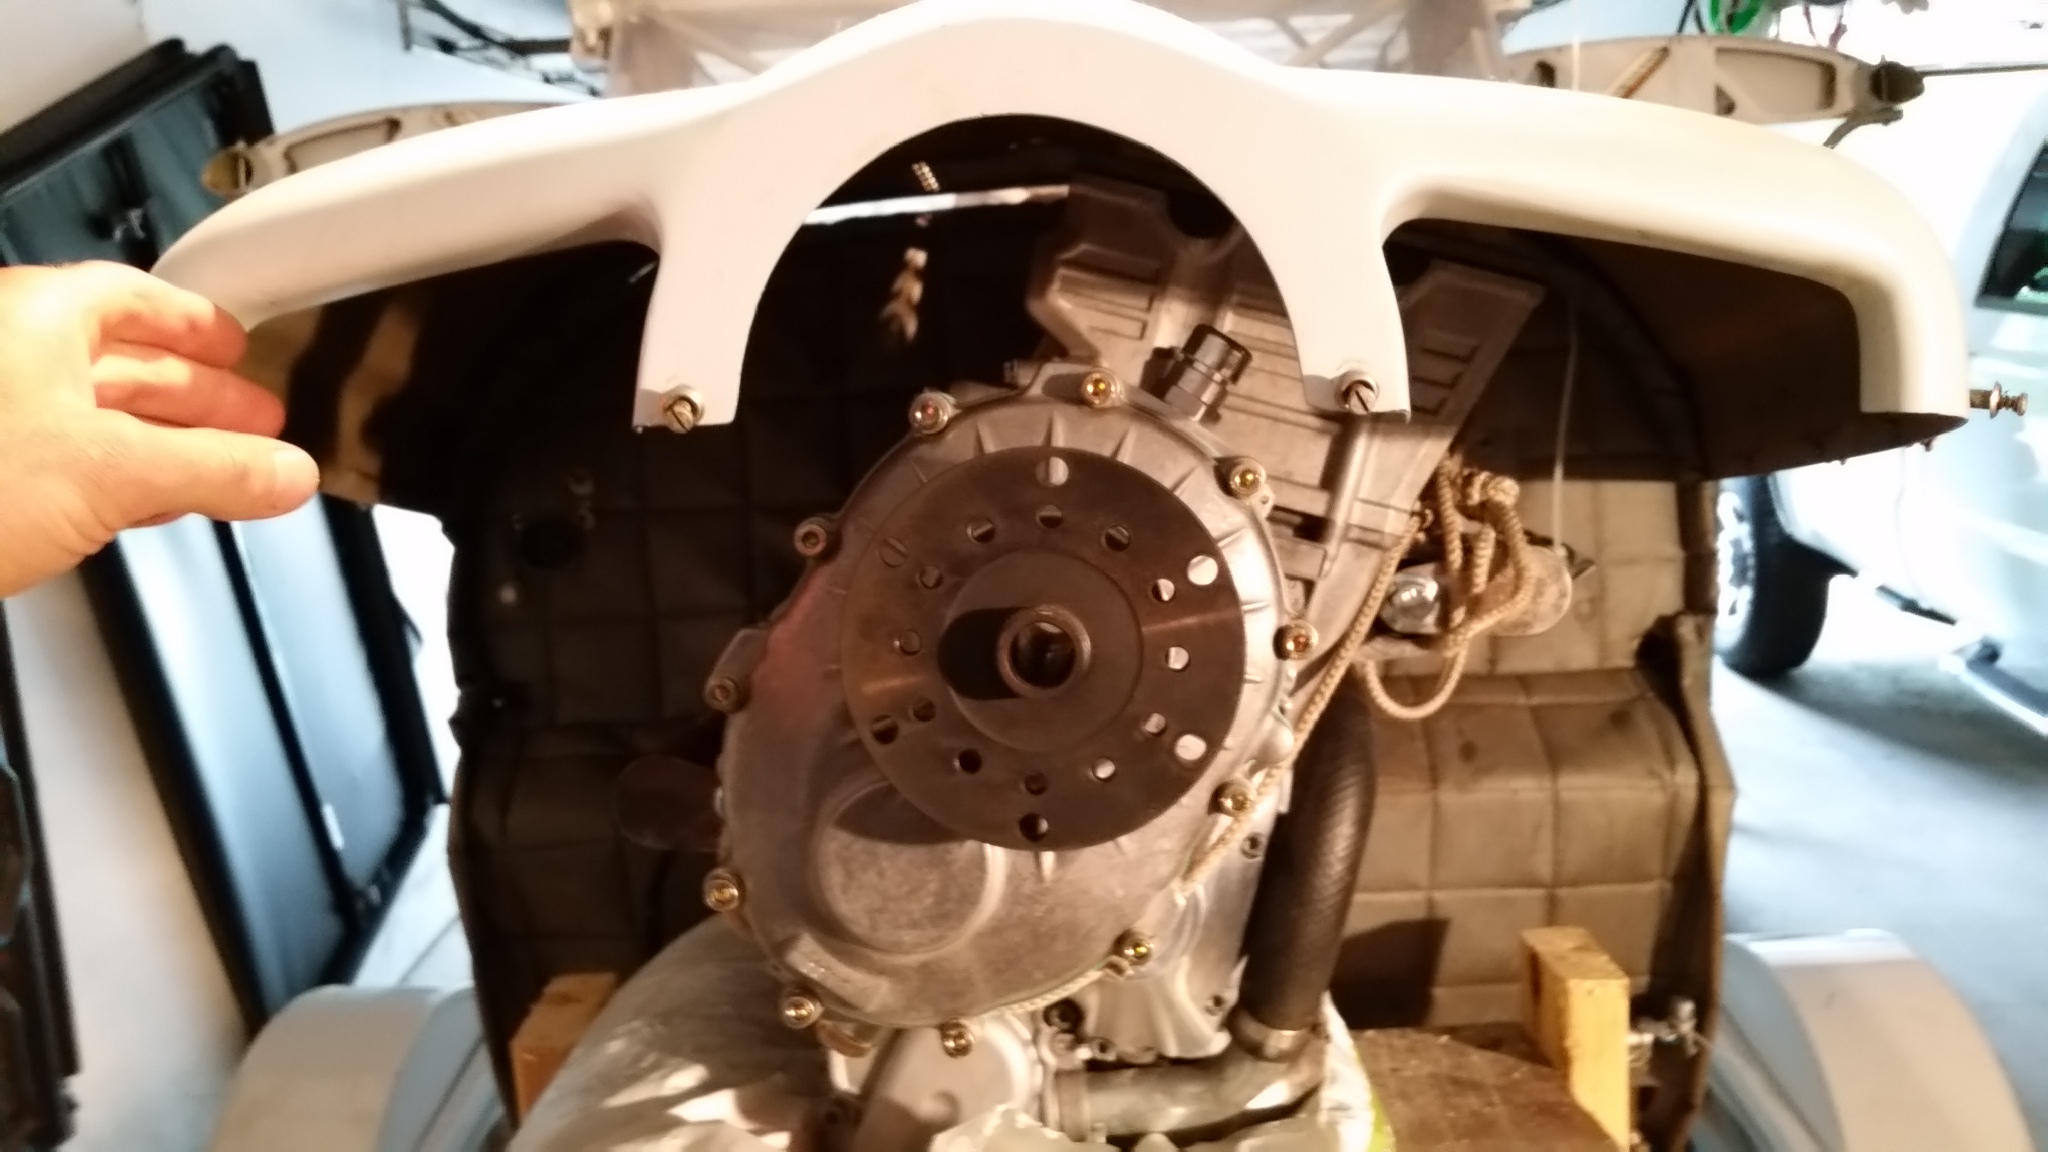
RX-1 ENGINE MEASUREMENTS (with Skytrax adapter and c box attached)
For anyone considering this motor, here's some rough measurements:
Total length is right about 27.75" from back of motor to prop hub.
Total height about 18
From engine top to prop center is about 7.5"
Width about 13" (without exhaust or airbox)
Some tilt of the motor could be done (my install will be fairly vertical (see pics). Tilting would make overall height slightly less (16 maybe) and width a little more (15ish). Tilting would also bring prop center down and left slightly.
In my install, I am aiming for the prop hub to come out exactly where the subaru did. This will require a hood cutout and "bubble" on the top to allow for the cylinder head to protrude about 2.5 inches (the subaru cowl was sloped down alot since that motor was a boxer: wide and not tall)
-
Hey Jared, I have some measurements for you over in a personal message I sent. Find your message up in the user panel at the upper right of the page here.
That way we can communicate without cluttering up the forum.
Brett
-
Unless you adjust the RX1 clutching to make up for the 25% power loss this won't be much of an accurate test.
Ken.........
You're 100% right.
It'll be under revving and running lower in the power curve. Capable of more HP if I reclutched for more rpm.
Hadn't thought of that.
But, thinking a bit farther, the same could be said for a fixed pitch prop on a plane where you suddenly dropped a cyl. So in that sense it would be an accurate test, or at least accurately representative of the performance loss you might enconter.
Agree?
1 person likes this -
OK. So a member here whom I highly respect brought up a challenge to a premise I had made when choosing the RX-1 motor for repower. I am glad he did because it helped me come up with a plan to test my guesstimate.
My premise was that if an RX-1 lost a cylinder for some reason (bad coil, spark plug, burnt valve, flake of gunk plugging a main jet.... whatever) that it would still pump out about 70-80 hp running on the remaining 3 cylinders. Note here that the RX-1 uses four fully independent "CDI/coils" integrated into each of the spark plug caps, so in a very loose sense it does offer some redundancy in the ignition system.
Based on my experience with my 65 hp KF2 on lotus floats, I figure that 70-80 HP would be enough to eek out a meager climb (150fpm) in my heavier KF5 on lotus floats.
UPDATE / EDIT: (Jan 2018)
Ok guys, finally got to that rx-1 test running with 1 (and 2) of the 4 cylinders down:
Yamaha RX-1 Performance Test on 3 cylinders:
So I put the theory to test out on the snow today by pulling a coil lead off a cylinder.
Results were better than I expected, with an easily started motor, good idle, and an estimated 80 hp output.
Details of test: 2005 Yamaha RX-1, 30 deg F day (heat wave here in MN!) through 2" of loosely packed snow. Top speed 78 mph with the #2 cyl coil unplugged.
That compared to a MUCH lighter 2012 Ski Doo 600 ACE (60 hp 4 stroke). Top speed 64 mph.
For the 100 lb heavier RX1 to go 14 mph faster than the ski doo in loose snow would probably take between 15 to 25 more HP. (Note that a lighter 90 hp ski doo I ride occasionally would have gone about 80-85 mph in those conditions)
So I am happy in those results. The engine sounded and ran surprisingly well! And 80 hp would be plenty to fully operate my kitfox 5 which was designed to use an 80hp rotax 912 as the normal powerplant.
Conclusion IMO is that dual ign is great.... but it only covers ignition redundancy. I prefer that the yamaha (with it's extra power reserve) which could carry the day very well with ANY failure of power output from a single cylinder.
Running on 2 cylinders test:
Test results running on 2 cyls (#2 and #3 coils unplugged):
I'm really surprised by this one, started right up, idled fine on the all cyl idle stop, ran 53 MPH down the trail!!
That's gotta be 50 HP!
I was guessing it would have done less, but that would keep me in a gentle drift down in the plane... giving 10 times the options and time for a emergency landing.
Really happy to see it perform like that!
2 people like this -
To each their own, but I won't fly a spark ignition engine without a redundant spark plug in each cylinder.
Same goes for me with auto conversions.
Have fun, good luck and be safe.
Can't argue with ya at all on your decision for DI as a personal requirement. It is better to have that redundancy.
But I am glad that you brought the question here because the rx1 engine choice is not one I took lightly. You challenge one of the main premises I had made about that motor (that it would run well enough on 3 cyl to eek out a meager climb in my KF5 on lotus floats).
But first my apology to Jared here for hikacking his thread!
Give me a second to type and then lets hop over to my thread and I'll lay out my plan to test my premise:


Low Fuel Level Warning - Kitfox Kit
in Avid and Kitfox parts Suppliers
Posted · Edited by Yamma-Fox
A while back there was a post about low fuel warning where I said I would post up the kit Kitfox is currently selling once I got mine from them.
Nicely done kit indeed. Every last little washer, tube clamp, ect is included. Simple one page instructions.
$185
Basically you tie into the fuel vent line and add a small tank which is mounted just above the header tank. Small tank has a float switch. In theory if fuel in wing tanks is empty or otherwise unavailable, the small added tank will go empty before the header tank and the float switch will activate a panel light.
I plan to use the flashing and buzzing type light because the one kitfox sent was a small sinlge led type which I probably would not notice.