
KenKelso
Contributing Member-
Content count
28 -
Joined
-
Last visited
Posts posted by KenKelso
-
-
Increasing the revs on my 582 to about 4100 all is normal, leaving the throttle set at 4100 for a few seconds and then the revs will surge to 5000+ with no further throttle movement. It's a bit disconcerting, any ideas?
Before I noticed this I had just moved the needles to the lower notch to reduce the temperatures a bit and then re-synchronised the carbs.
-
I agree. Even a straight-line, flat underside will work fine. I sure wish there was an easy way to put detents on the flaperon handle. I've got to at least upgrade my friction discs.
Hey Turbo, I 3d printed a flap handle detent setup, details in this post
http://avidfoxflyers.com/index.php?/topic/6873-3d-printed-flap-detent/#comment-62183
Ken
-
Thank you Ken for the input and yeah I would love to pop over to your strip when the weather improves, could you email me your phone number to airbornetroubadour@protonmail.comTroy has trouble keeping up with me, he likes to cruise at 60 mph @ 5000 and I'm doing about 75 mph at that so I have to slow down for him. We flew a loose formation with a phantom and it was hard work for me. On the way back from out day out at Rougham I lost them owing to a later take off slot. But I arrived over 10 mins ahead of them both at my eco cruise!
I know what you mean with the LAA it's sad how the organisation set up to promote light aircraft flying is sometimes a major obsticle to flying as well.
I would like to do the mod that you have done to the tail feathers on your Avid as I have a covered round rudder in the Hangar. The extra weight i could carry would be handy for another crew member.
I have emailed you with my phone number. Skiing this week, when I get home I’ll see if I have the tail plane mod. details. Is yours a Speedwing Aerobat? Needs to be for the mod. to get you 1020lbs max weight.
Ken
1 person likes this -
There is an interesting series of videos on 3D printed VG's on YouTube, shows their effect nicely. I can make these for you if you go ahead. Ken
1 person likes this -
It would be interesting to experiment Alan but getting them past the LAA modification system may be the biggest problem. One advantage of VG's is improved controls but as the flaperons fly below the wing I suspect this would not be the case on our Avids. We need someone with a wind tunnel!
I know that you would also like to go a bit faster to keep up with Troy and I am looking at drag reduction on my bird. I have so far designed some fuel filler fairings for 3D printing and am now working on lift strut wing and fuselage fairings.
BTW my strip is holding up well this winter so if you fancy a bimble up Cambridge way give me a shout.
Ken
2 people like this -
While you had this apart, why not have instead accomplished the aluminized Kitfox supports? Denny Aerocraft SB #9, 9/12/91 - flaperon hangar rib failures.
In the UK changes like that have to be put through the Light Aircraft Association (LAA) modification procedure. The repair I carried out was already an approved repair scheme.
Ken
2 people like this -
Here you go Leni, AutoCAD 2004 format.
BTW Paypal'ed you a small contribution yesterday, keep up the good work.
Ken
1 person likes this -
nicely done! Still on my list of things to eventually do is cad the ribs so I can cut them out with the CNC router. I like the way you did the clamp/alignment blocks!

Been there done that akflyer, unfortunately I think they changed the speedwing profile slightly after mine and this drawing is for a 1998 model. These drawings are in AutoCAD 2020 format say if you would like me to export in another format.
Ken
1 person likes this -
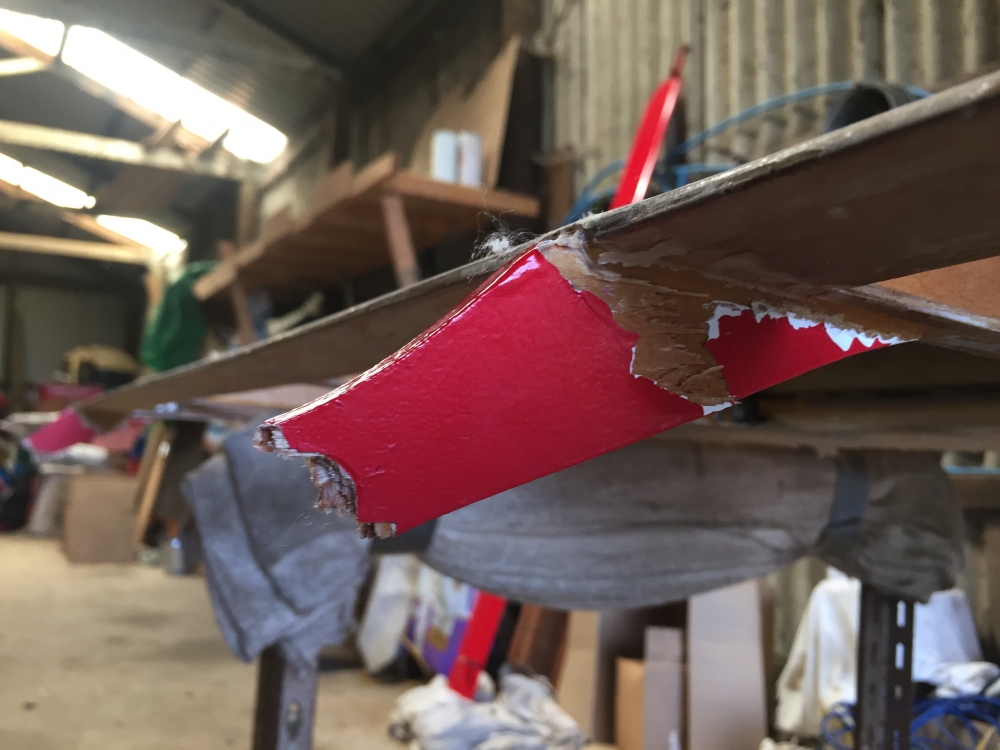
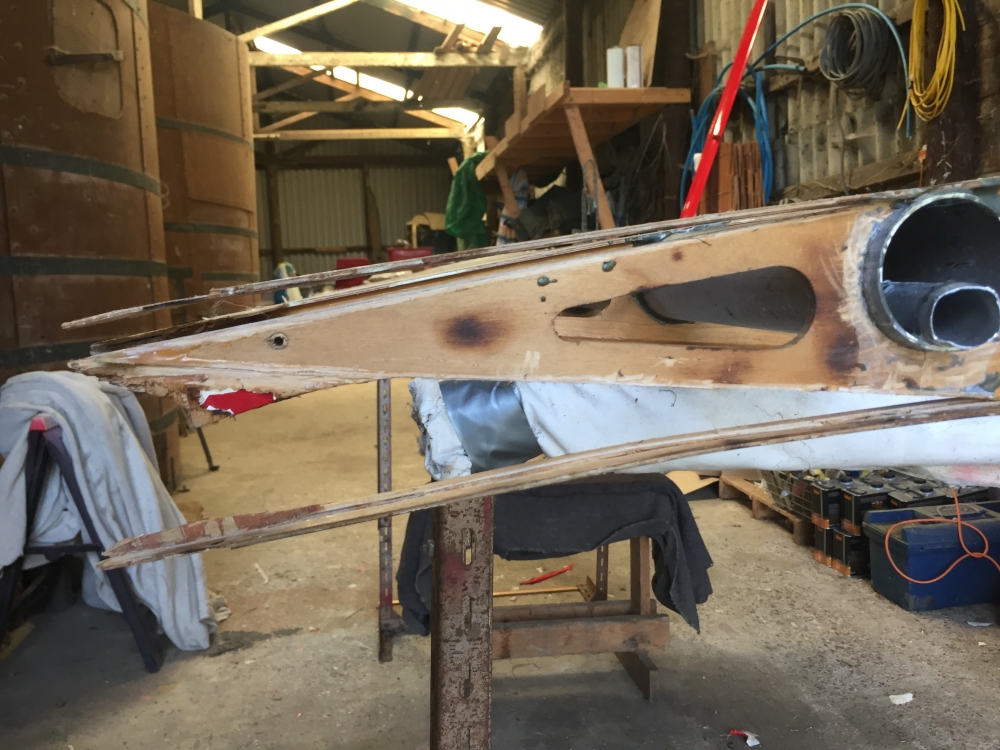
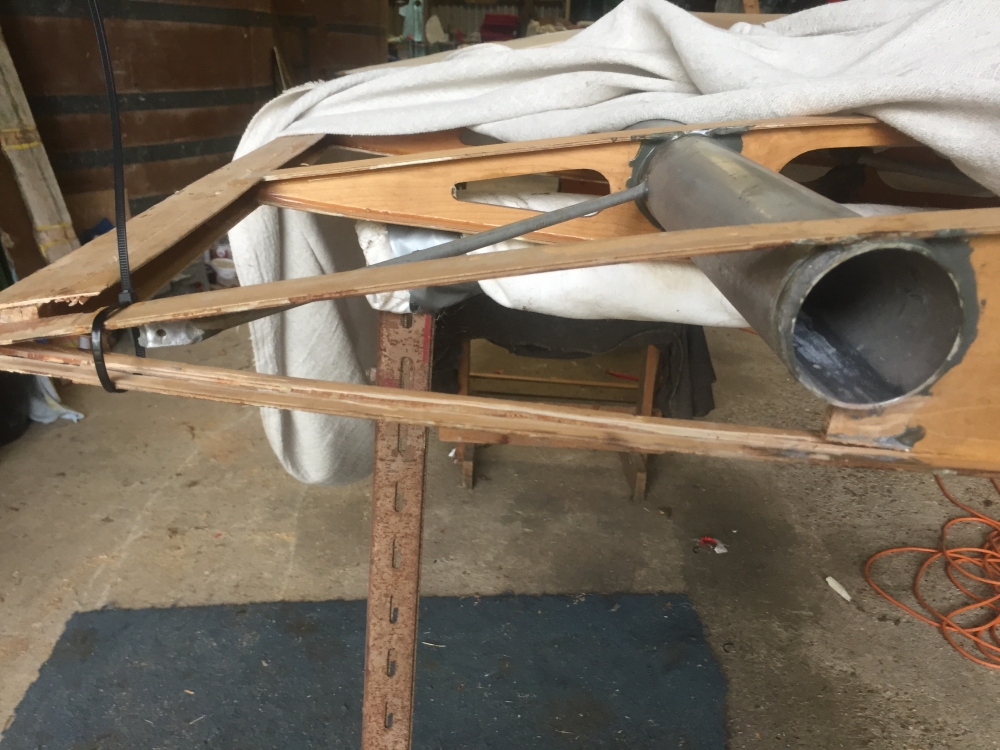
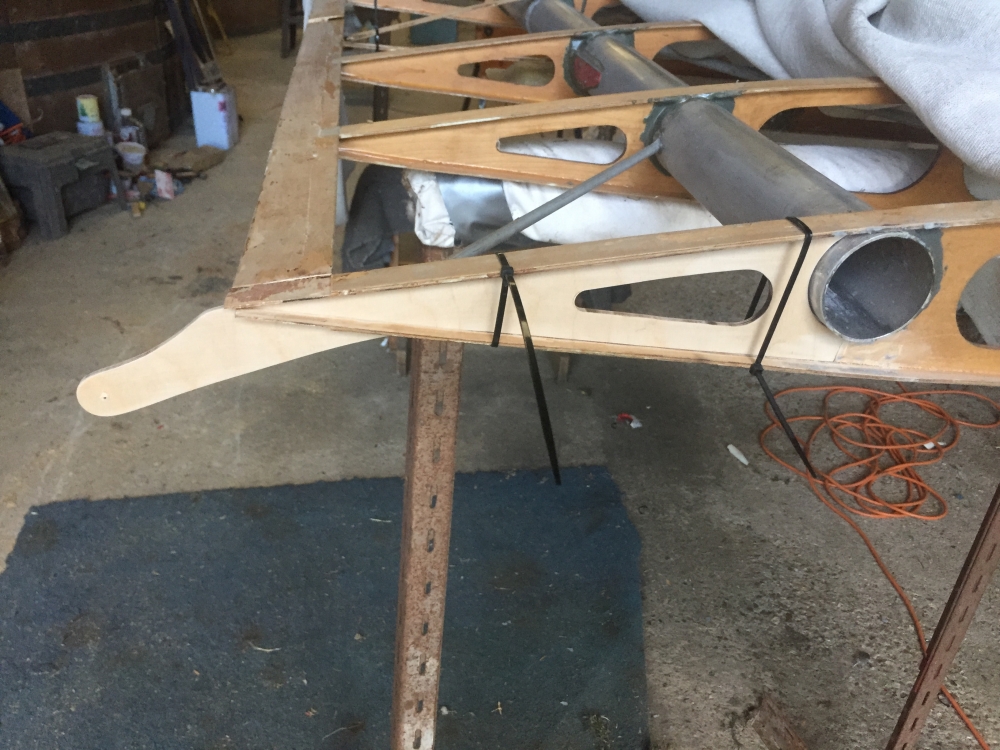
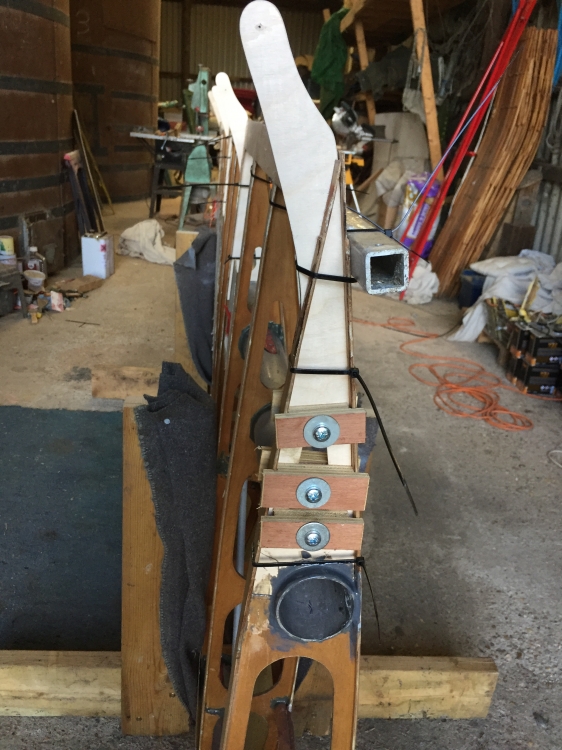
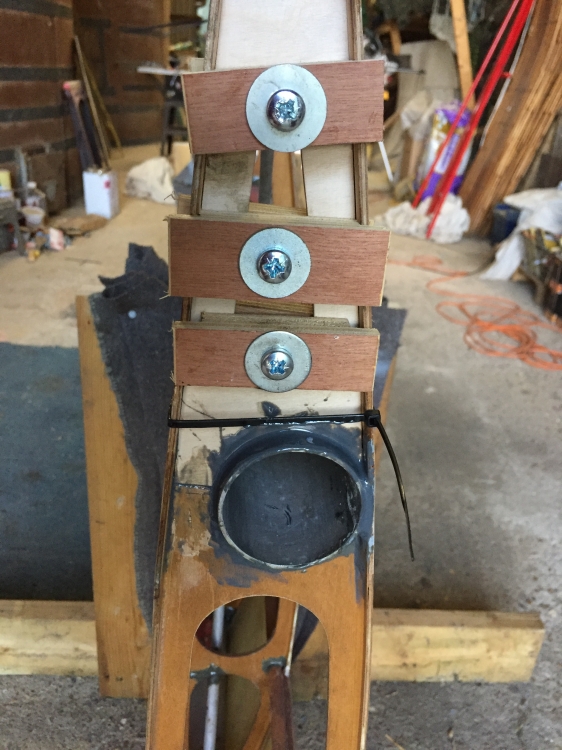
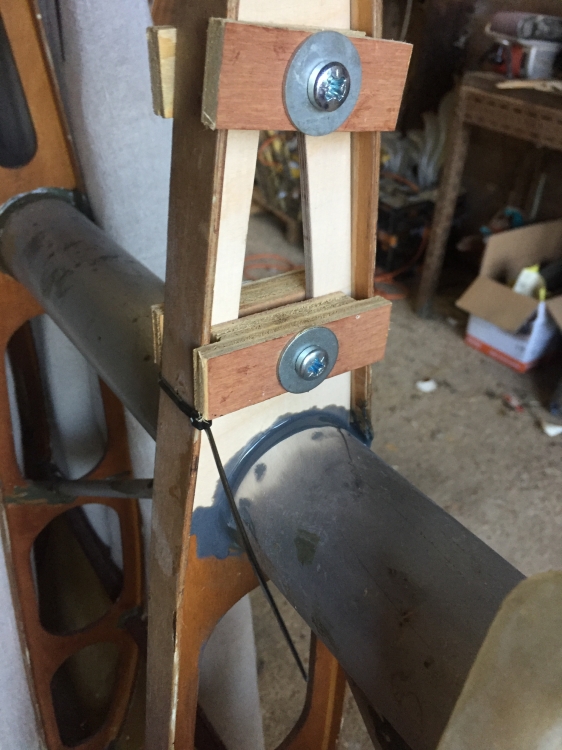
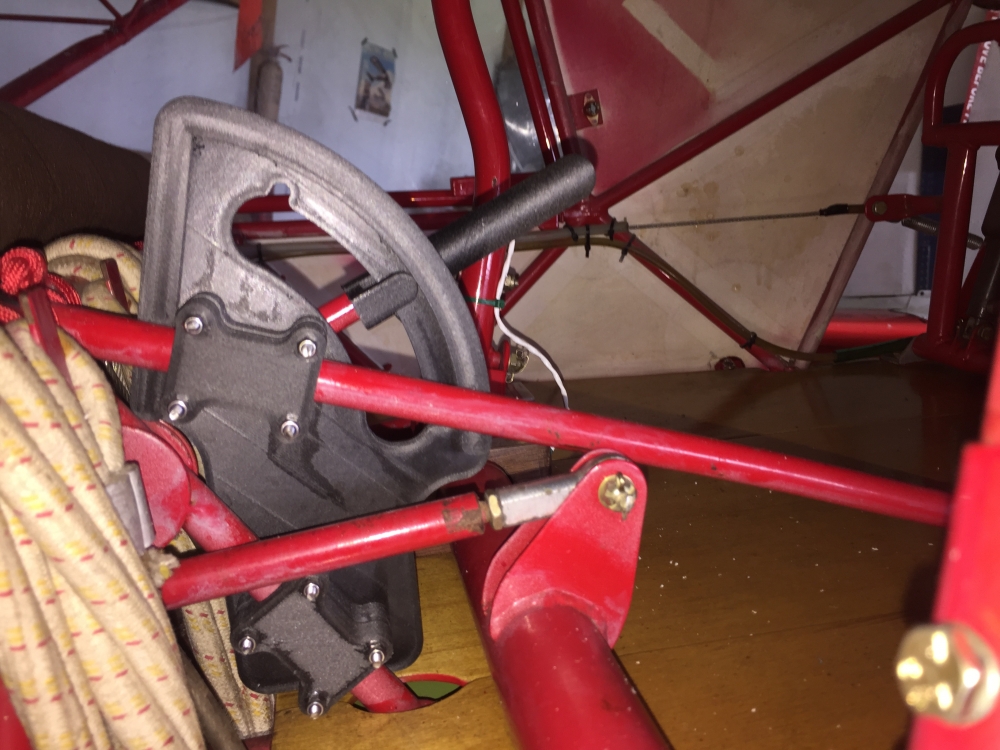
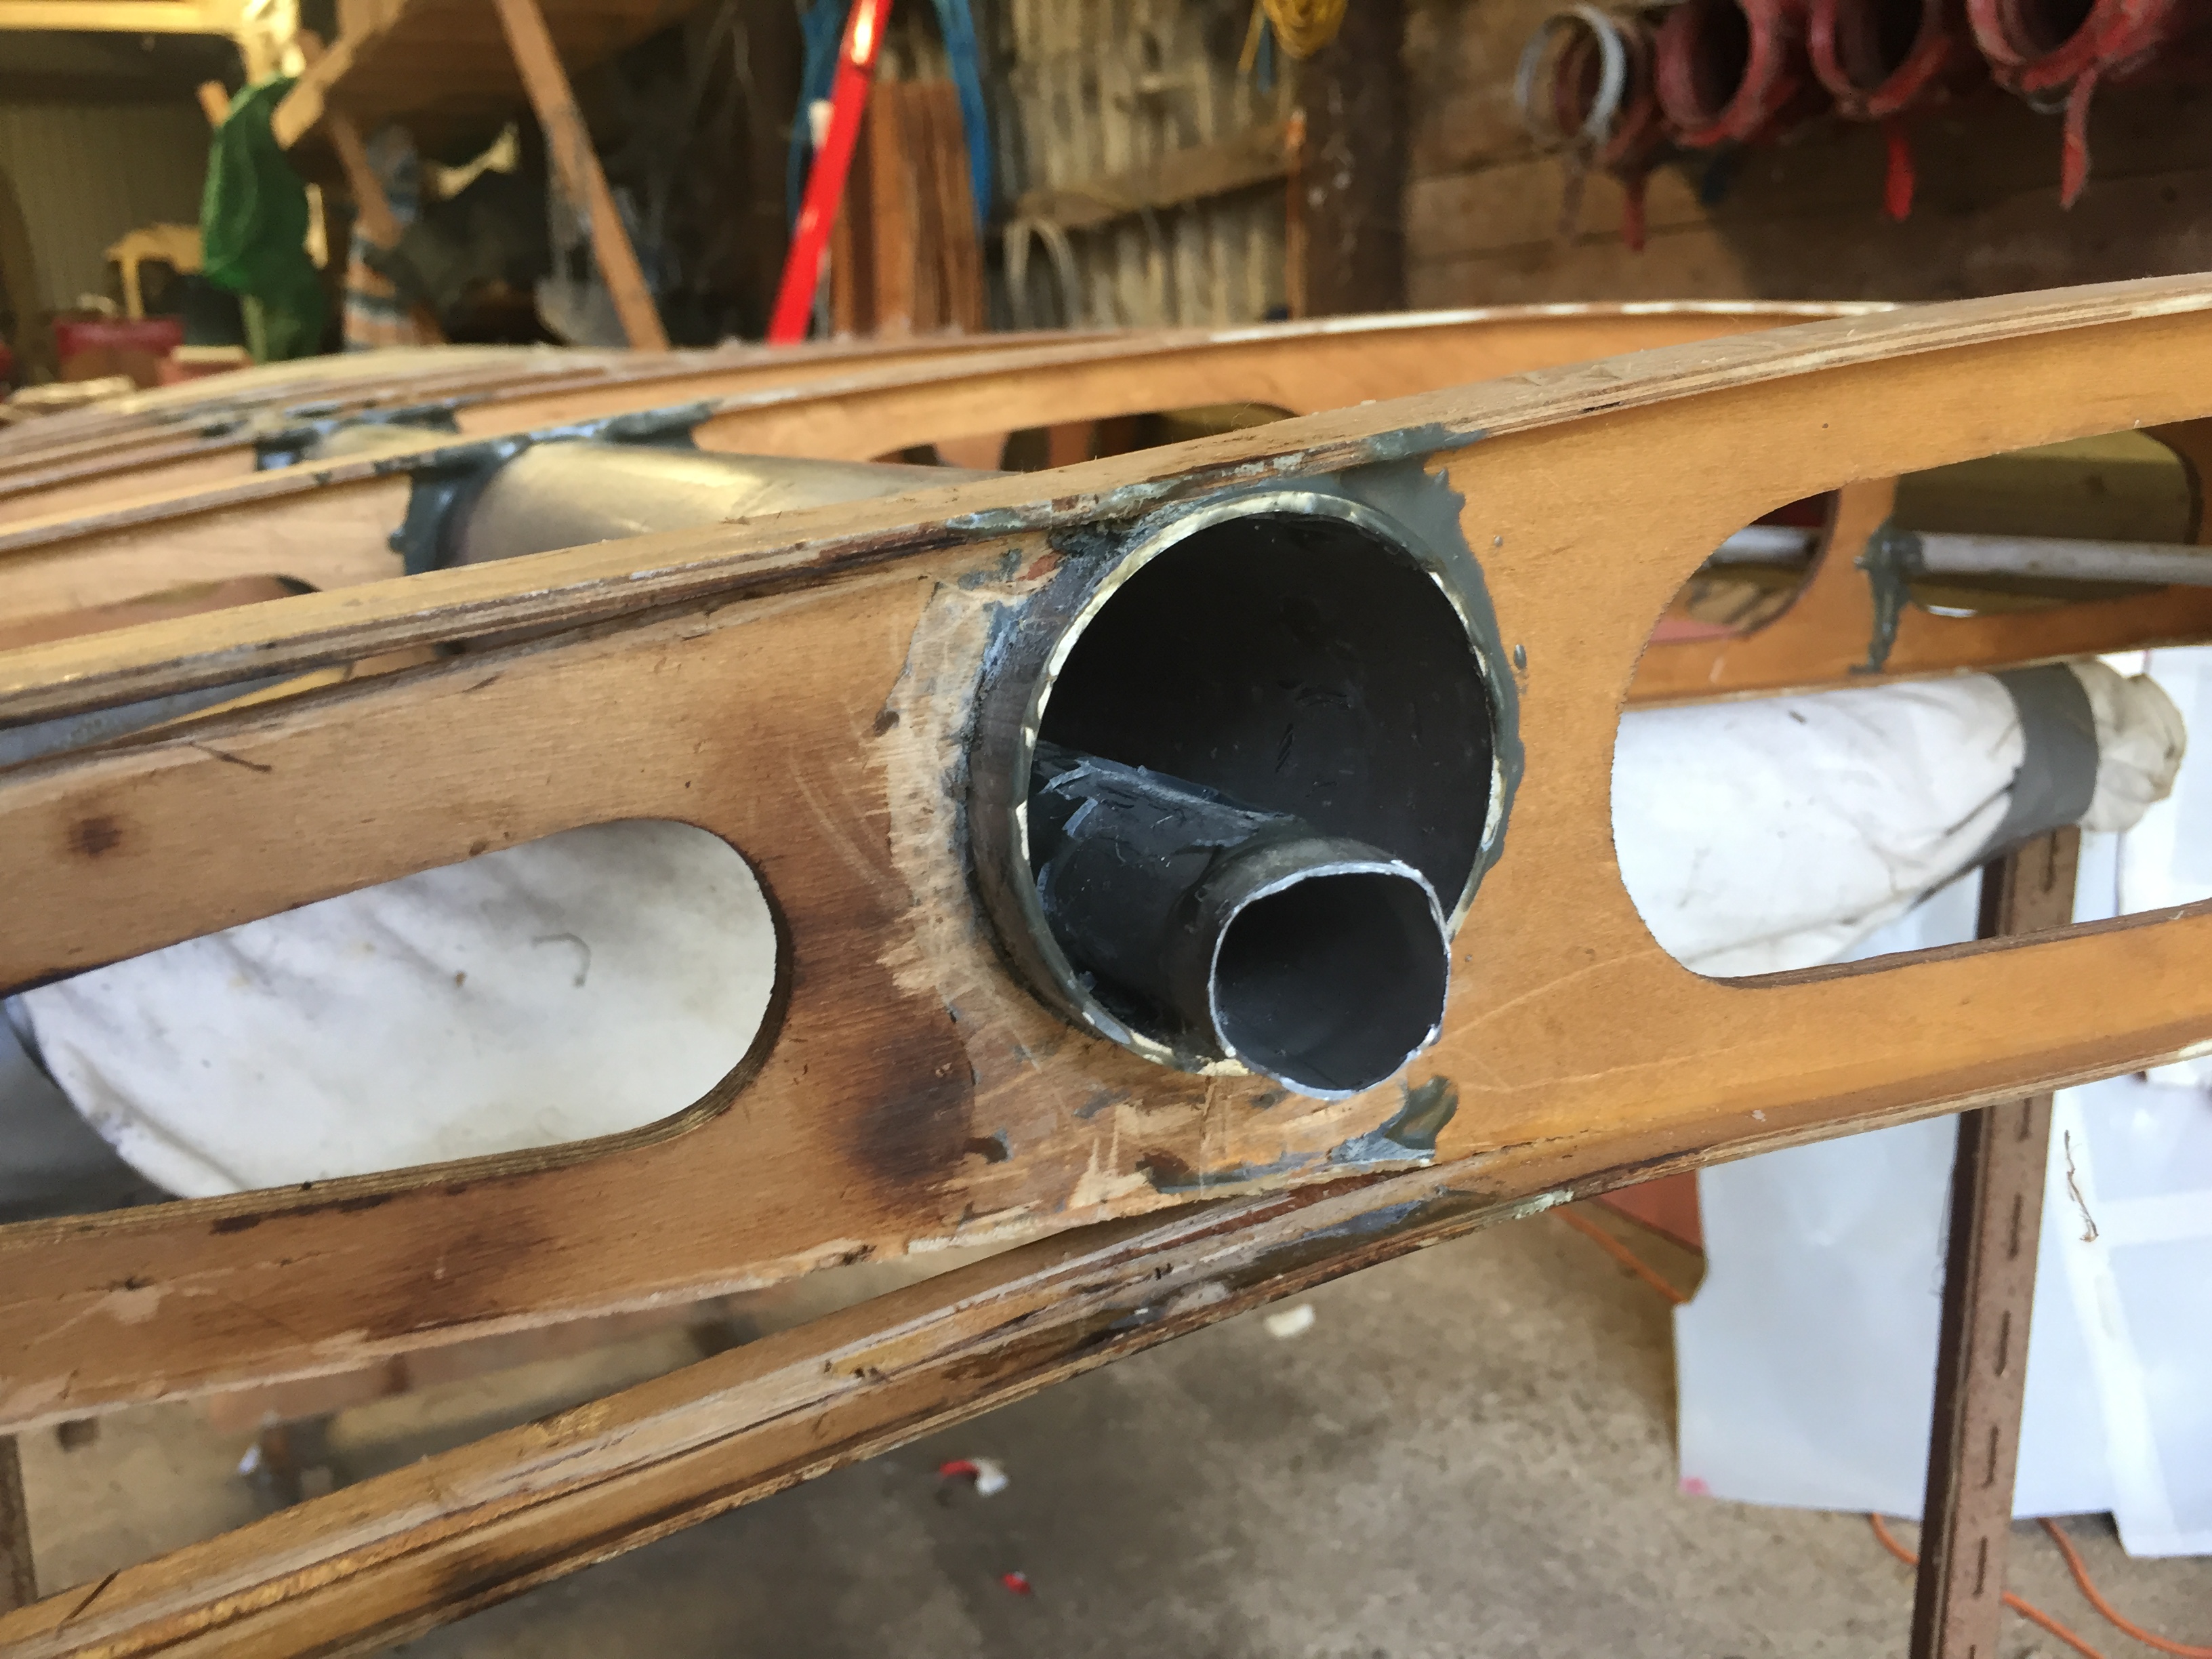
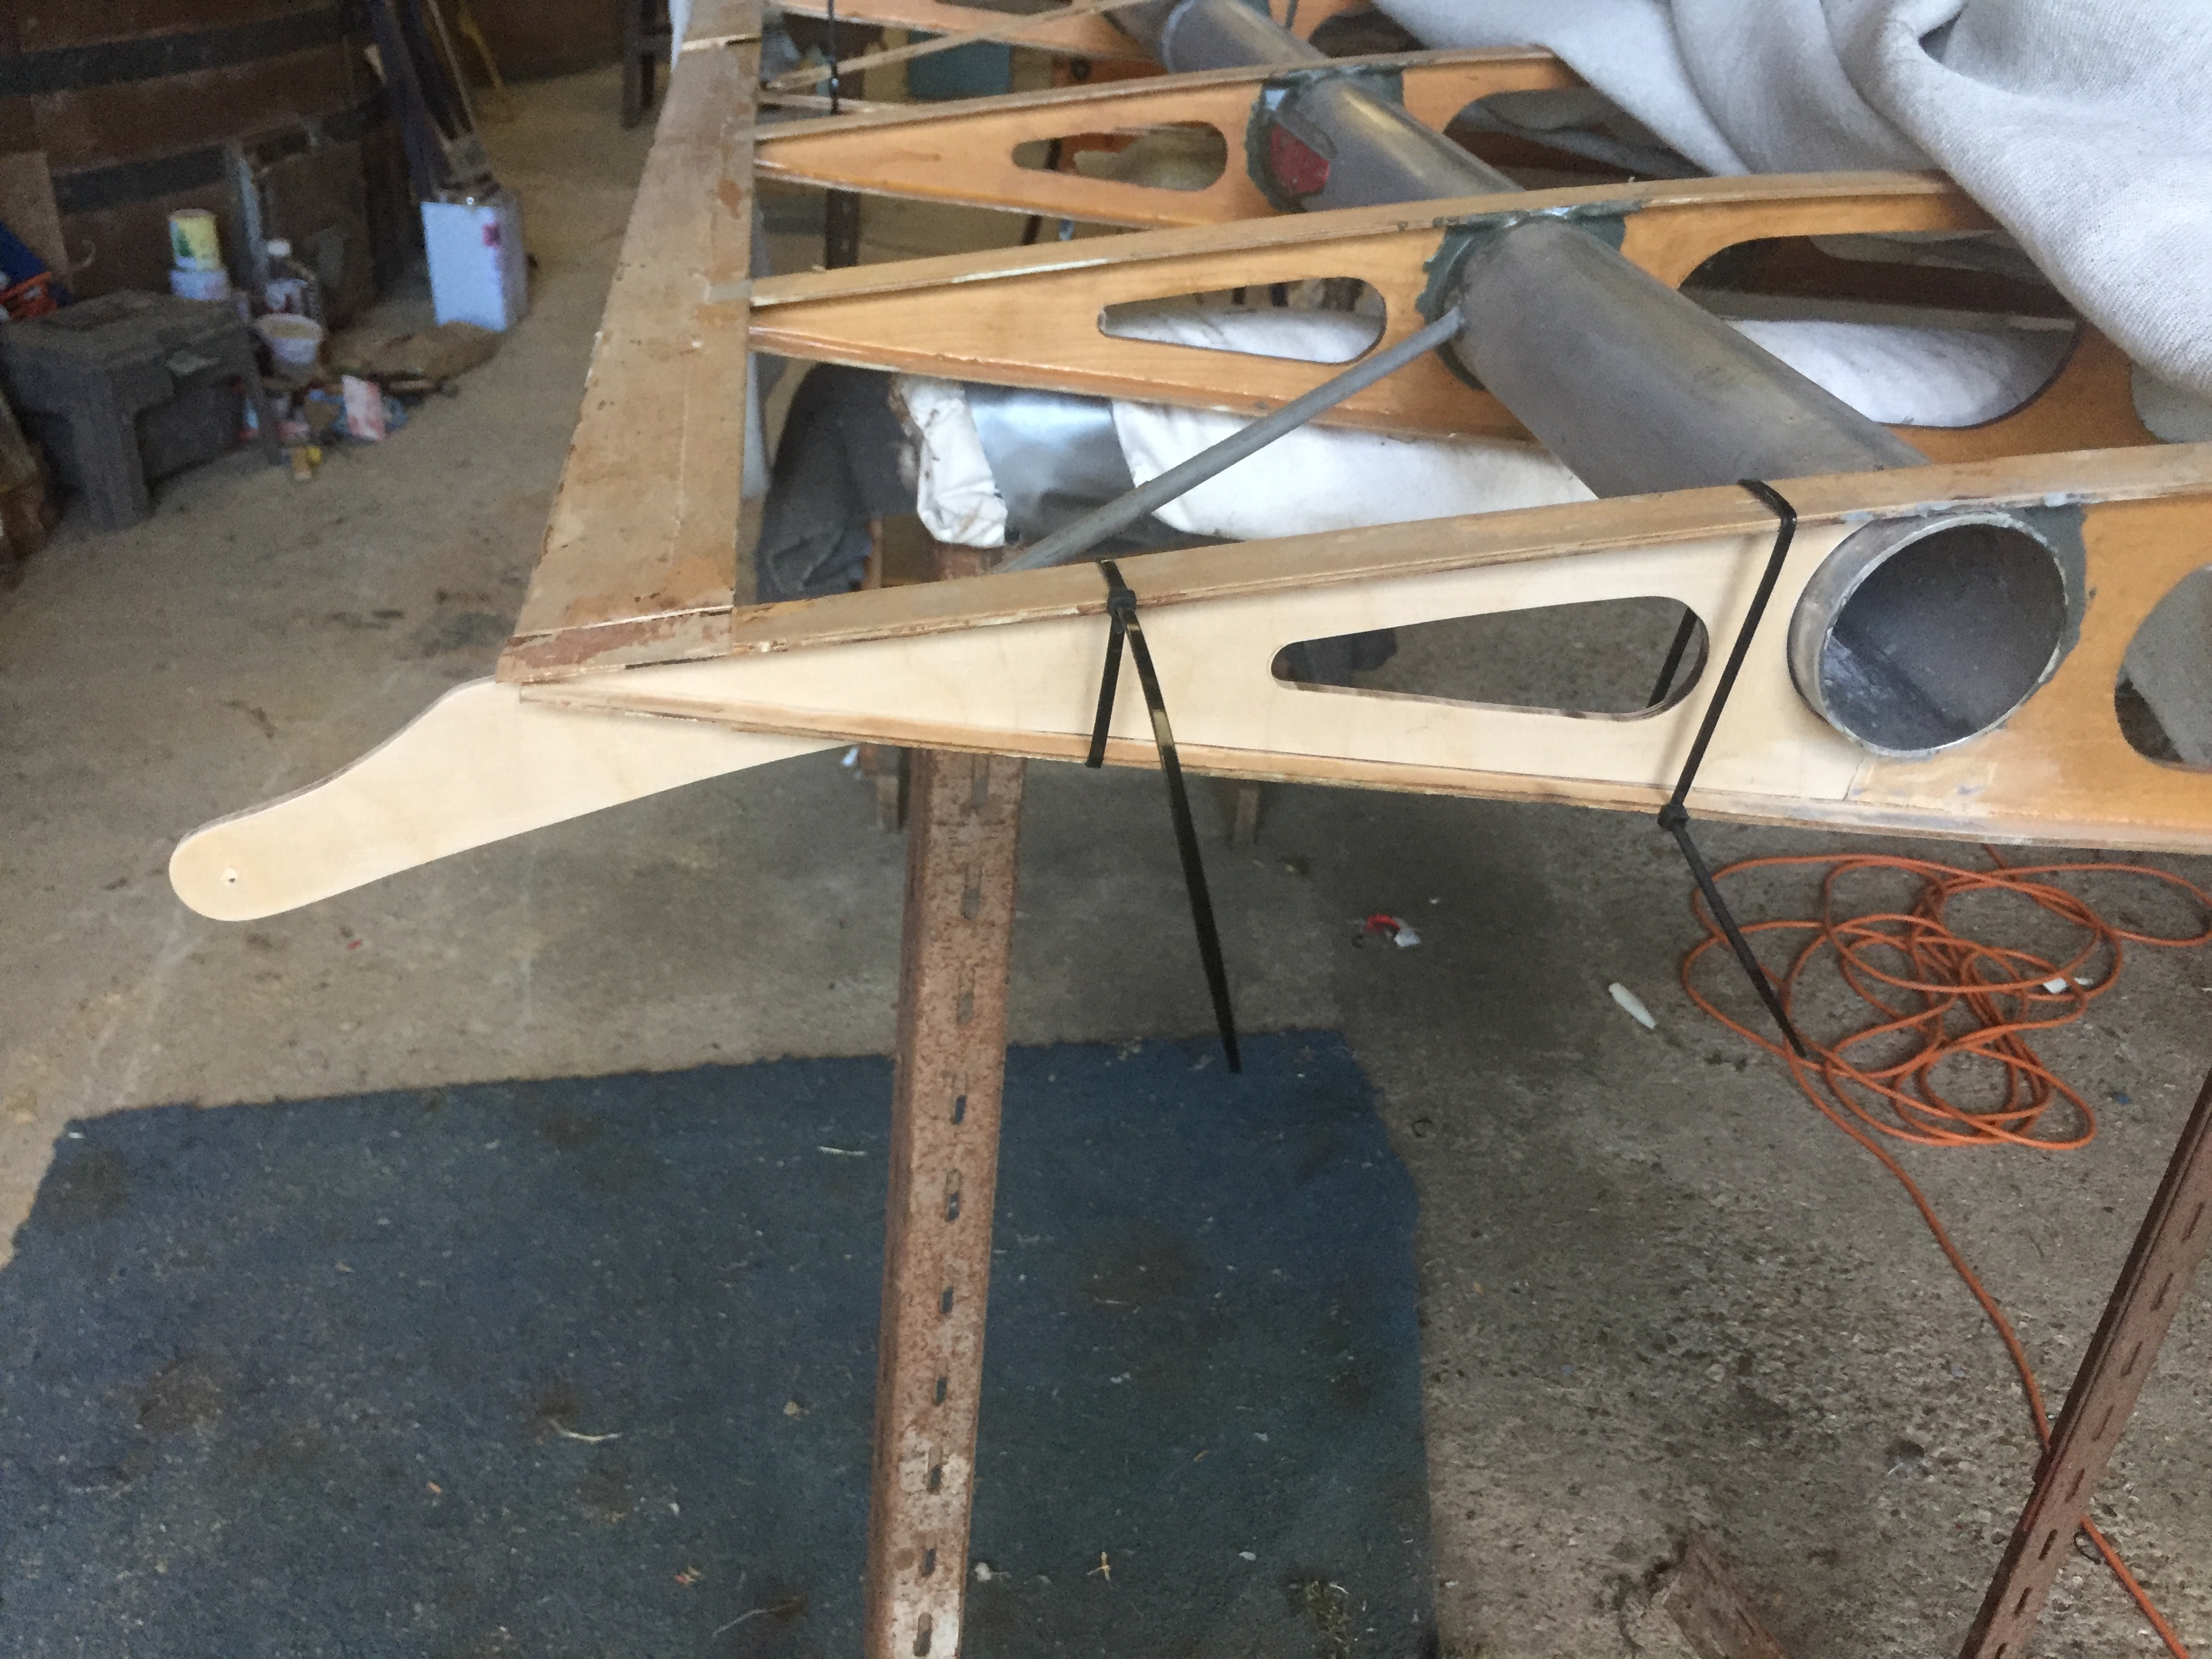
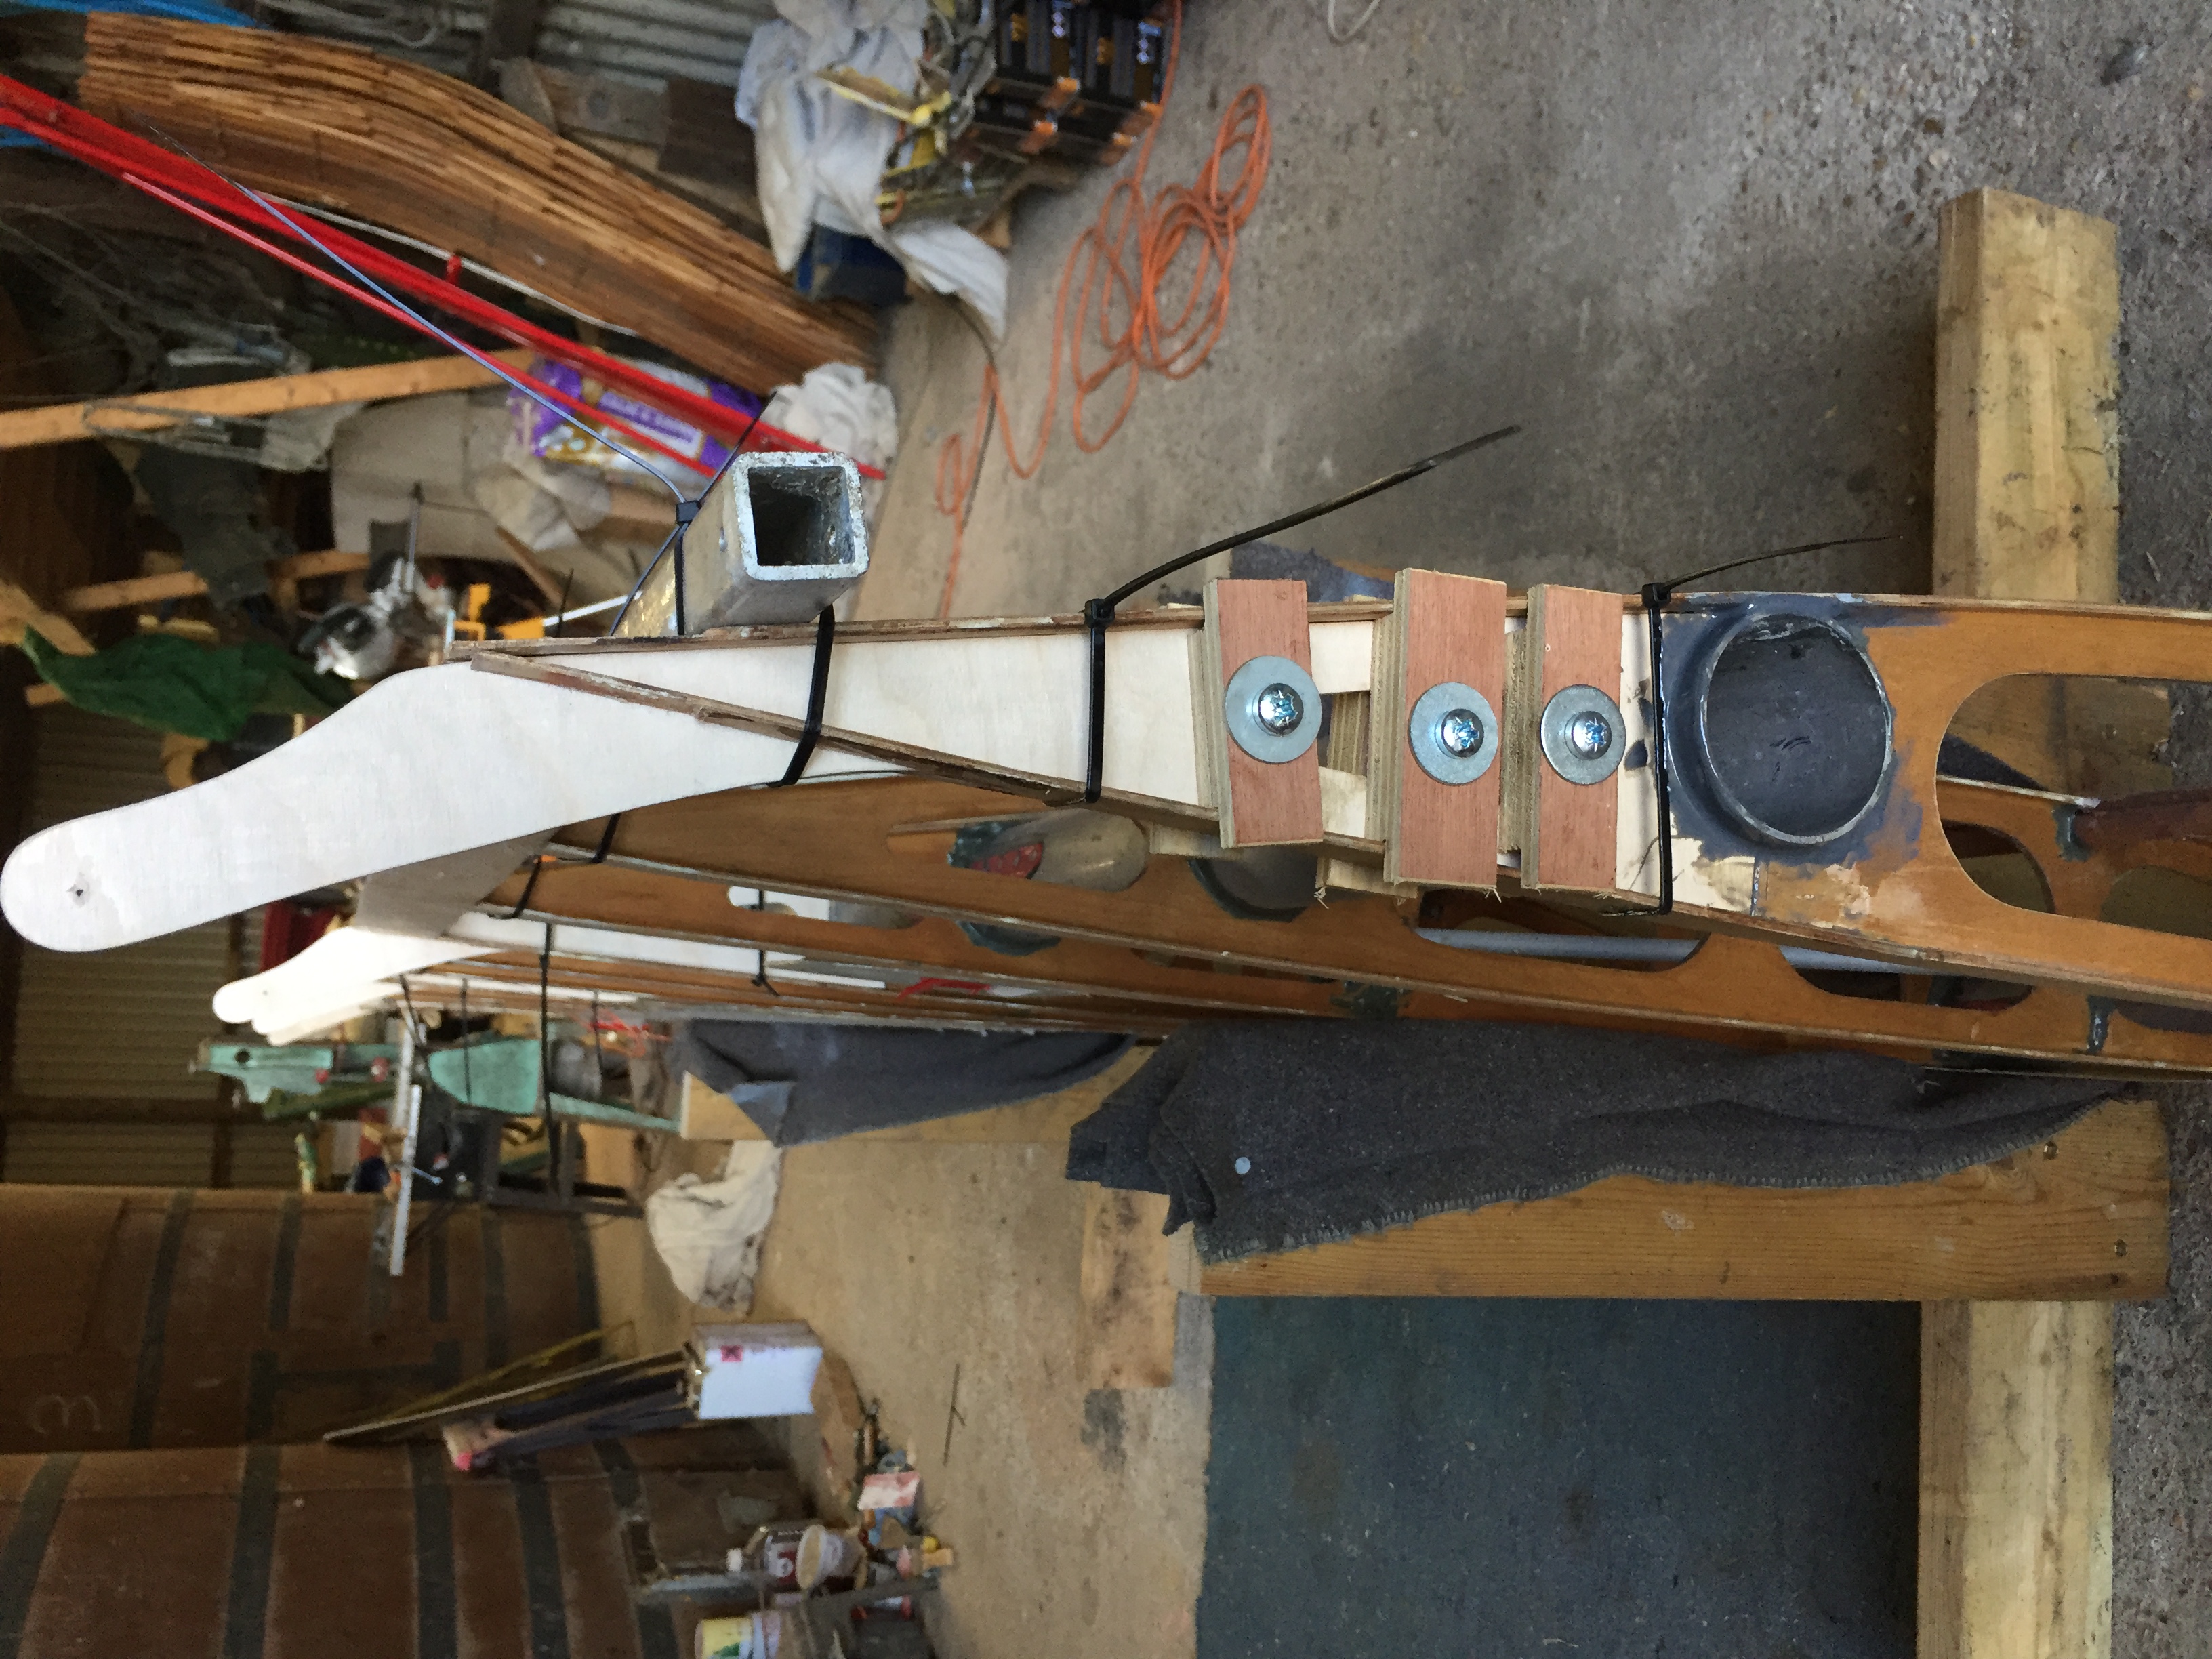
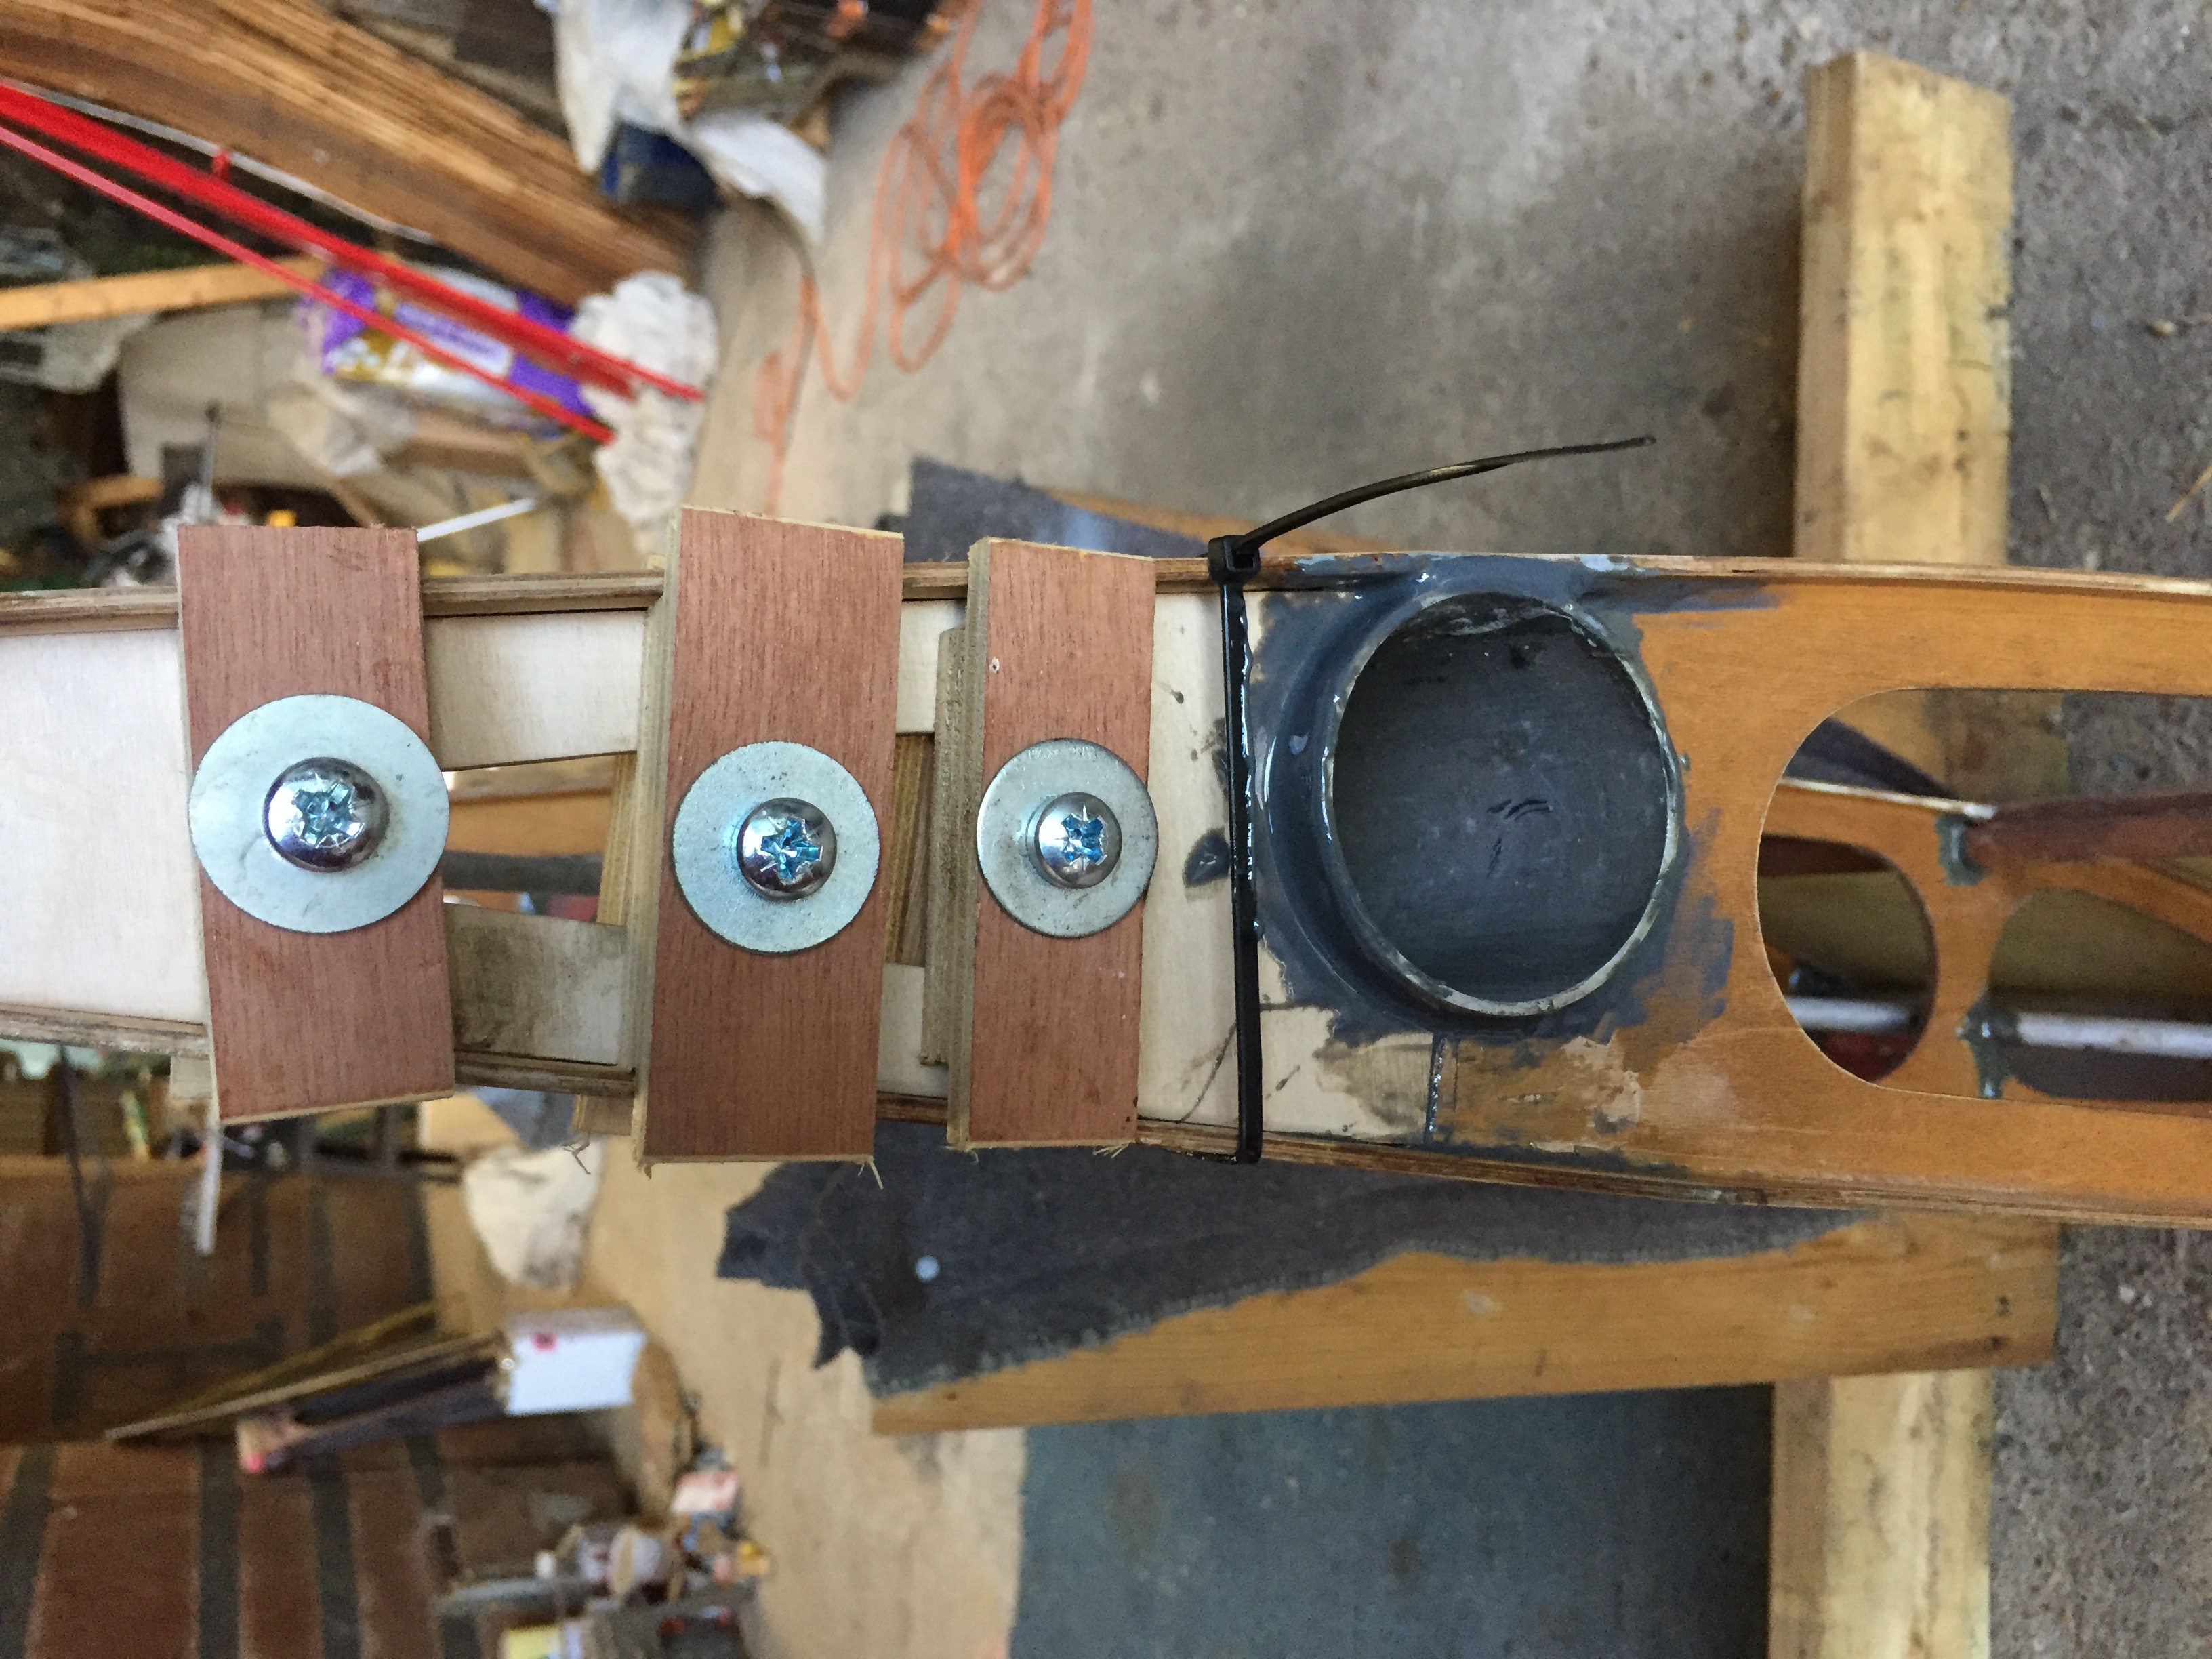
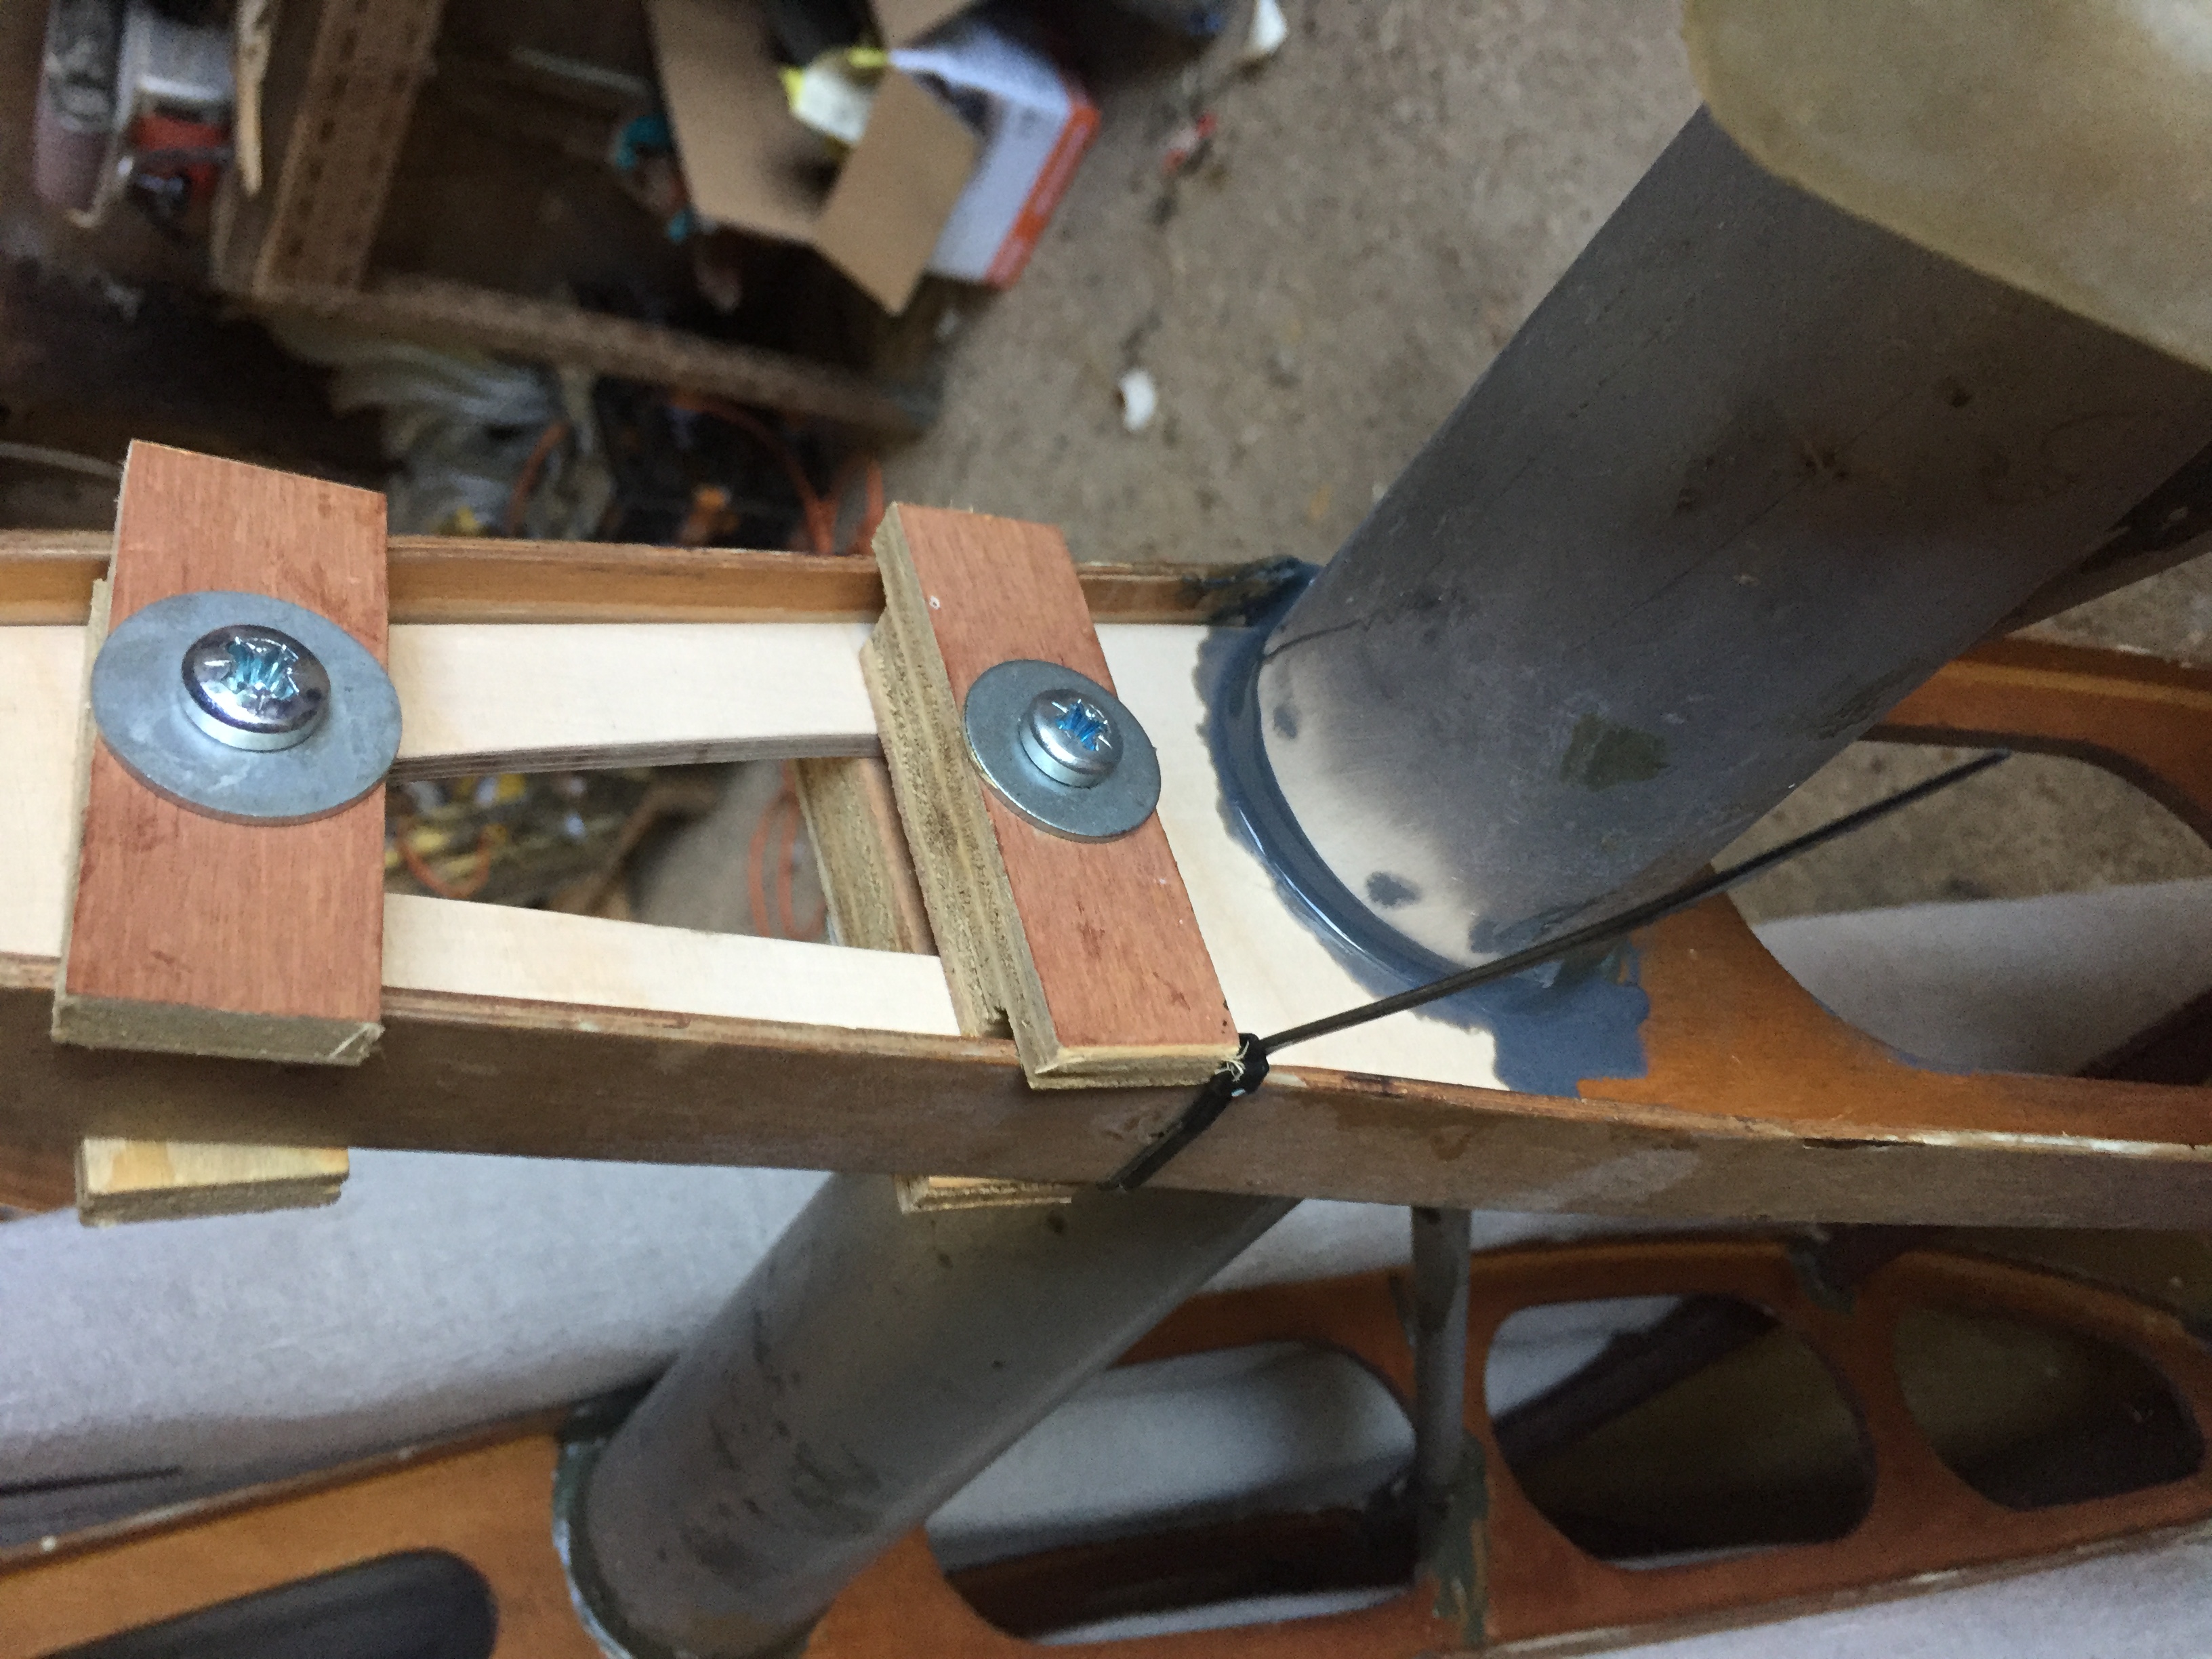
In case others have to do it here are photos of my repair to all the flaperon hangers on my Speedwing. The process was:
1/ Strip all the fabric
2/ Using a hot air gun soften the glue between capstrips and ribs, prise the capstrips off.
3/ Soften glue on rib to spar joint.
4/ Remove rear rib section
5/ make new rear rib sections using one of the broken ones glued together as a router pattern.
6/ Glue rib replacement part to spar using structural adhesive.
7/ Glue capstrips to ribs
8/ Re-Cover and paint wing!!!!

 3 people like this
 -
There are a couple of posts about slats here:
Ken
-
In the UK ‘cowboy’ is used as a derogatory term usually applied to a tradesman who does a poor job or rips you off!
I enjoy some of the videos but Cory Robin preaching about his amazing life style gets my goat.
Ken
2 people like this -
Congratulations on making a more effective braking system, but in my humble opinion ground loops are caused by bad rudder action, and brakes are a way to try and fix a problem that was created by the slow feet.
But on the other hand your stick lever looks great, take a look at some of Fred Stork's posts, he installed a dual brake handle system on his airplane so he has differential hand breaks.
I have tried all versions by now: pure toe brakes, mono hand brake on the stick, double hand brakes on the stick, toe brakes coupled with mono hand brake (this was the theoretically most pleasing solution) and finally mono hand brake on the stick and a switch for braking on only one side.
I agree that ground loops should be due to bad rudder action and that differential brakes are there to save the situation. But I find the reality being the opposite. It is very hard to be brake in a “creative “ fashion with the toe brakes while still working the rudder. Some can do it, but most will fail when they are half way into a ground loop. And while it can happen to anyone it is less frequent for the experts...
This is why I, not an expert, prefer having easy access to powerful, while still easy to dose, equal braking. My solution is a main (motorcycle) brake handle on the stick. Moderate brake an rudder still allows for fairly precise maneuvers and I can brake hard when needed without the risk of being to hard (ground loop...) on one side. And, for tight situations I have a switch that direct all the brake power (fluid) to only one side making it easy to turn around one wheel (a flashing light tells me the switch is engaged to avoid leaving it there for landing...)
Hello Fred,
could you let me know more about the valve that you used to select left/right braking please, is it a solenoid valve or just manual.
Ken
-
The brakes caught me out the other day on my Avid.
A thermal caught me as I touched down and kinked the plane a little to the left, full right rudder applied but I kept going left!! Unfortunately I went off my airstrip onto some rough ground so a wingtip went down and the flaperon touched the ground. The wing is now stripped of covering and I'm doing the repairs.
Not a ground loop as I basically went straight but at 20 degrees to the strip.
I don't have much time on the Avid but have about 700 tailwheel hours and am in current practice with a Chipmunk so my feet are not dead.
My analysis is that full right rudder brings the left brake forward and unless one has the presence of mind to lift the left foot then the brake is applied. As the aircraft slows the rudder becomes less effective but the brake doesn't!!
Basically the brake pedal geometry sucks.
I am thinking that valves on the pedals and a lever on the stick would give good differential braking and be similar to the setup on the Chipmunk.
Ken
 1 person likes this
 -
If you don’t trust plastic (polymers) then the files could be used to CNC machine the parts from aluminium.
Ken
-
OK NorthIdahoAvidFlyer it's raining here so I can't go flying so I've added a version with 5 positions which should result in 3 degree of flap per.
Ken
4 people like this -
Version with 5 positions as requested by NorthIdahoAvidFlyer.
1 person likes this -
Files now posted in the Files section
Ken
1 person likes this -
Possible NorthIdahoAvidFlyer, if I get a moment I'll do it. No promises though, I'm a bit busy having fun

Ken
2 people like this -
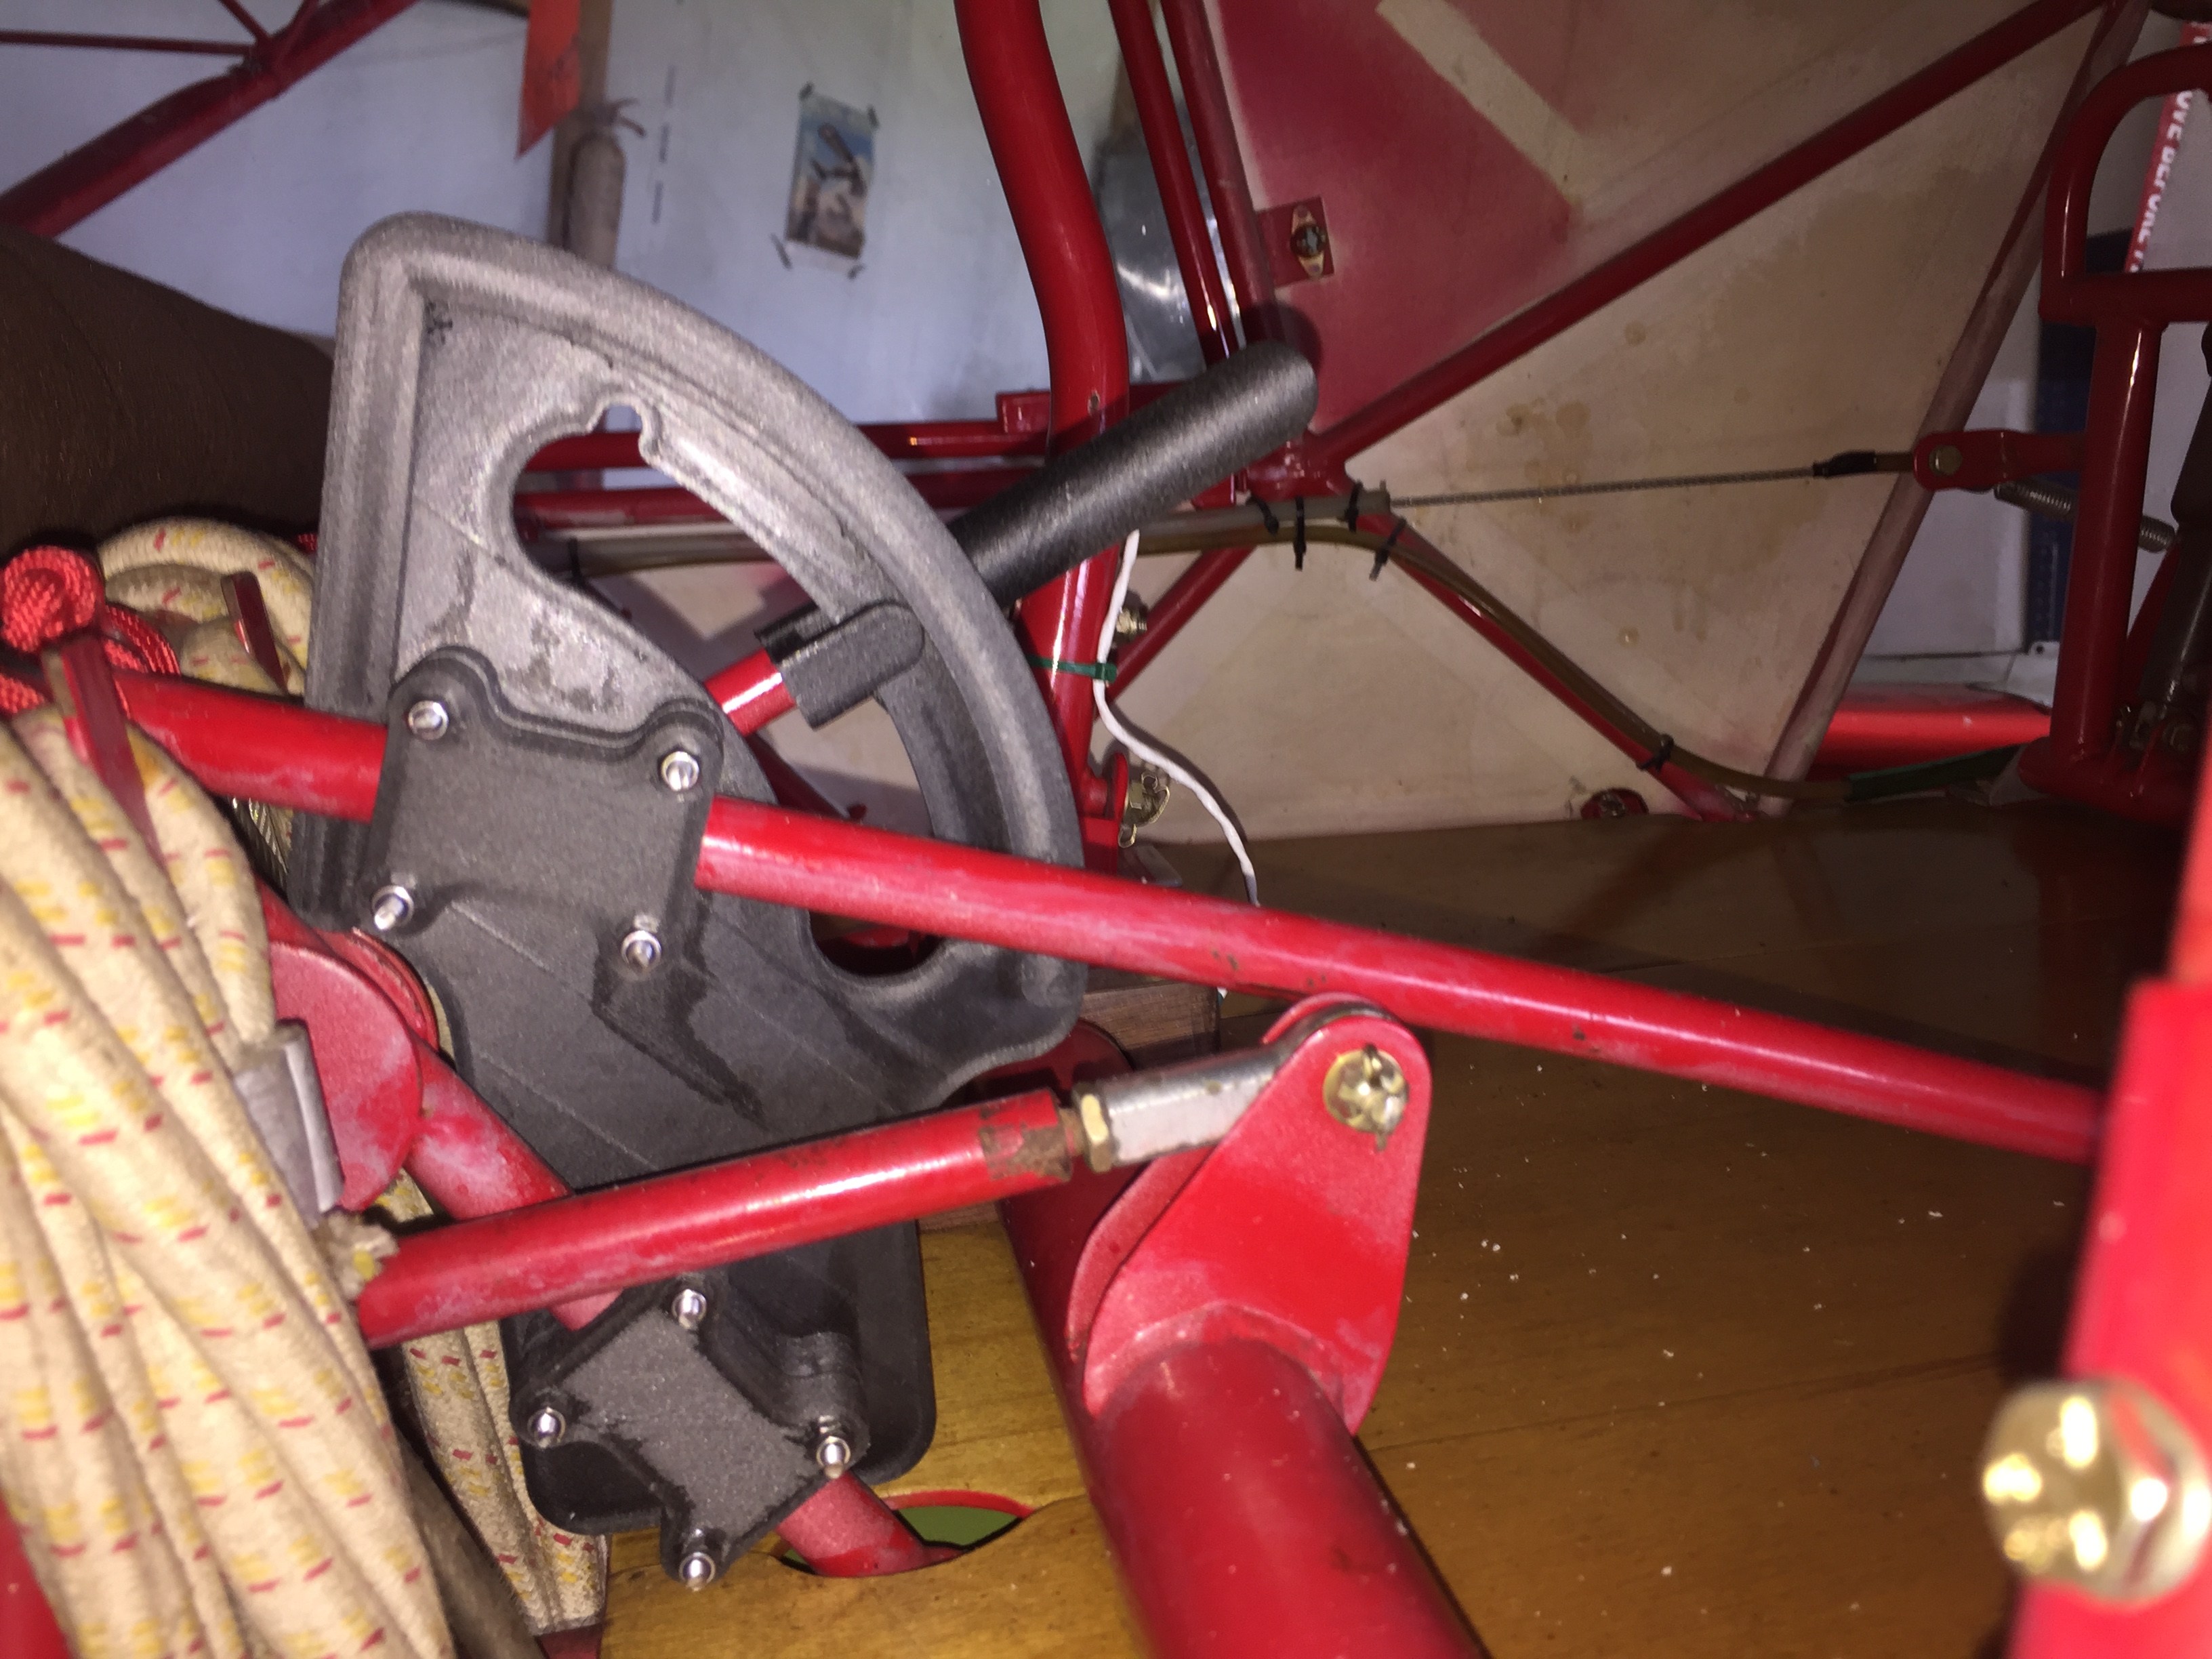
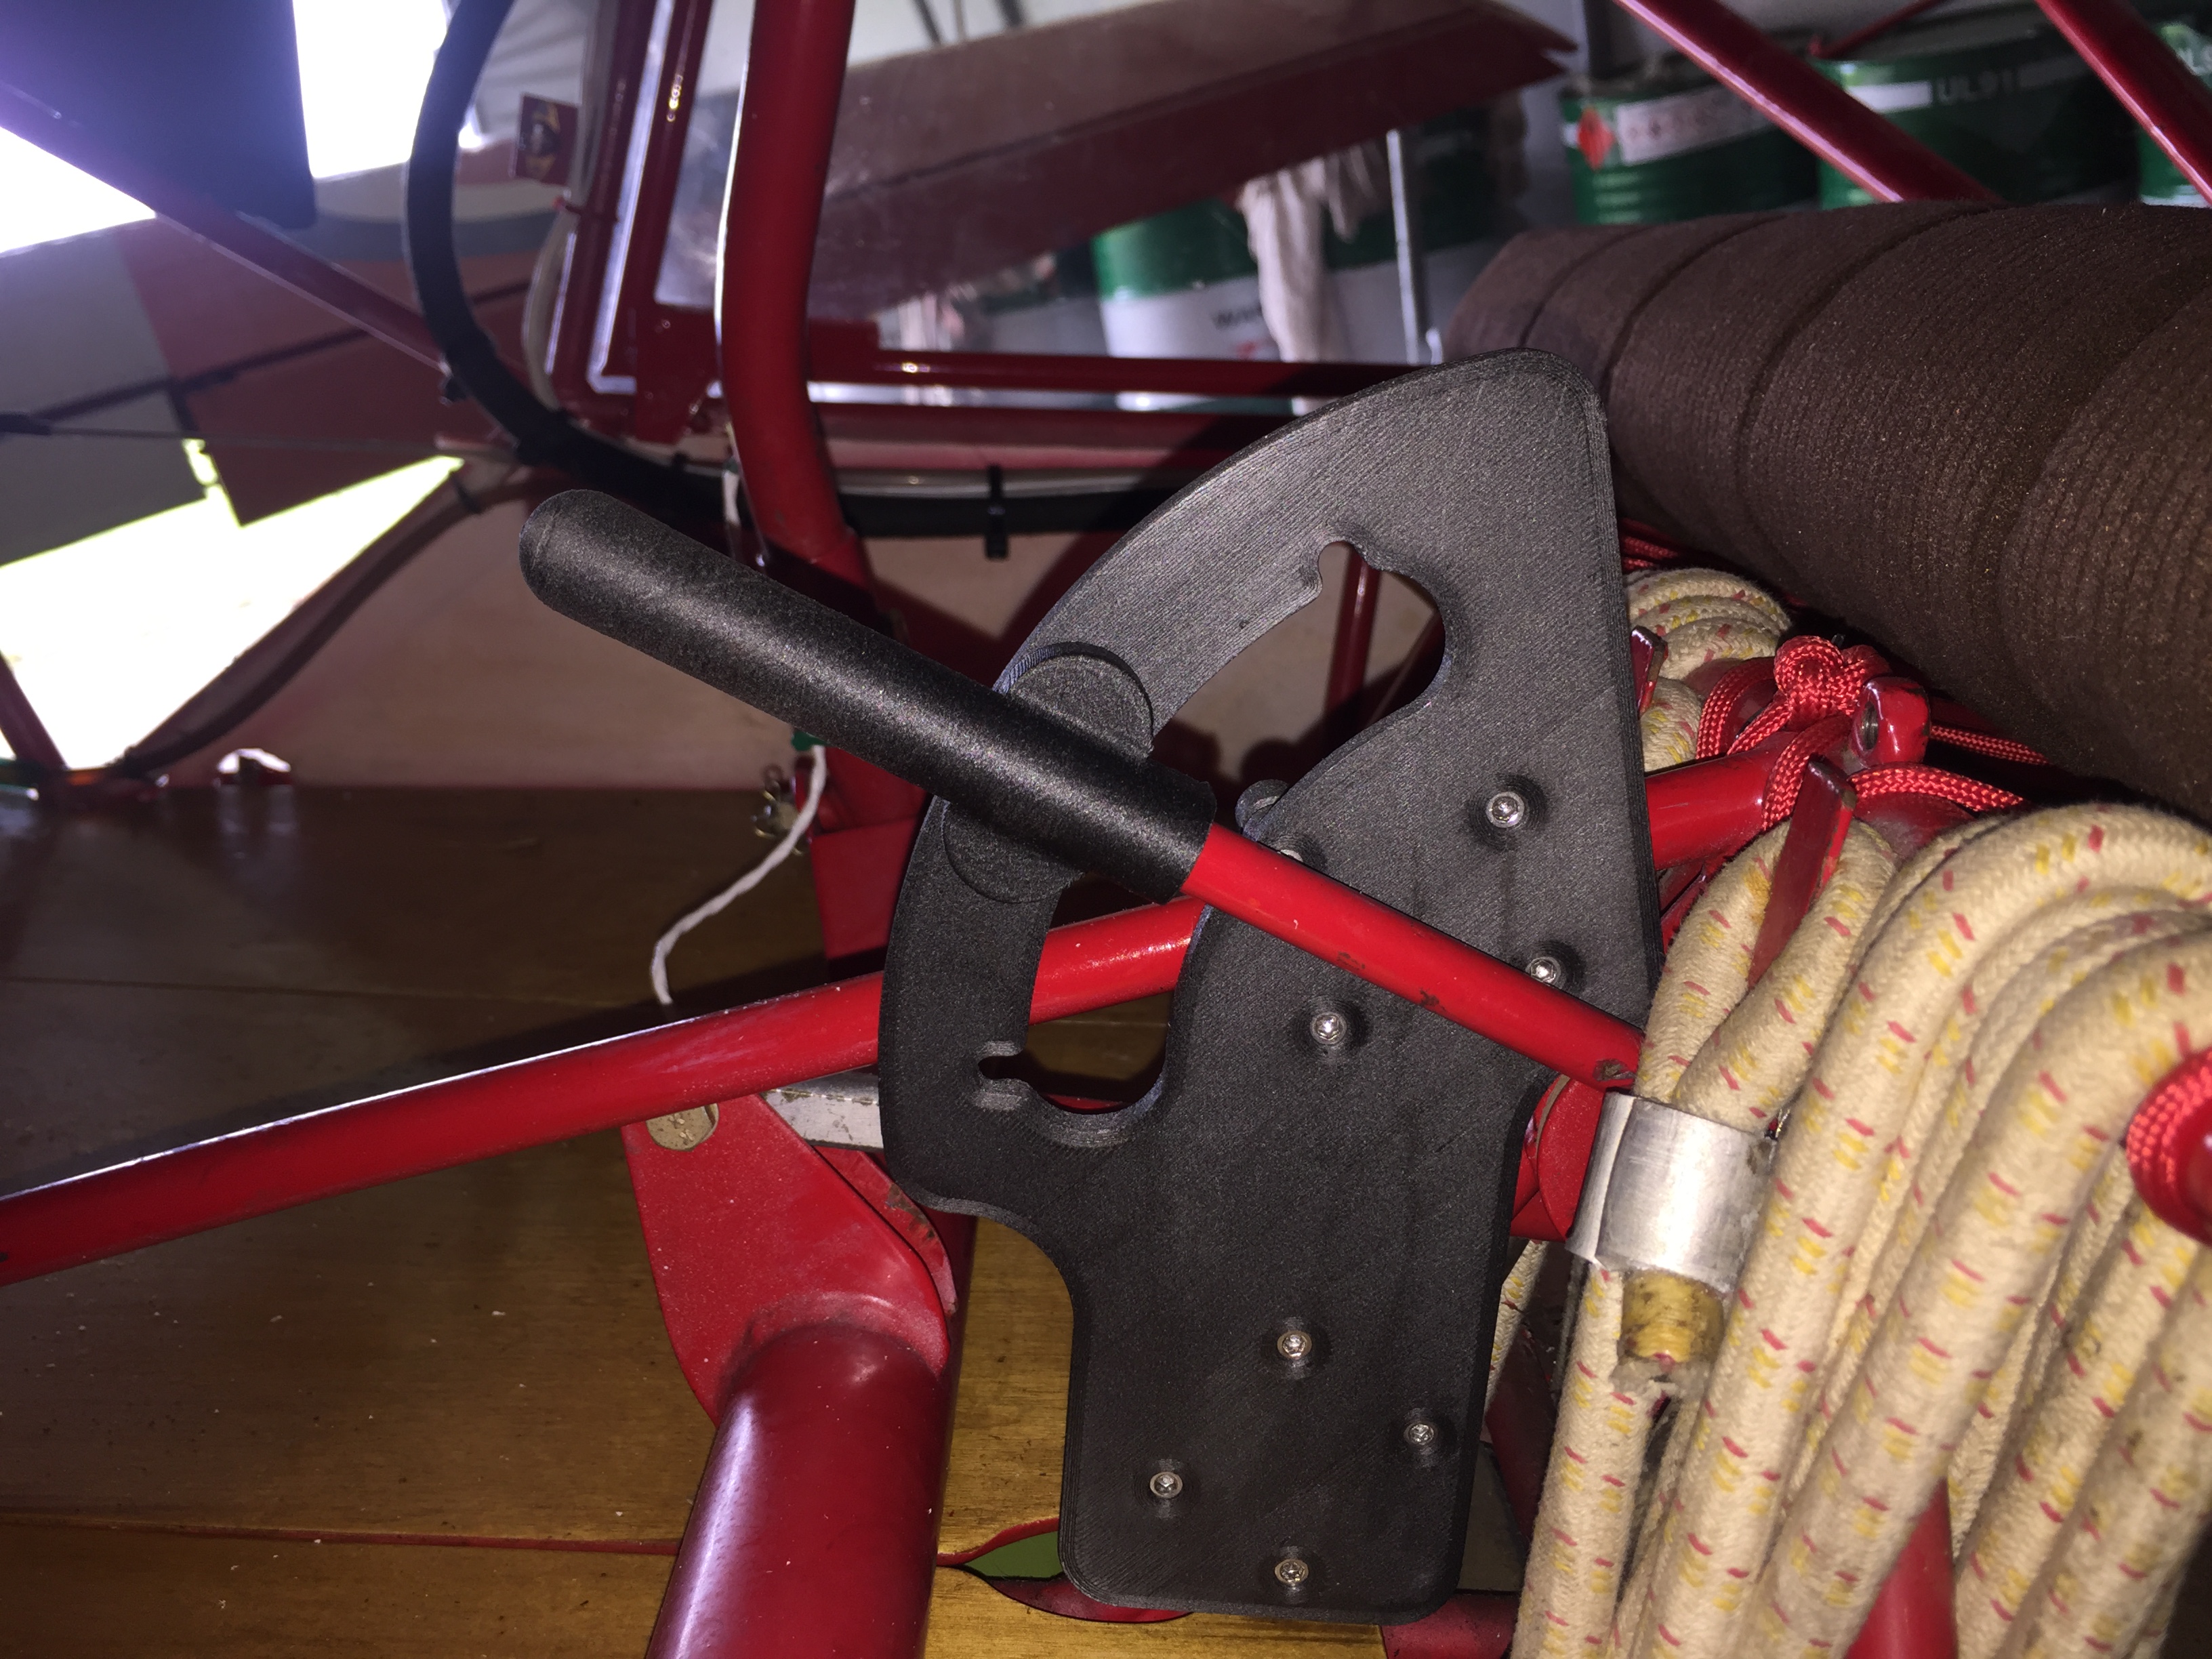
Here are the files required to print the flap detent:
Avid Flap Detent.stl 1 reqd.
Avid Flap Handle.stl 1 reqd.
Avid Flap Cap Piece.stl 1 reqd.
Printed with 20% Carbon Fibre filled PETG filament, 0.2mm layers, 5 perimeters, 5 top and bottom layers, 25% fill. Handle will probably require 5mm brim for printing.
A 3/8" diameter x 1" spring is required, 8 x 3mm diameter x 30mm cap head screws and nylon nuts also required.
Flap system may require adjustment to give zero degrees on the fully forward detent, the fully aft detent should give 15 degrees.
Ken Kelso
 2 people like this
 -
As CloudDancer shows there are plenty of outfits that will print stuff for you, another is 3D Hubs. I would have to charge about £50 (Sterling) plus shipping to cover my time and materials.
I will post the files into the Files section with some notes later today.
Ken
1 person likes this -
Though you guys might be interested in my take on a flap lever detent, it's 3D printed from carbon fibre re-enforced polymer.
If anyone would like the files to print one let me know.
Ken
 4 people like this
 -
She Flies, follow this link for the video:
No snags and no adjustments required but I am having trouble restarting the 582 when hot, plugs are getting wetted. Any tips on shutdown procedure would be welcome.
Ken
4 people like this -
These are a couple of articles from Graham Laucht's UKAVID newsletters from 1993. Very useful if you are about to fly a Speedwing for the first time.
-
Ah yes forgot that bit Jim!


Rotax 582 surging problem
in Avidfoxflyers General Hangar
Posted
No not flown it yet.
I am wondering if a slightly bent needle could be causing it?