
fusionfab
Members-
Content count
107 -
Joined
-
Last visited
Posts posted by fusionfab
-
-
some 120 or 200 grit on a sander will polish up a window for you to see the gas just fine. Take 5 min and smooth it out then wipe some epoxy over it and it will be plenty clear enough to see the fuel level in the tank.
just doing that as we speak and it is much clearer. The fibreglass layers are pretty rough and overlapping. Sanded them flat with 220, which got most of the fabric glue out also and now just wiping on a thin layer of epoxy
 2 people like this
 -
I used the ones from perkins. If I was to do it again I would have just stuck with the sanded window on the tanks and used a flashlight to see fuel level on the not so bright days.

I just ordered th elbows and grommets from leading edge but I do want to try the sight window first.
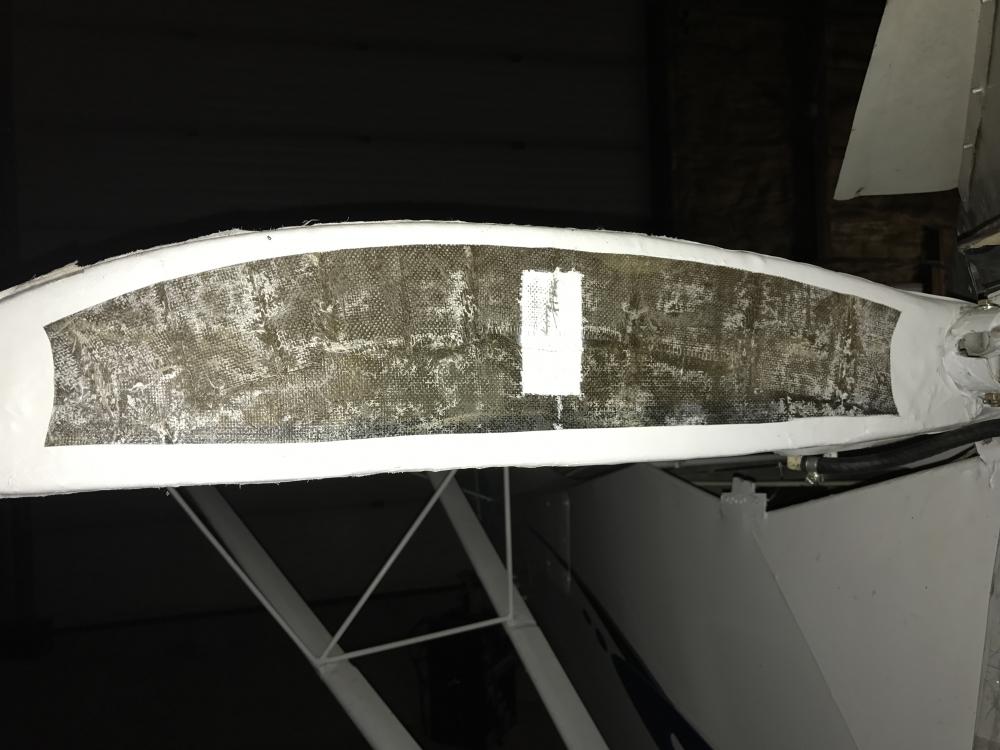
Only problem is the previous owners fabric covered most of the ends leaving very small window that was painted over. Here's a pic after removing fabric but before cleaning off the painted square. Now my issue is trying to clean off the glue the fabric left behind.
 1 person likes this
 -
I added a led strip to see mine better . Couldn't get myself to drill in the tank for such a small set up .
I removed some fabric to expose the end of the tank. And I can lightly see it but not as well as I'd like. I may have some little leds laying around to try
-
Take a look at the leading edge catalog, page 19. Look at part # H7286 for the fitting, and H7285 for the grommet. Can probably find the hose at the local hardware store. On the left side of the page, click on the lowest item, fuel pumps, tanks, and supplies. That will take you to page 19. JImChuk
http://onlinecatalog.leadingedgeairfoils.com/app.php?RelId=6.4.3.11
thank you Jim, I will for sure place that order today. I haven't hear back from Bear Perkins yet. But either way im going to get the parts on their way while I work on just a visibility method with the end of the tank.
i cut away the excess fabric overlapping the butt of the tank and will work on lightly sanding with high grit to clean them up helping with visibility
-
Bear Perkins sells a sight tube kit that's easy to install. No threaded fittings. It works well in realatively thin fiberglass tanks.
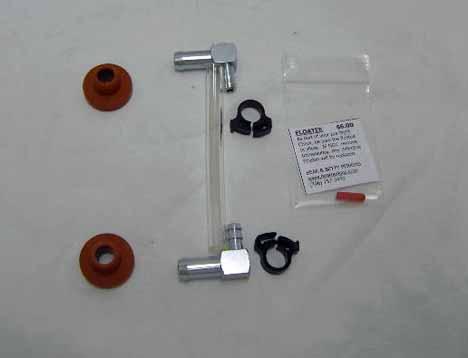
I had tried purchasing a couple of his kits in the spring but he said he no longer carried them. I'll try again tomorrow with those kits and hopefully he has them.
Thanks
-
Anyone think I can drill the holes in each tank and fibreglass in two NPT female fittings?
-
Hey everyone,
my plan failed with the low fuel indicator so am just going to do it the right way and install fuel sight tubes or another method for fuel level.
can anyone show me pics of their fuel sight tubes to give me ideas. Or pics of other methods used?
Thanks in advance everyone.
-
Aircraft wire is a bit more expensive but much more robust. Using marine heat shrink connectors gives you the glue in there to help hold the wire as well and makes it much less prone to breakage, Aircraft crimps help too as they are a double crimp and have the second crimp around the insulation. A set of real crimpers with proper dies will keep you from over crimping and breaking the wires.

is that the heat shrink Aircraffspruce has with the glue inside?
-
Maybe drill a hole and wire tie?
simple enough. That's what I'll do. Thank you
-
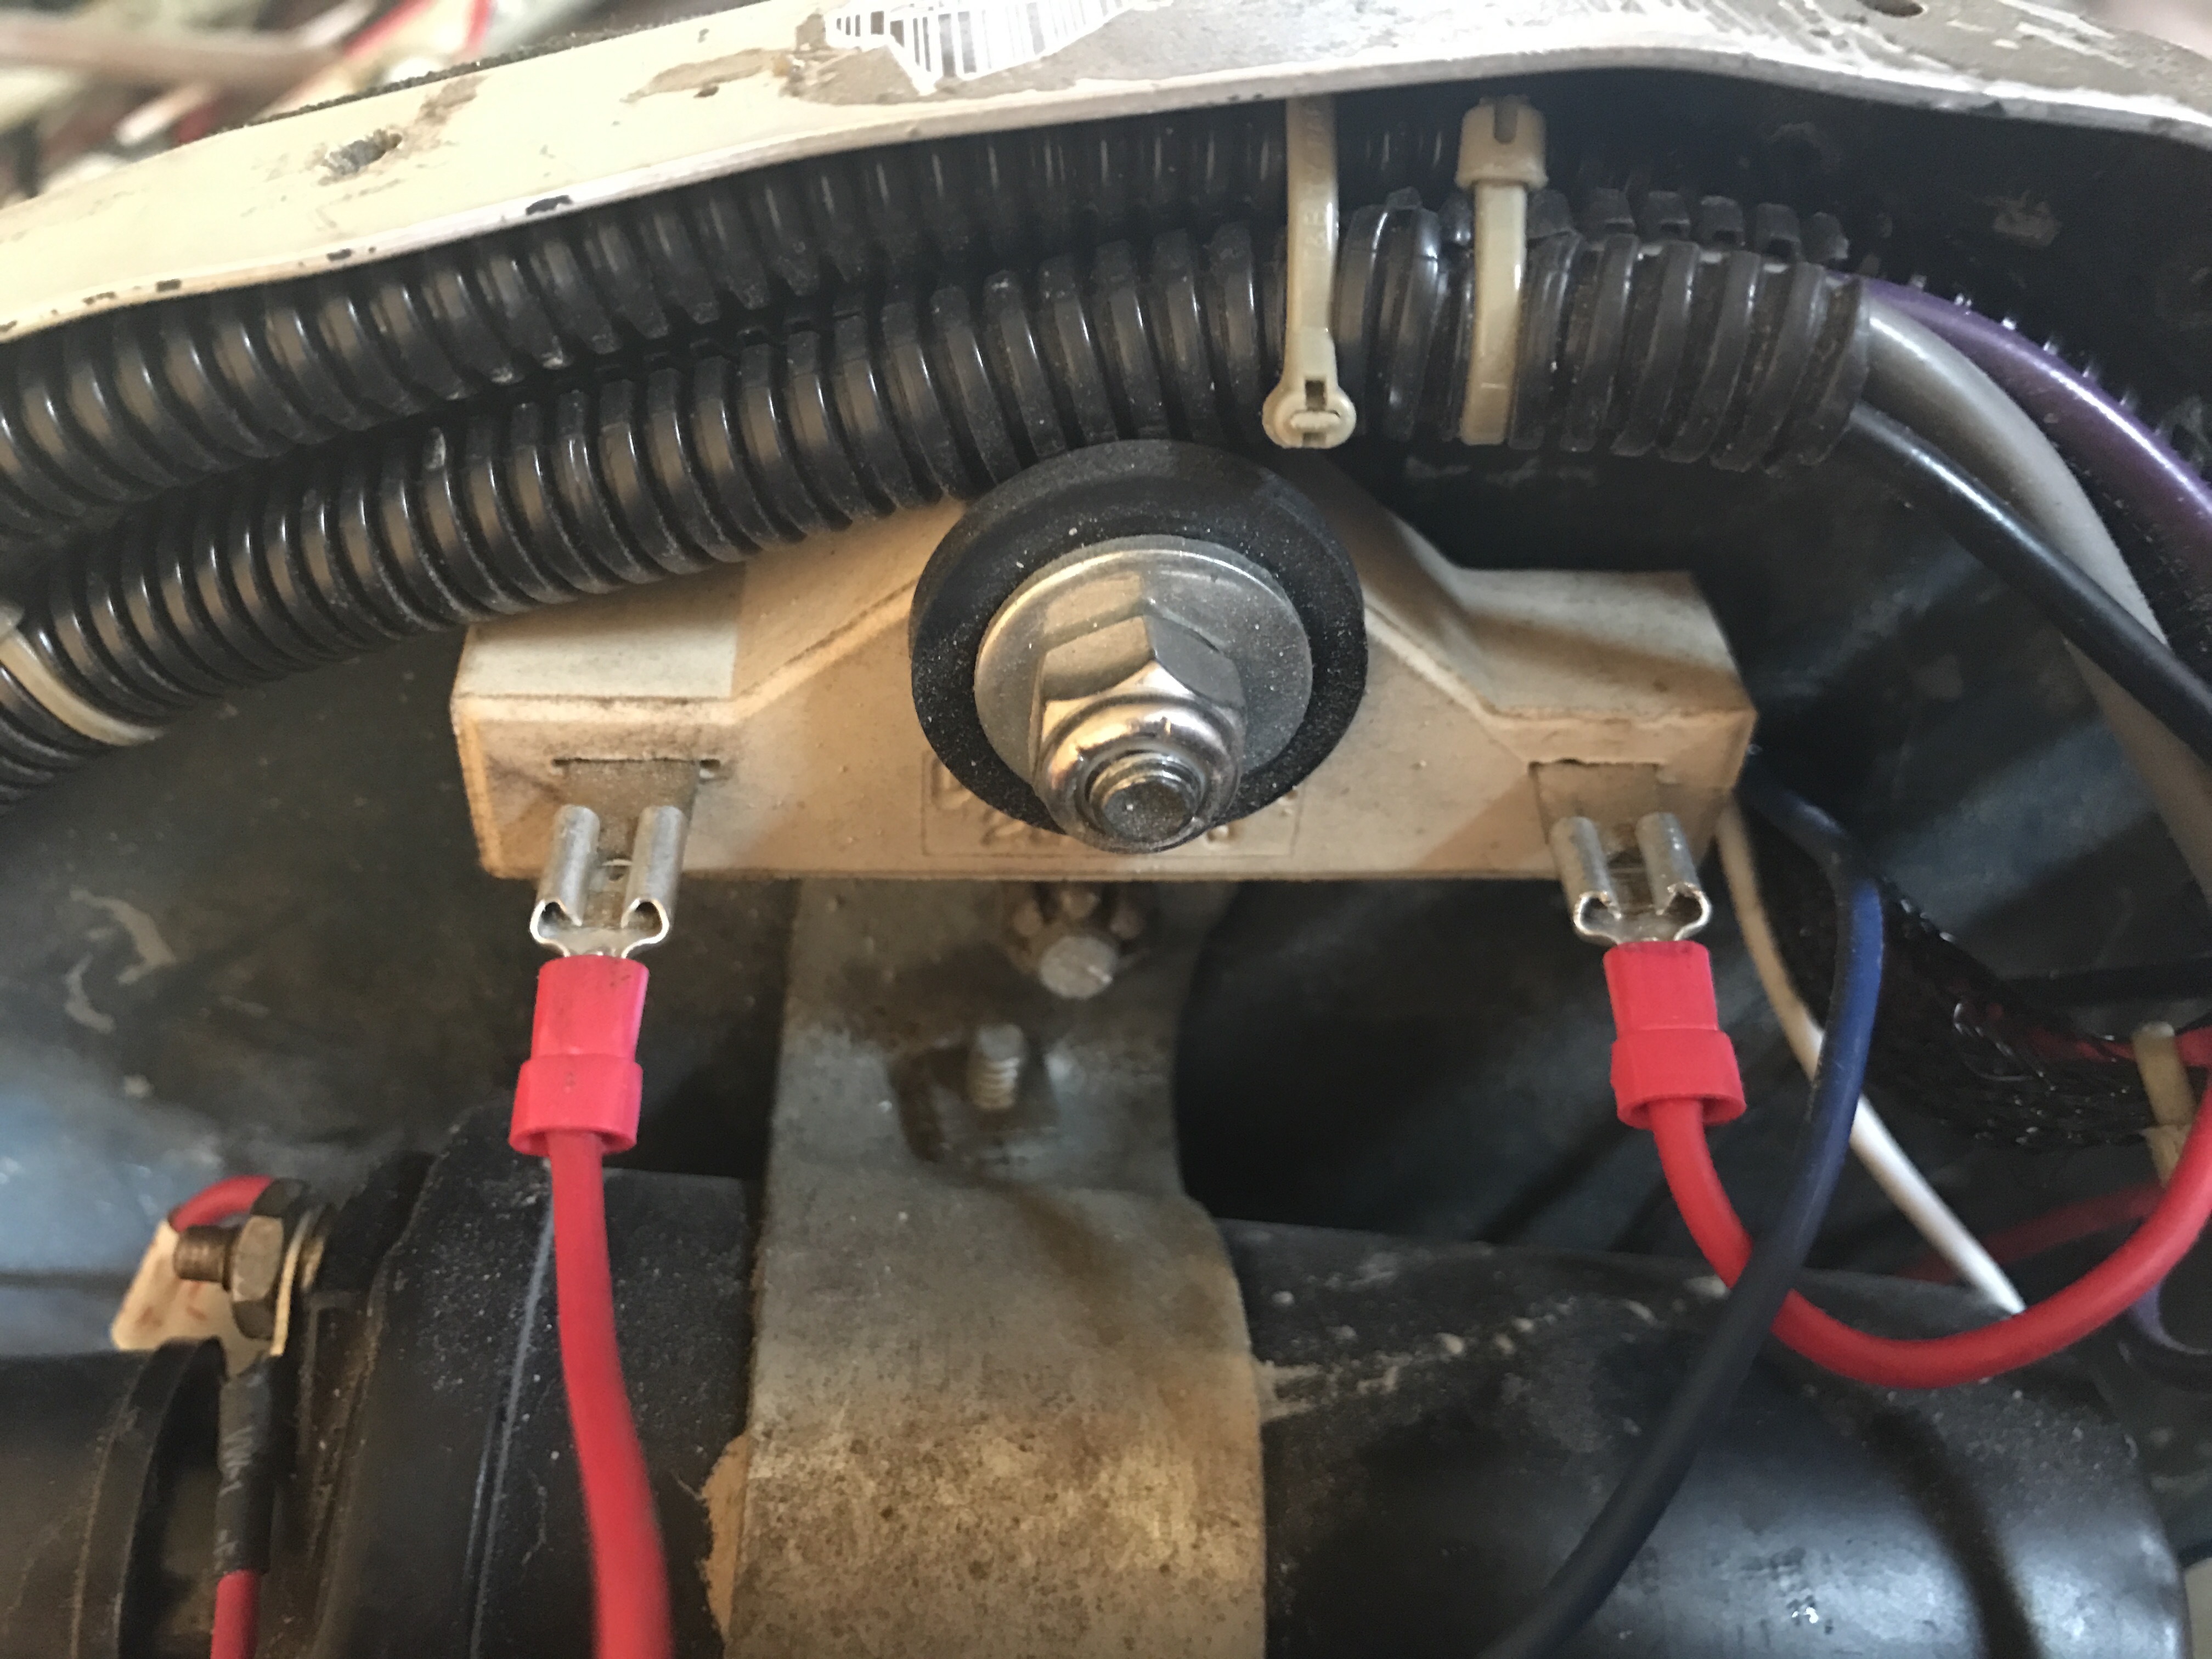
Hey everyone
just went to start the plane and was dead with no spark. Noticed that the cable depicted on the left had bent at the terminal breaking underneath the shrink tube. So I replaced both with the plastic crimp fittings and soldered the other ends hoping the plastic would add support to the wire at its joint, better than shrink tube.
Now how can I go about securing these terminals to this resistor?

-
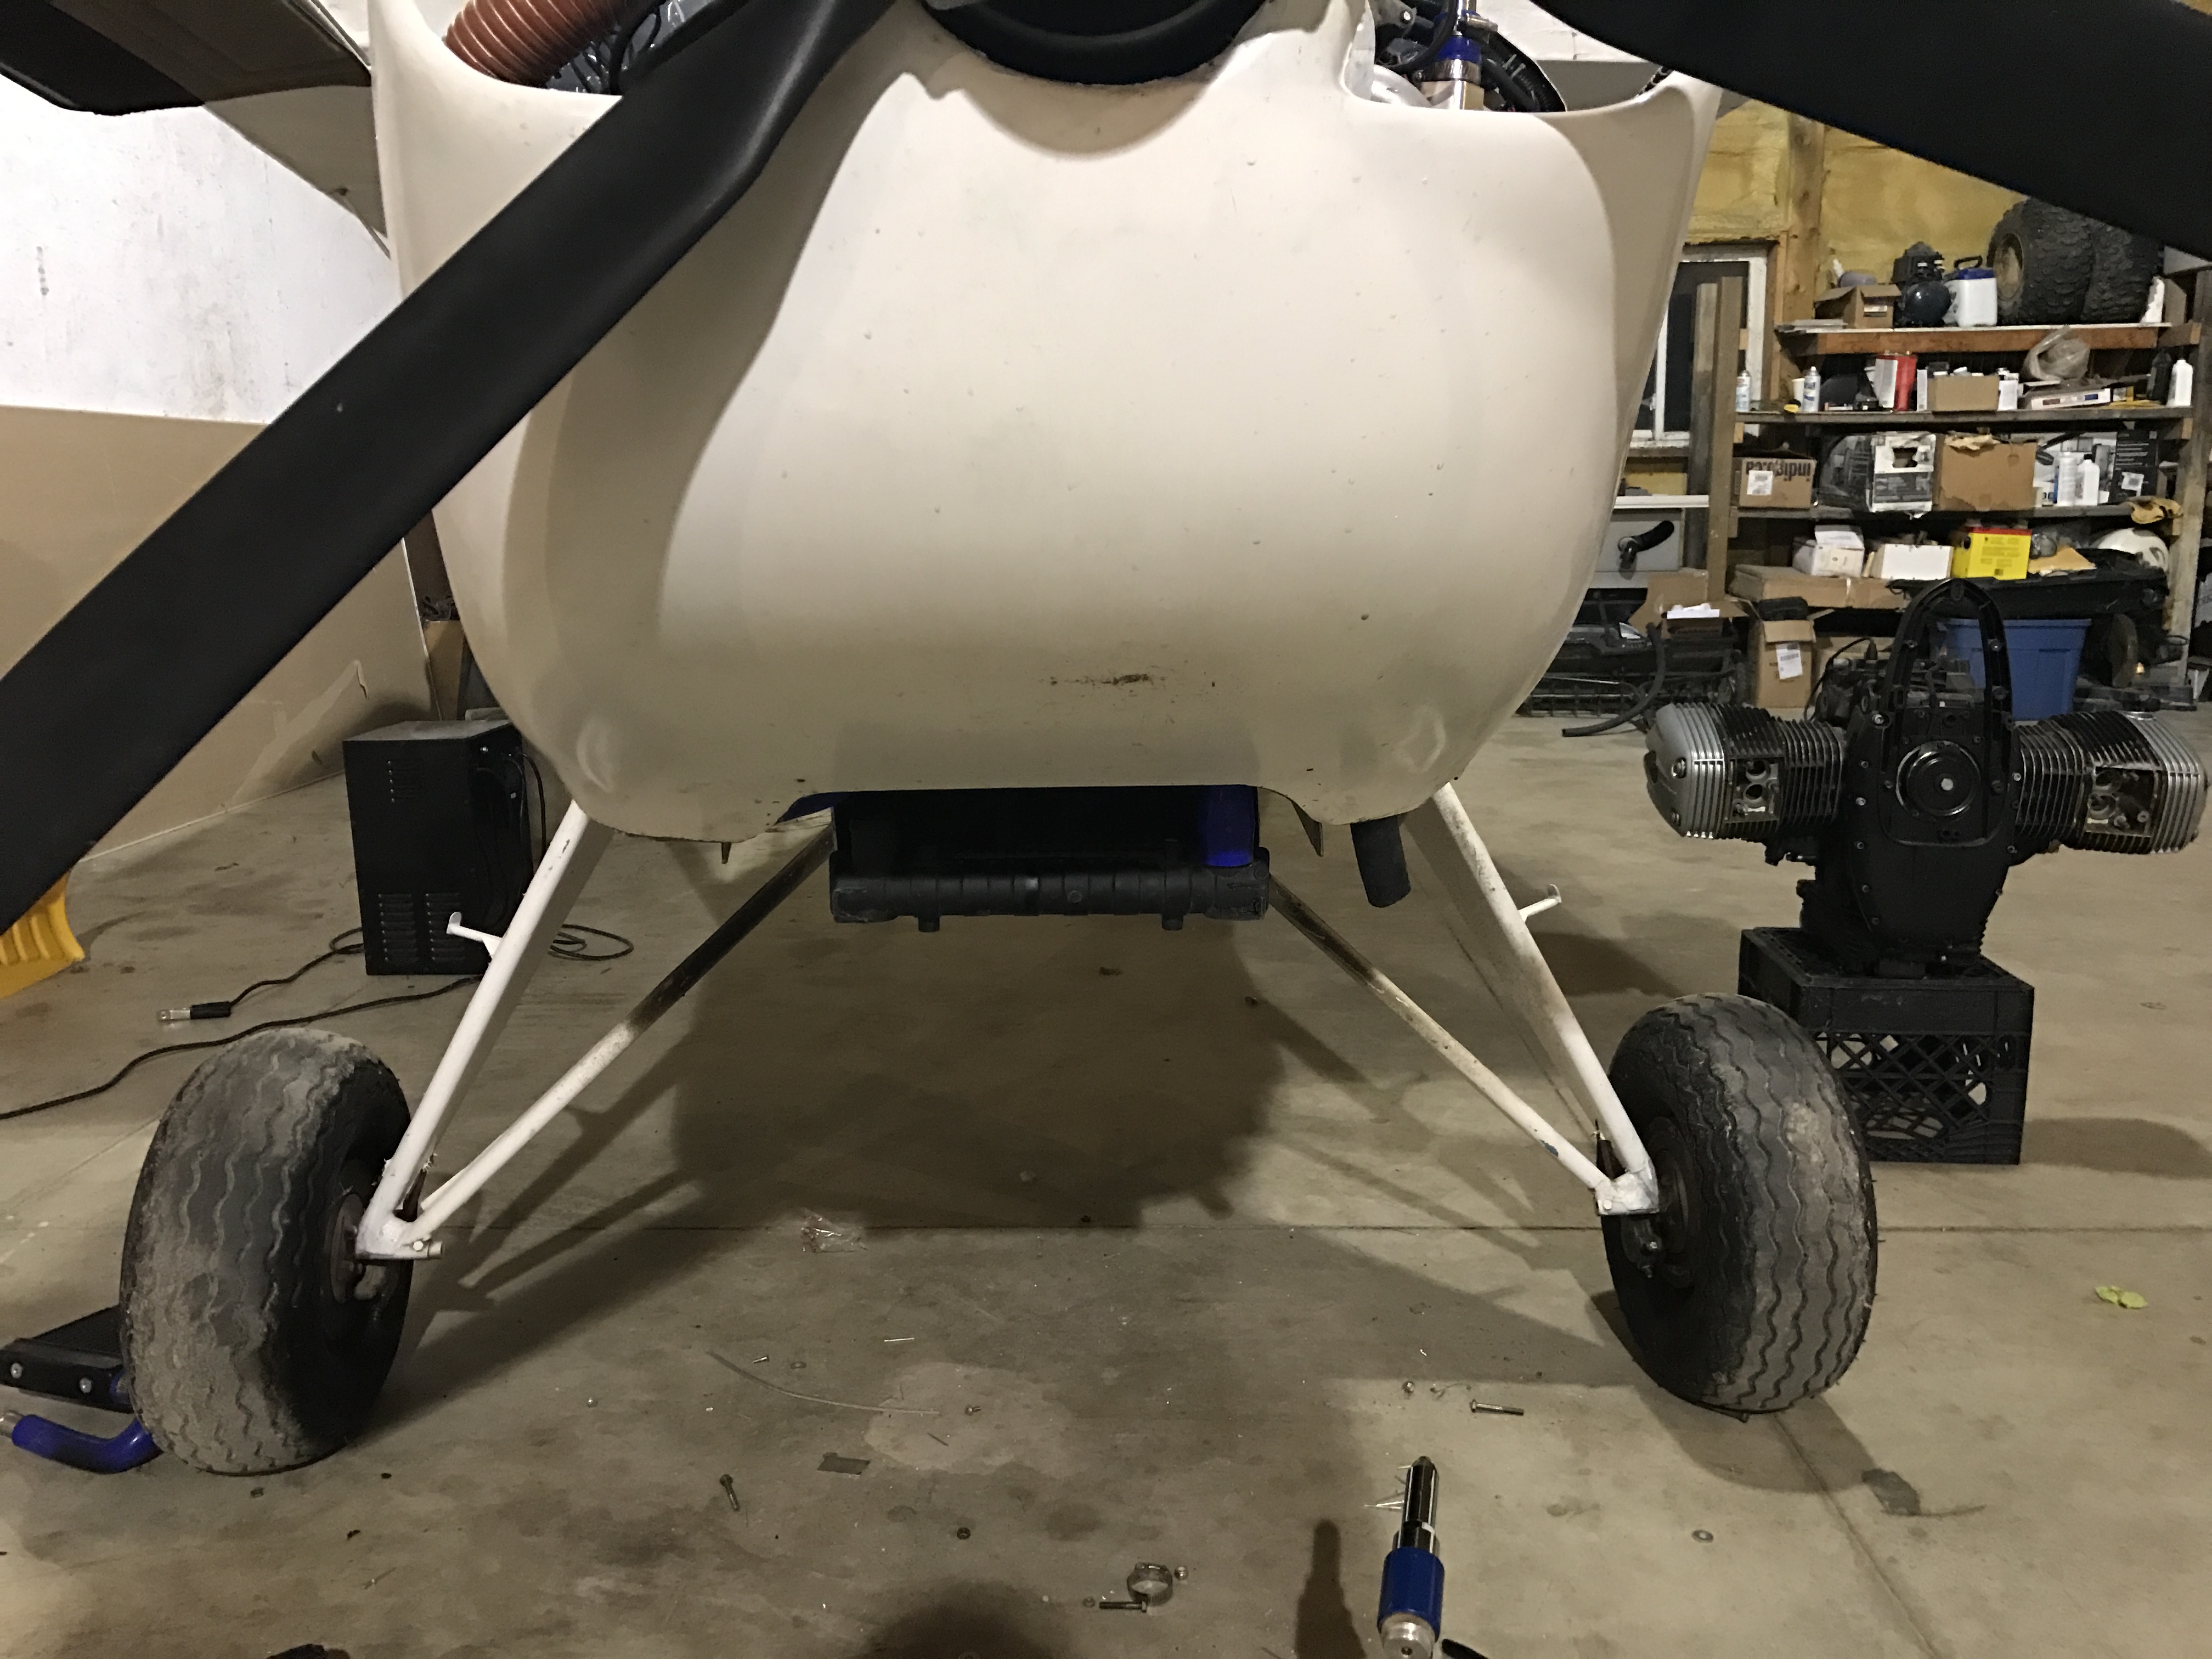
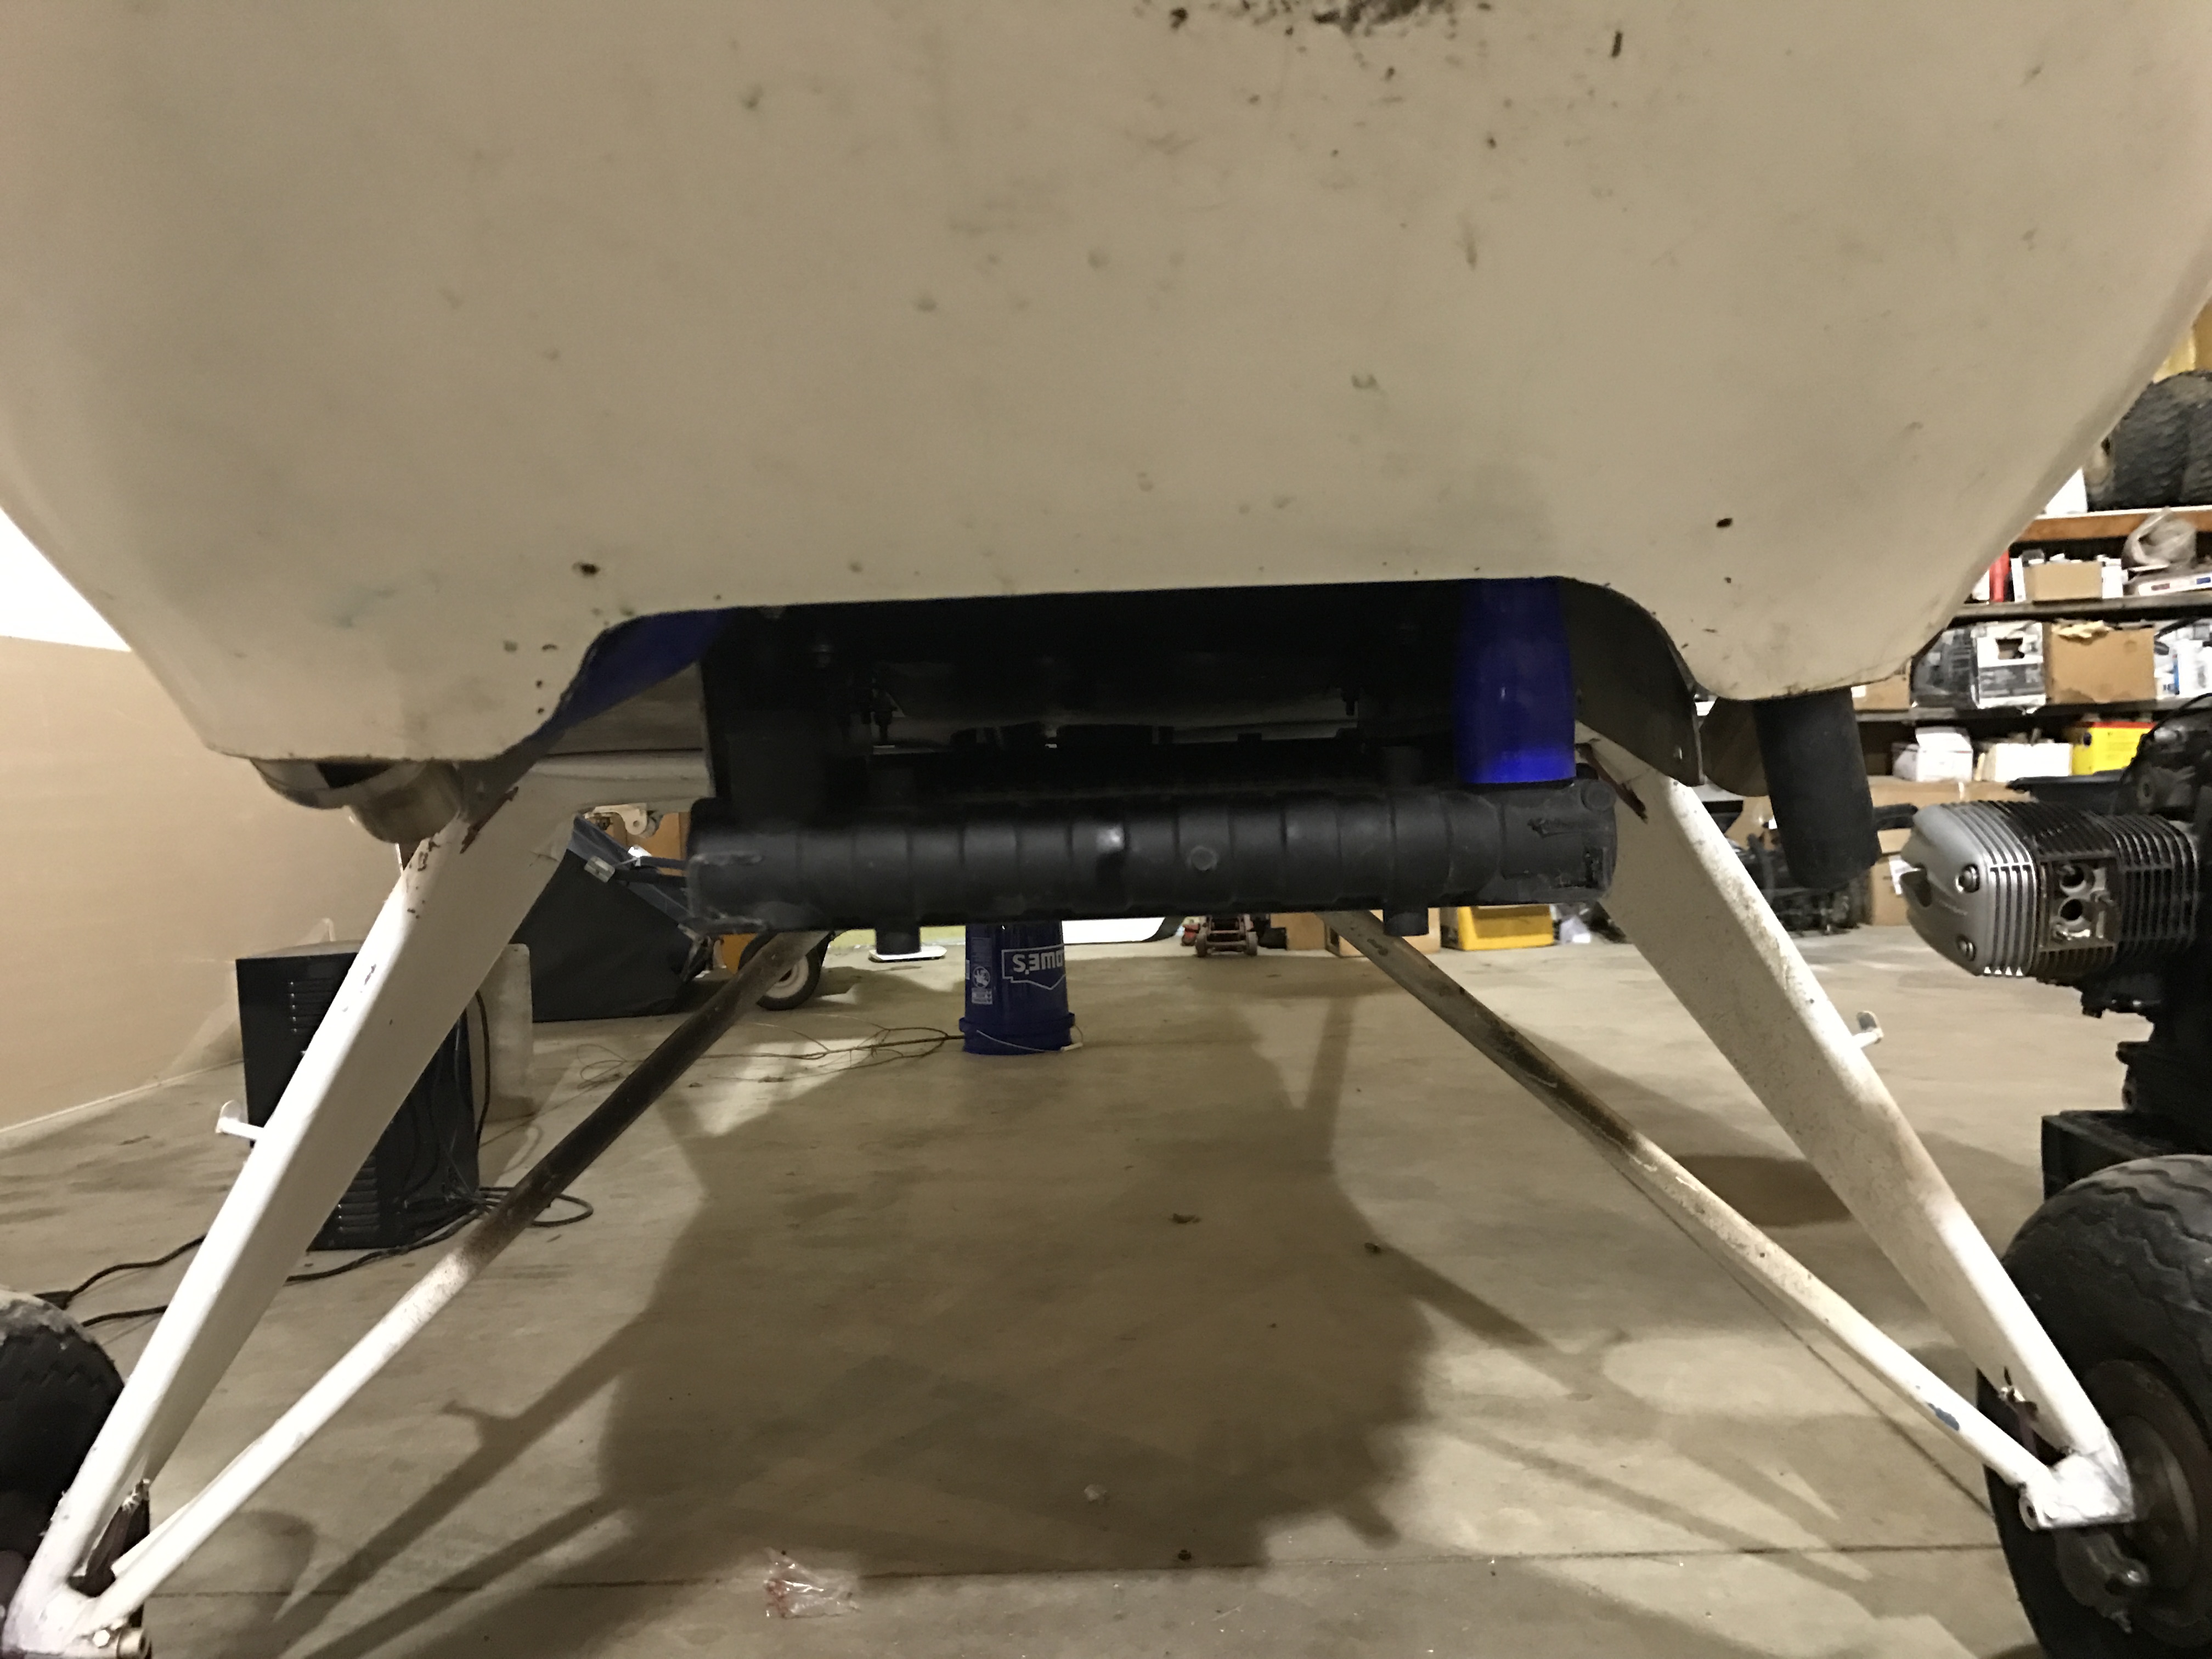
well last week I did a final test runup before I start my taildragger lessons this week. Made this runup a long one going full throttle at 4800rpm for 2 minutes then to cruise. My temps appeared to be an issue.
First was the oil temp gauge reading 275-300 when the actual oil temp itself didn't exceed 196. Figured out I had the wrong temp sender for the gauge and got that straightened out.
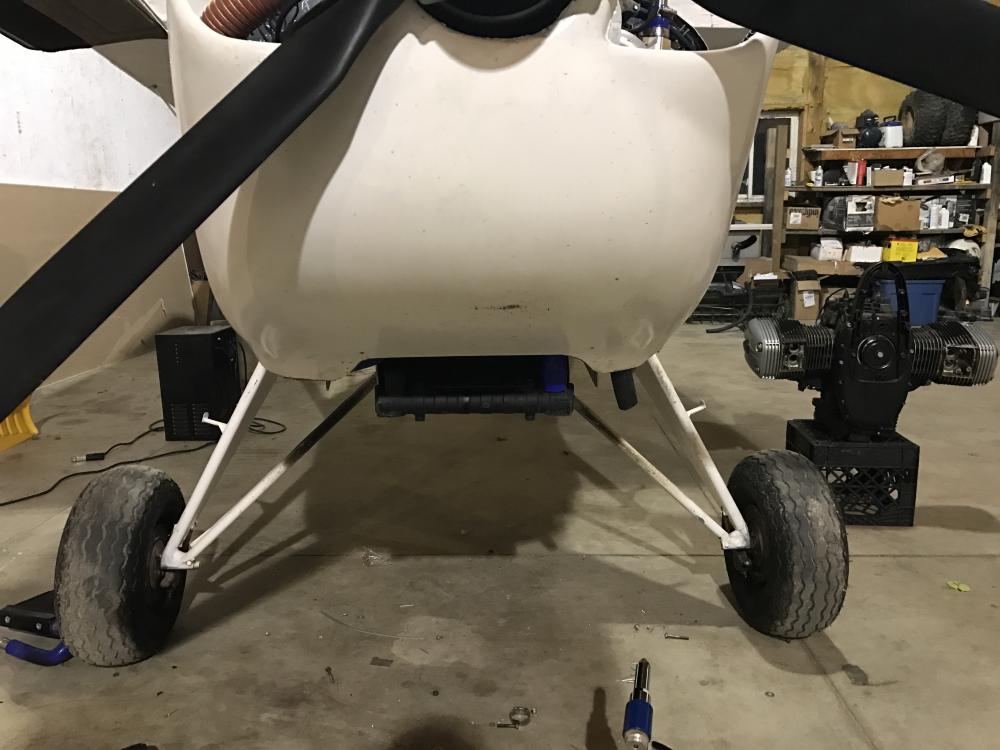
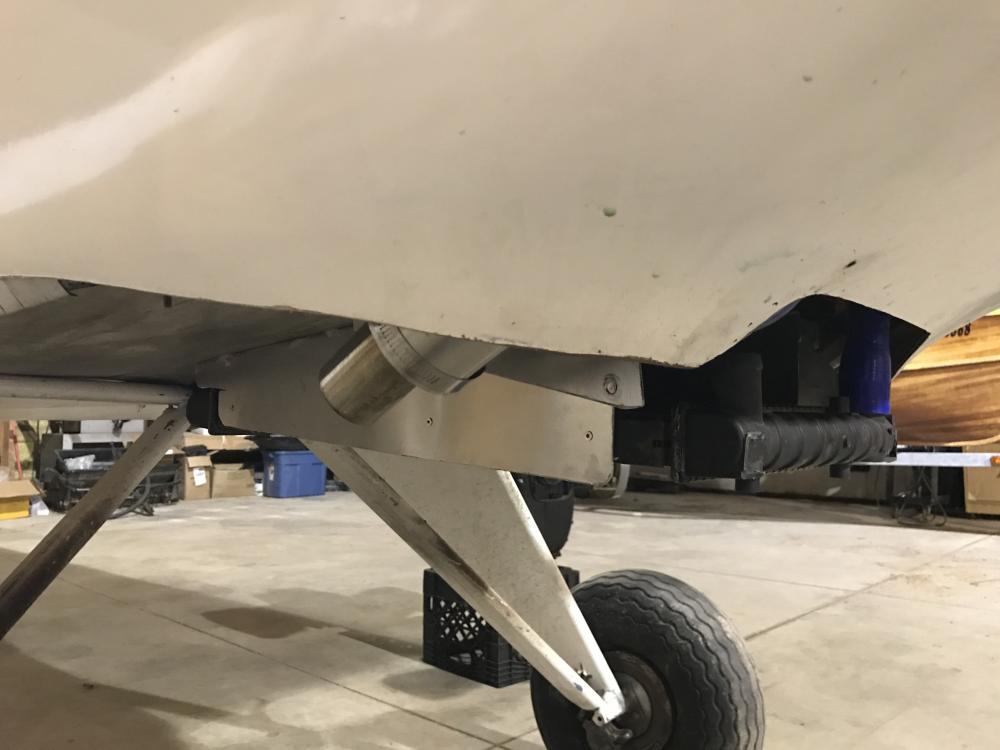
Next was cooling, I installed a cbr1000 rad at the bottom exit of the cowling hidden away. The temp climb slowly, but never stopped climbing. It reached 210 after 2 minutes of full throttle before I dropped to cruise and it continued to climb. It didn't start cooling off until I just dropped down to idle.
So I decided to try and stop reinventing the wheel and install the VW Rabbit rad that many are using. Bent up some aluminum and mounted it up underneath and trimmed the cowling to create good flow of outside air down and through the rad. Going to give it a shot like this with a thermostat and go from there. Next may be louvers to further help direct airflow.

-
Ok thanks guys, I was afraid to hear about the outta business thing.
The single carb engine in my plane has a custom aluminum intake for the increased air and fuel of the Weber carb so I don't have the thermostat. But I've figured out how to plumb this one in I just was hoping to eventually replace it. I dislike having incomplete engines around.
-
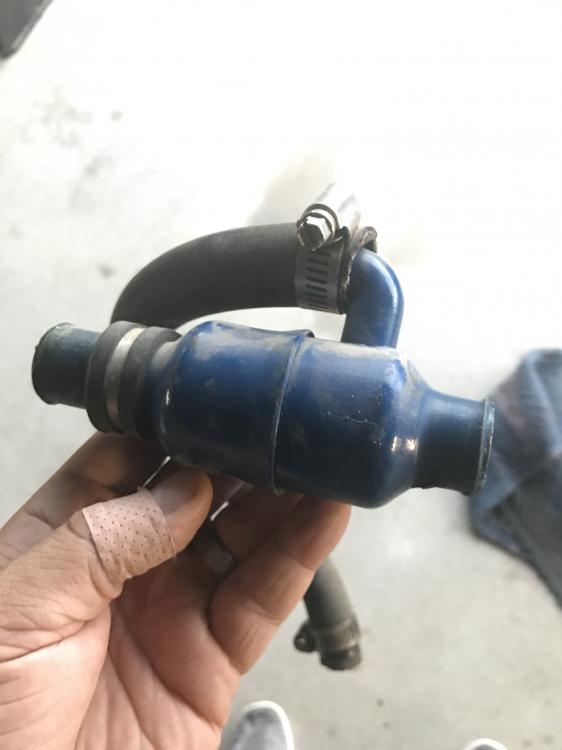
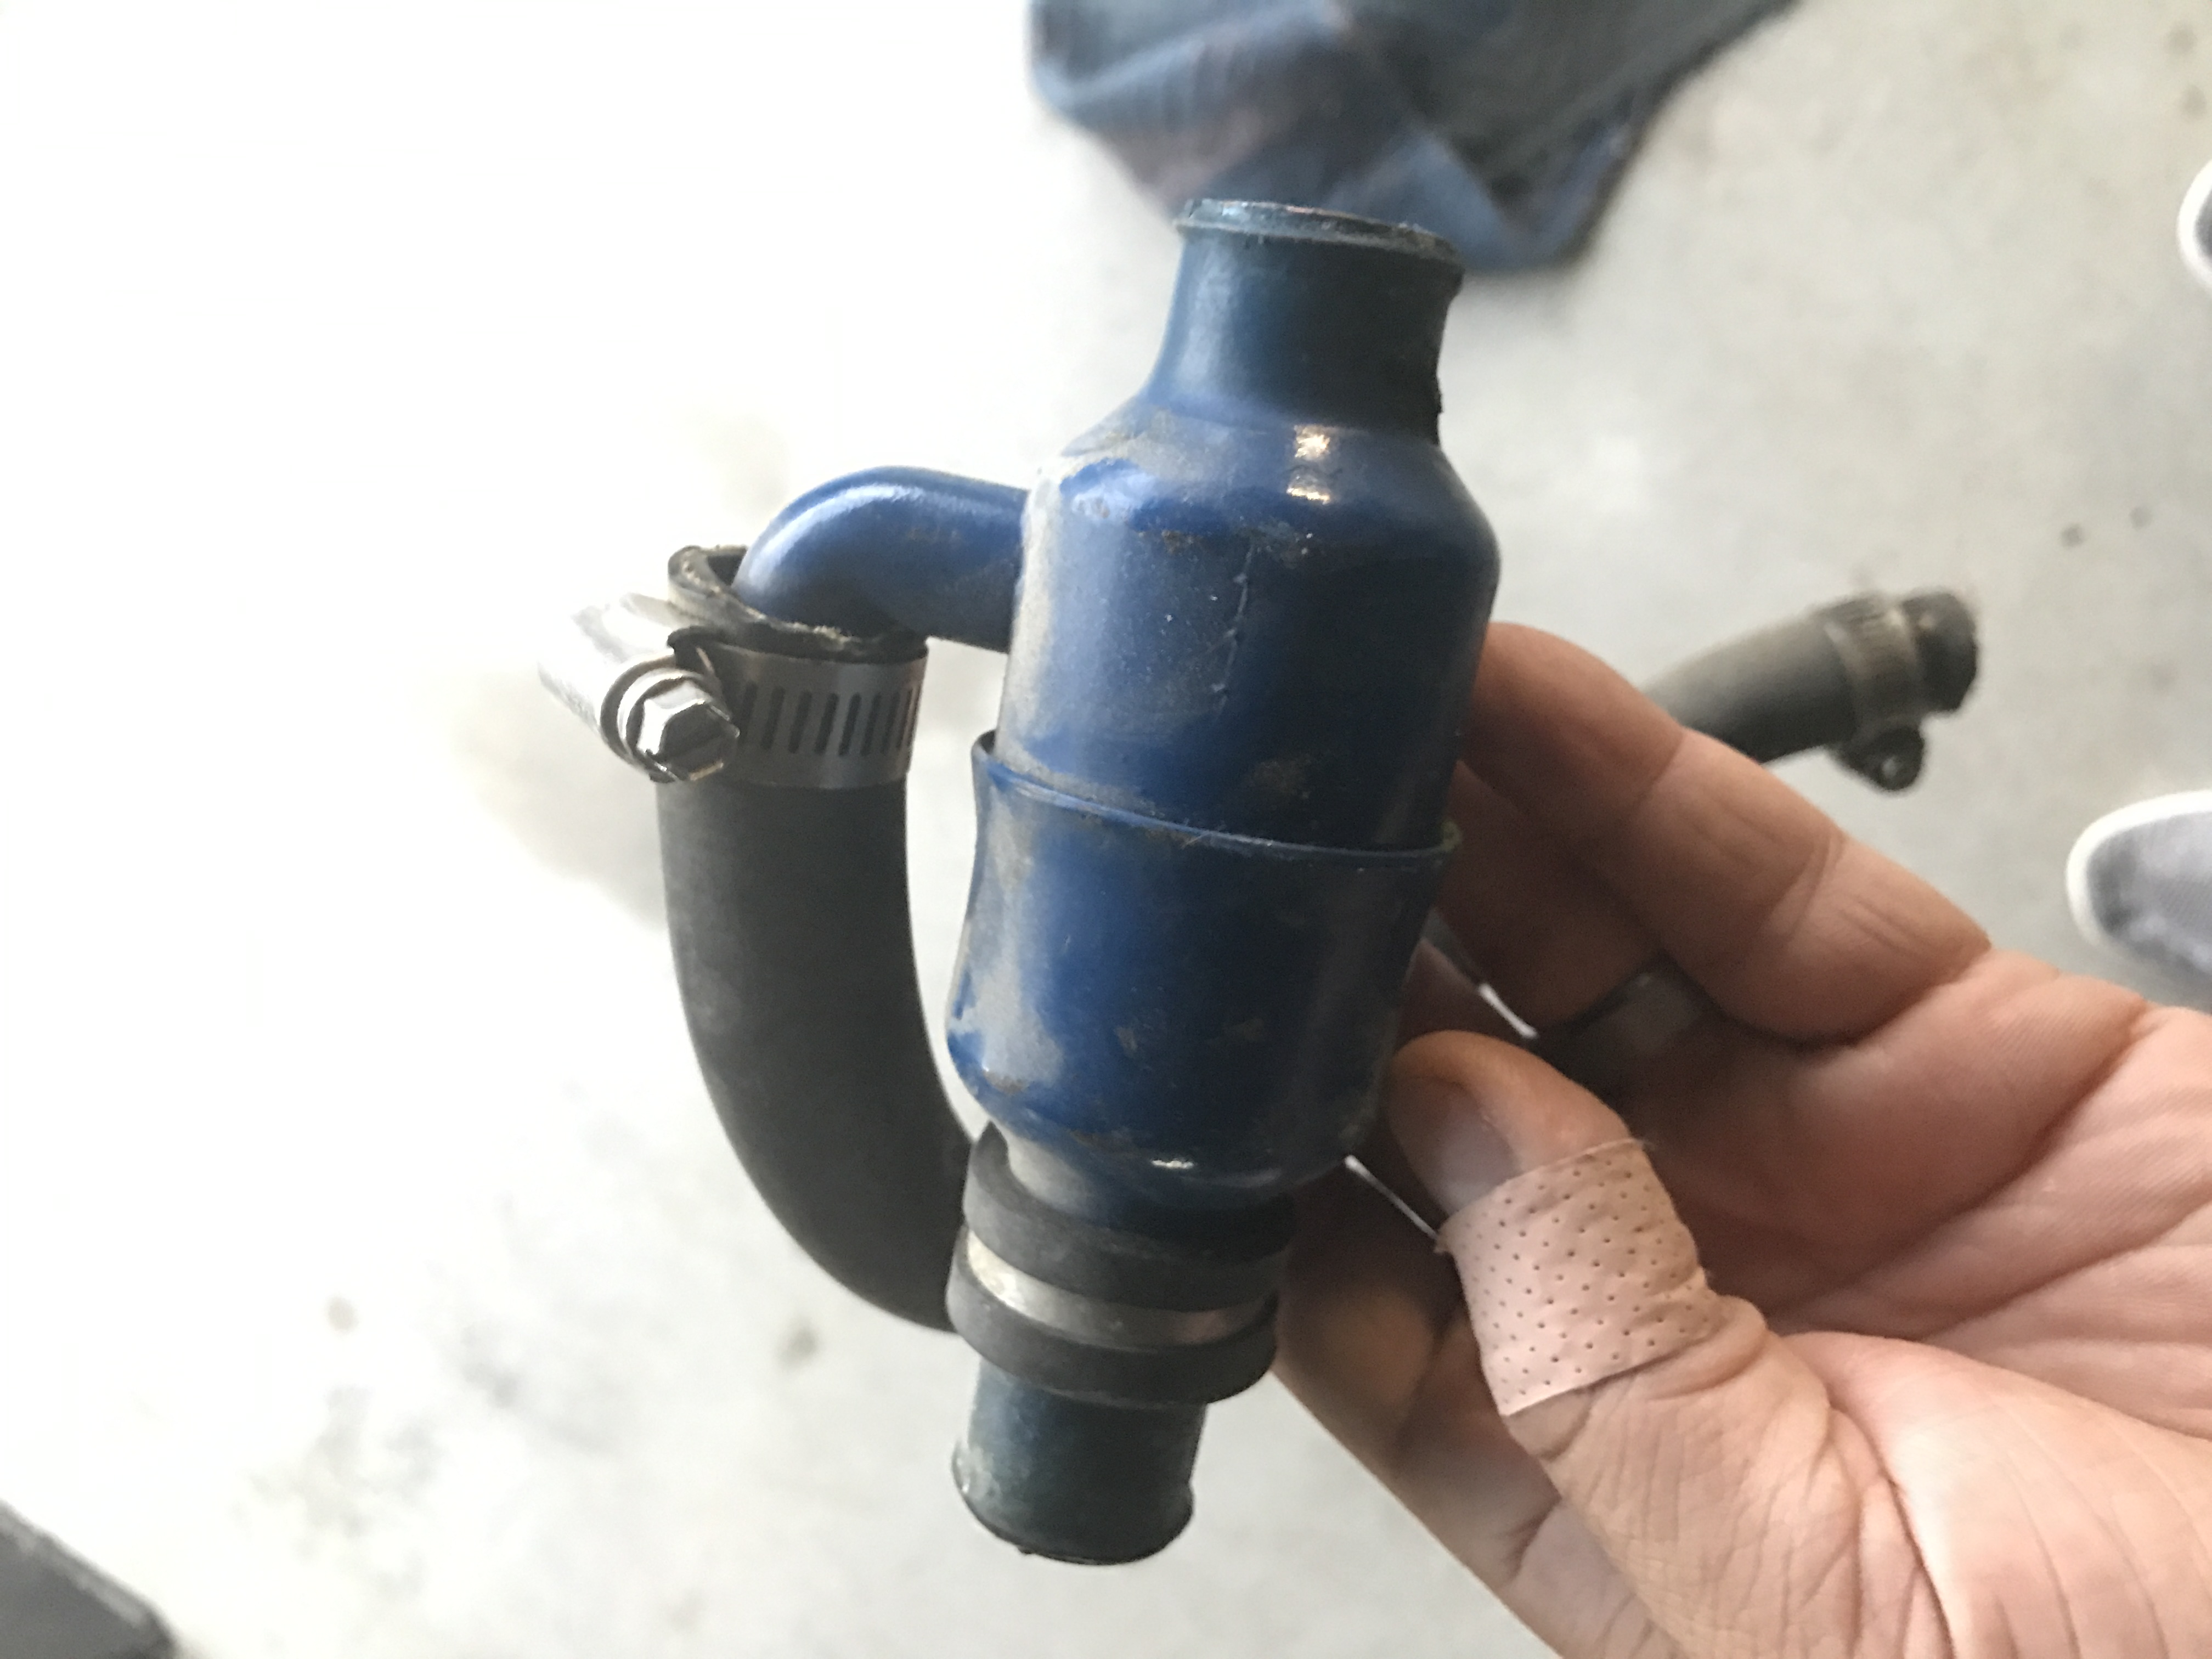
Is this an automotive part?
I've never seen anything like it before in the aircraft world.
I have no clue but my guess is yes. I believe between the two engines I have the one this came from was built by stratus so I may try contacting them I just can't locate any contact numbers or emails.
-
hey everyone
between the two Subaru EA81 aircraft engines I have, the one I decided on using didn't have a thermostat housing so I'm robbing the one off the other but would eventually like to replace it with the same one. Does anyone know where I can get this? It's 1" in and out and 3/4" bypass.
-
I'll be following this thread as I'm sincerely interested in this conversion. I have Subaru now and so far so good. But would really like to shed some weight. Very informative thread thank you.
My biggest worry about this engine is the 10,000 rpms, compared to 5000 rpms for the Subaru which has run 300-400,000 miles in a car without rebuilding. How many miles does it last in a SnoGo? EDMO
I agree, that's my concern but really, my only concern is the high Rpms to achieve the hp. I'm just really trying to find a way to achieve more useful load without going back to 2 stroke.
My plane is totalling 722lbs and with two of us flying there's limited space left for fuel.
I have completely rebuilt a BMW 1150 engine but am just at a wiring harness and computer snag. Until this Yamaha engine caught my eye
1 person likes this -
I'll be following this thread as I'm sincerely interested in this conversion. I have Subaru now and so far so good. But would really like to shed some weight. Very informative thread thank you.
1 person likes this -
Hey EDMO, I just figured it out that I never got around to installing the proper sensor I had purchased for this gauge. Just went through past emails and I ordered two sensors, one for water and the other oil but the oil sensor was wrong size so I never got around to it. Just ordered the correct and will try it out.
I know the POH you're talking about. I've printed it off and keep a copy in the plane. I love it.
http://www.avidfoxflyers.com/applications/core/interface/file/attachment.php?id=10238
-
Just wondering where soob owners have their oil temp sender mounted? I have mine mounted on the rear of the engine at the oil pump housing but the gauge is reading 275-300 degrees when the actual oil temp itself is 196 degrees.
Thanks everyone
-
Following this build lostman, I just purchased the 2L plans with hopes of starting it as a next project while flying the avid.
I admire the design idea with lower turtle deck and larger vertical stab. Nice work. Looking forward to more pics.
1 person likes this -
Standard STOL or Heavy Hauler wings are 29' 10 1/2" I had 2 MK IV Avids. Both weighed 585 lbs. One had a 582, the other a Jabiru. Both had the HH wings. What's in the plane that you don't need? If the Subaru is 75 lbs heavier than the Jab or Rotax, and you use 25 lbs of lead in the tail to offset the extra 75, where is the rest of the weight coming from. JImChuk
I've read through a number of threads here and kitfox forums, that it is rare to keep a Subaru conversion under 700lbs as EDMO said also.
My Subaru engine weight 206lbs with everything on it and oil. But minus plumbing, coolant and rads which came out to 24lbs. I may be wrong but the 582 is around 130lbs? Then the battery size needed is 26lbs mounted at the back, plus an additional 10lb weight in tail. With that said. Your bird at 585lbs would then weigh close to my 720 (roughly)
Its a popular conversion with good success rate. Would I do things differently now having run into limited payload, absolutely. But for the time being I am happy with it all and am just hoping this instructor who is at least my size will be able to fit. Fingers crossed.
1 person likes this -
daaaaaaumn. She is way on the heavy side. If you are fast enough to get the tail up, your fast enough to fly.. well, not sure with that one. 720 pounds in a speed wing.. your stall is going to be way up there. Hopefully its an extended speed wing.
I think they're an extended speed wing, or clipped wings? Each wing from butt rib to tip is 11'6" plus cabin 38" so total span is 26'2".
Can anyone tell me what their Subaru powered mk4's weigh?
-
If you read the "Kitfox Pilot's Guide" by Ed Downs, (sold by Kitfox), you would read his statement against "High Speed Taxi" - "Don't Do That!". I recommend that book to all new Kitfox and Avid flyers. That's about the only advice I can quote on your preparing to fly the bird. EDMO
I am sorry I didn't mean high speed taxiing. I meant short run ups. So I'd set up, full throttle, raise tail, and drop throttle to gently bring tail down. But if that's considered the same then I will for sure stop.
I will have to leave the interpretation of that to the more experienced Avid taildragger pilots. I guess as long as you are confident of your control enough to prevent a ground loop, then it is OK. EDMO
yeah I am not sure if it's considered the same thing, but nonetheless I'll stop lol. I appreciate the headsup.
-
If you read the "Kitfox Pilot's Guide" by Ed Downs, (sold by Kitfox), you would read his statement against "High Speed Taxi" - "Don't Do That!". I recommend that book to all new Kitfox and Avid flyers. That's about the only advice I can quote on your preparing to fly the bird. EDMO
I am sorry I didn't mean high speed taxiing. I meant short run ups. So I'd set up, full throttle, raise tail, and drop throttle to gently bring tail down. But if that's considered the same then I will for sure stop.
-
Yeah unfortunately that's what she's weighing in at, I'm not proud of it. I even went out and bought good scales because I didn't trust the numbers I was getting.
It has a Subaru ea81, belted redrive, single weber carb and custom intake manifold. Also has speed wings.
Also forgot the 29lb battery in the back plus 10lb lead weight. Those didn't help my cause. For CG issues yes, but not overall weight.
I finished this project with the plan of flying on my own and wife (she's tiny) then either upgrading to a bearhawk or finish the BMW engine I have and consider a conversion. We'll see I guess


Recommended bungee for a fat plane?
in Technical tasks
Posted
Hey everyone
as some of you may know. My Subaru converted mk4 is sitting at 716lbs empty weight and I'm noticing that my new bungees 3/8", 90" long and 8 wraps is flexing quite a bit. The heats stance is pretty wide at empty weight and the tires running on the inside edges.
Any suggestions or advice whether or not this is ok and if not what would be a better bungee setup to go with? 1/2" maybe? More wraps?
thanks everyone