
napierm
Members-
Content count
26 -
Joined
-
Last visited
Posts posted by napierm
-
-
For all users of wide "bush" gear on a KF I know from experience that the rear gear mount is very weak in compression. The front mount is attached to the seat truss and so is pretty stout. But the rear one attaches at a point where there is a single tube going across under the seat.
What this means is that if the gear catches hard this cross tube can fail and the rear part of the gear leg attachment wants to come through the bottom of the seat. Think of it as a long lever arm and picture where that rear point wants to go....
If I were designing a wide gear set I would do a Highlander style with the 3 attachments, the rear one with a big diameter tube that attached below the lift strut. That is a very strong attachment plus it is not under my butt.
FWIW
-
I'm a little late for this thread but I thought I would add my 2 cents. I flew the Hacman on my 582 and had good success with it.
The Bing carb works by metering the fuel flow through the various jets from the float bowl to the venturi. The fuel flows up because of the venturi vacuum (also known as ported vacuum). This is different from manifold vacuum. (I got laughed at once for hooking up a vacuum advance to manifold vacuum rather than ported vacuum so I have this concept down pat) Ported vacuum generally increases with carb airflow. The Bing 54 slide carbs increase the venturi area with increasing "throttle" so the ported vacuum is more constant than it normally is with butterfly valve carbs. Also, the Bing 54 carbs do block off the back of the throat at idle so there the ported vacuum all but disappears. Then the idle circuit behaves normally. (BTW, I had to replace my "55" idle jets with "45" jets to get it to run well at idle. Otherwise it would load up and quit on final. Nothing to do with the Hacman, these jets are too rich from the factory.)
The pressure in the float chamber is vented to the nipple on the side. So the differential pressure (float to venturi) and the jet sizes are what control fuel flow. These vents are normally connected into the dual air cleaner so that the float chambers see the same pressure as the intake ports of the carbs. The Hacman works by slightly lowering this pressure to lean the mixture. In practical terms hook it up and start with a large orifice from the air cleaner. Then work down to a smaller one. You really shouldn't be able (or need to) change the EGTs by more than 200 degrees over the adjustment range. I don't mind turning the dial quite a bit but most all of the adjustment is in the 1st couple of turns anyway. As others have said you do wind up needing a larger main jet. Once tuned up the system works great. Lets you lean at altitude. Better yet lets you richen it when you point downhill from a long cross country so you don't get too lean.
I really have to thank Tom Olenik for explaining how to set up and run the 582. He had is own business, Olenik Aviation, for a while but found a better job as a "Propulsion Engineer" for a corporation that makes big drones. I gladly bought all my supplies from him at the time.
Greensky also sells this system for the Bing 64 CV carbs. In this system they use the manifold vacuum. This vacuum source varies a lot with throttle setting and prop loading. They say in the online instructions to close the valve (full rich) before pulling to idle, otherwise you could shut off the engine. A better solution would be to take advantage of the Constant Vacuum (CV) available in that venturi. Looking at the carb I can see that the venturi is ported to the top of the CV chamber. I'm still looking at that chamber cap to see if there isn't a good way to secure a nipple there on one of the carbs. The very top has a thin metal cap that looks to be peened in place and bonded with hi-temp epoxy. It doesn't look strong enough that I would trust it not to fail with anything attached. The advantage would be a fairly constant vacuum over most RPMs. At idle (closed butterfly) this vacuum all but disappears so again the idle circuit would behave normally.
The CV carbs are about 1/2 altitude compensating anyway. It's only at "high" altitudes (say 7K+ feet cruise) that they could use a bit more leaning. Not as clear a use case as with the 2-strokes.
FWIW,
Mark Napier
1 person likes this -
Anyone want to do similar with the 912 overhaul manual? It's not distributed unless you have taken all their classes *and* are a shop "in network".
For instance, an older engine should have all the seals replaced. But there isn't a published procedure for splitting the case and reassembly. I've done a 582 twice now and was grateful for Tom Olenick talking me through it the 1st time. Is there a build up of similar tribal knowledge for the 912?
-
G'morning gents.
With the use of metal brackets for flaperon hanger hinges, there are no long and short ribs and KF4 each rib share the same profile and spar hole locations. Larry is correct in one regard, however, non-flaperon ribs are 5mm tails and flaperon ribs are 6mm tails.
@Jim,
I -may- have an extra KF4 rib, not sure which. I also -may- be in need of a KF3 long rib if'n you care to swap. I don't have any extra hangar brackets though, sorry.
I need to make up a set of KF IV ribs and have one non-flapperon rib to use as a pattern. I can confirm that the one I have is made from 5mm Finnish plywood. Can someone confirm for me that the flapperon rib is cut from 6mm plywood?
Thanks in advance.
-
OEM Rotax is less than $800 each new...
When I needed one 4 years ago Lockwood charged me over $1100. The web page showed less than $800. The charge whatever the $@!@#$ they want to.
-
I may be wrong but try a 582 vent nipple from the head? It was awhile ago.
Yes, exactly the same part.
-
As you begin your inspection, *don't* cut the fabric. I've repaired a few places on my III and helped with other fabric repairs. Your can peel the fabric off. If it was covered the standard way, peel the tape up from the side enough to show the edge of the top fabric. Then peel the top fabric off leaving the tape attached. Preserve all the tapes. Then peel the side fabric off from around the top tubes. Hopefully you don't have to take it loose from the bottom too. If you do have to take the bottom off then try to peel from under the bottom of the sides 1st and *don't* disturb the side or upper tapes: just peel from the inside. The idea is to leave the finish tapes undisturbed along with that expensive finish. A thin dull knife helps to separate the fabric from around the tube. This takes patience but it's well worth doing.
As for the bent tubes, I made a simple tool that has a 1/16' chromoly strap and a half "U" block. The idea is that the strap goes around the tube and about 1 inch away the U presses against the tube. The is enough steel on the U block than you can get a cheater bar on it. Draw a sketch or two and you should get it. I can post a picture. Anyway, you can slowly work out the bends. Unlikely that the tube is buckled. It can be cold worked a long way.
When the tubes are strait again, the fabric can be glued back on in the reverse order you peeled it off. The tape gets glued down last. If done carefully the only line left is the zig-zag seam at the edge of the one tape that you pulled up on one side. That can be touched up. If you're real lucky even that may line up. If you peeled from underneath even that will be hidden and no one will see it. Once glued back down tight the fabric has some shrink left in it that can be taken up by carefully using a hobby model airplane covering heat gun.
I know this isn't the recommended method but I've seen it work and used it myself.
Good luck,
Mark Napier
1 person likes this -
It's more complicated than what was reported in the news. Very bad day....
http://www.ntsb.gov/aviationquery/brief.aspx?ev_id=20130330X85743&key=1
-
I used the Odyssey PC625 battery which weighs 13lbs. It is way overkill for the 582 but I wanted some reserve for electrical stuff and sure starts, etc. The PC625 also is one of the cheaper models of this brand. You could probably use the PC310 which is only 6lbs but I think its too pricey.
-
What is it in the motors that is breaking? The duty cycle of them is low enough that they should last if well built and matched to the load. The actuator motor in an autopilot will easily last 2000 hours of constant motion and that is the old brushed versions. The new stepper motor versions - I have no idea how long; basically limited by the life of the bearings.
Sounds like IVO needs to do some re-engineering.
-
Not sure how I missed it before but spruce does sell these bearings.
http://www.aircraftspruce.com/catalog/appages/bsp3hf.php
Glad we don't have "the most basic and most widely used type" they sell. Darn'ed near $80 a set.
-
Having a tough time finding those bearings online. Spruce doesn't carry that part number. Went to the Timken website but it's about the most un user friendly site I've ever seen.
Bill 8/3/2004 - Has to get one in, will call me back.
McGuire Bearing 208-342-2281 Ordered 8/9/2004 Steve
1 2 Hub Shaft Seal 7/8IDx1.575ODx1/4Thick 08152SB 6.08 12.16
Cross for CR 8763
Joey,
I have ordered new seals from these guys, give em a try.
Mark
-
So does it make me a bad guy if I chuckled at this?

"caused by chemical reactions" , right. Dry ice to gas co2 isn't chemical or dangerous. Called ATF? The world we live in now is too stupid to fathom.
Now mixed oxy and gas in a Mylar balloon, that will wake the neighbors and maybe even break a window if you're not careful.
Guess who had a wasted youth?
-
Hey C5,
I thought you had the Kitfox 8" wheels. I run mine tubeless. Bead is so hard to set on those ATV rims the tire is not likely to pop back off.
Mark
-
What specs do you need to plug numbers into your exhaust calculator? I need to come up with a good exhaust system for my 800 conversion I am workng on. Trying to cut twist and fit the stock pipe into the cowling is gonna be a beyatch do to the way the exhaust crosses over the top of the engine. Ahh the joys of experimentals! I figure I am going to loose a little power becasue I have to monkey with the exhaust, but I am starting at 140 HP so I think I can afford to loose a little bit, as long ans she still runs smooth!

Here's one:
http://www.mez.co.uk/mezporting/exhaust_length.html
There was another one but can't find it now. Wants CC of 1 cylinder, target RPM, and exhaust valve timing.
Found a picture of Paul's HKS on his trike. He sent me more detailed stuff a while back but I think I've lost it all now along with my last brain cell.
-
I'm putting an HKS with a 3.47 gearbox and a 71" Kiev prop in my Kitfox. There are a (very) few planes flying with that combination and reporting OK performance (SkyRanger, Avid, Super Koala). Frankly, I got the engine very cheap otherwise I wouldn't do it.
I'm going with short rear intakes (8" length *including* the carbs) and 30" exhaust pipes based on the experience of a trike flyer in S. Africa and some testing done by a few on the HKS forum. FWIW, those numbers also agree with what came out of calculator for motorcycle intake/exhaust design when I fed in all the numbers from the HKS.
That guy in S. Africa cast me a rough pair of intakes like the ones he had for $50. (I said thank you kindly). Took me a little while to machine them to fit. Won't be night and day difference but when starting with 60hp I'll take every bit available. Probably will lose some lower speed torque (nothing is free) but will trade it for improved climb performance.
So my KF won't be a great climber or go fast (darned I feel bad now) but will be good for cruising around. I found that the 582 did *not* like avgas and car gas isn't available if I'm tooling around very far from home. Plus that engine always needed some tinkering (hate Rotax part prices -> crazy).
-
I've got a 700e so of course I've thought about the 700T.
Expensive but it is a great match for a Kitfox/Avid. It's at least 20lbs lighter installed than a Roxax 912. It burns less gas so you need less fuel for the same range - more weight savings. Fuel injected so no carb ice. Single lever control. The turbo muffles the engine enough that it can get by w/o a muffler can for more weight savings.
Downside -> more complex, short (very conservative) initial TBO, brand new so no history. No FWF available yet so you have to roll your own.
But yeah, at 7500ft it produces more power than a R912S.
-
My KF III elevator is the same. They were make to "feather" like a shuttle cock. I think the idea was to help prevent flutter.
The KF IV elevator is larger and does not have this feature.
In the process of recovering my KFIII elevator I noticed it was out of line. When you put it on a flat surface the left elevator is about an inch higher than the right. The tubes are all straight and it doesn't appear to have been bent but it definitely not even. Have I pulled it out of line by uneven shrinking of the covering or bend it or is this some aerodynamic Kitfox thing of which I'm ignorant?
thanks,
EG
-
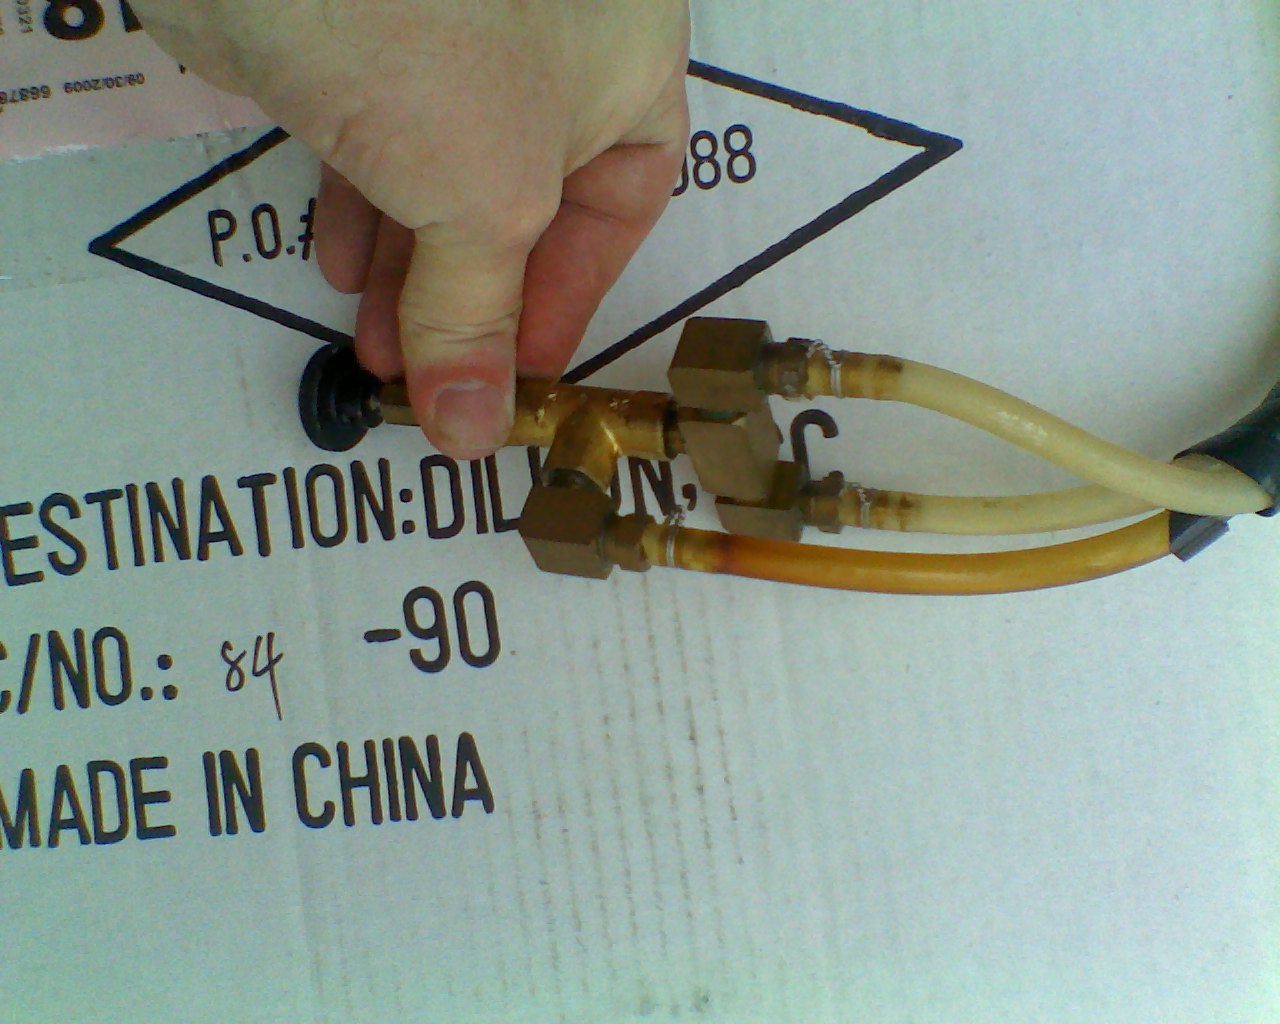
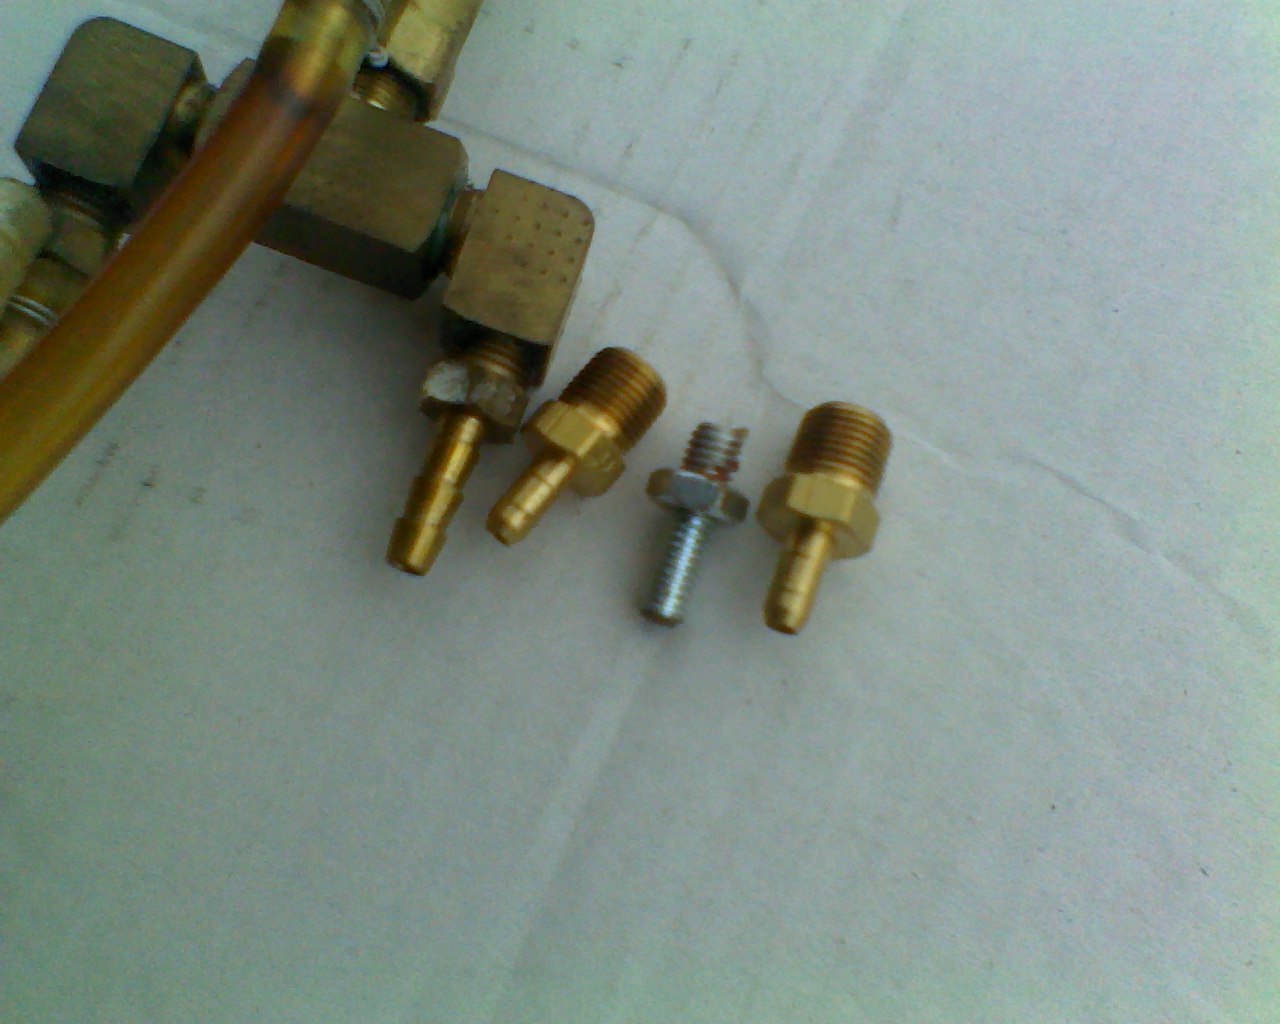
Couple of pictures of the barbs. I just didn't like the ones supplied...
The single fitting closest to the knob attaches to the hose from the carb "ported vacuum." The hoses on either end of the "tee" go to the air cleaner "sense" and the carb "overflow/sense.".


-
FYI, I didn't like some of the supplied hardware. I didn't use the plastic clamps at all but used a couple of turns of safety wire for each connection. For the connection to the "overflow" tubes on the carbs I used small diameter urethane fuel lines for a better fit. I used more aggressive barbs on the valve end and with more safety wire.
For the connection to the carb "ported vacuum" you want Rotax part number 940558. It has a good barb on it and will hold onto the line well with a couple of turns of safety wire. The gasket is part number 830890.
Also, an orifice made from a Autozone vacuum restrictor drilled out a bit and placed in the sense line (the one from the air filter) will increase the EGT adjustment range. Use with care.
I mounted my control valve with Adel clamps to and underneath the throttle control just out far enough back that I didn't hit it when using the throttle.
Cheers,
Mark Napier
Leni it's a manual system. I will be able to adjust just about the entire power range. Here's plenty of reading for you on the system.
http://www.greenskyadventures.com/bing/HACmandetails.htm
On this page there is a little drop down box in the center top of the page that will navigate you around to other articles and a FAQ section.
-
Tom Olenik worked with Rotax and had the HAC dialed in only to have Rotax quit selling them.
The Hacman works pretty well. I never forgot to look at those EGT's in flight and the adjustment range is small enough that you would really have to be asleep to damage the engine. However if you worry about it get an EGT with an alarm. Such a thing can be made with comparitors if you want to do an electronics project.
It is very nice to be able to climb up and catch a tailwind. Also nice to be able to enrich the midrange if needed during a descent. Can't do that with the HAC.
BTW, there wasn't much different about the carbs. In fact all the new 54's sold now have the same modification. It's a port in the venturi that give you "ported vacuum" to run the HAC. I added the port on one of my older carbs but you can pick up one that already has it on ebay. You only need one.
FWIW,
Mark
-
I'll 2nd that unless there was a problem in storage (damp/humid/open intakes and exhaust) I would have a very hard time replacing a new style crankshaft with only 5 hours on it.
-
On my KF III I repaired the inboard flapperon ribs using JB weld and microballoons. It had set up for years and a fuel leak had melted the inboard ribs. Cleaning the area 1st was the real chore. I applied some JB weld to "wet" the area and then mixed up some with microballoons to the consistancy of firm dough to replace the ribs. It has held up well. I suppose Hysol would have worked as well.
Also, there is also an old KF service letter about adding some small stainless steel pop rivets to help secure the skins to the actuator tube.
FWIW,
Mark Napier
Morning Skip,
Sounds like a pretty good plan on the small hole and injecting glue. The flaperons on my avid do have foam forward of the Tq. tube. The flaperons are really floperons when they are not bolted to the wings. I was certain mine were broken and that I needed new ones till I pulled a set off a buddies and his were just as floppy, yet the plane was flying fine. I finaly just convinces myself that it was going to be OK and put them on my lane as is. Once bolted on they are solid.
-
You can get a pair of unlocking "wings" from Matco that will release earlier if you need them to. They can be ground down to release a little later if need be. So the wheel can be adjusted to release over a wide range of angles.
I wasn't wild about the angle the chains make down to the wings so I made a set of spacers on 3/16" bolts to jack the chain attachment points up a little. Not ideal but it does work and is much better than the Maule.
Question: Why do you like your tail very low? Is it to get the prop a little higher up?
Jabiru on barnstormers $2500
in For Sale and wanted, you got it, I want it
Posted
I'm not a fan of Jabiru. Guy here put a 3300 in an 601hds and really struggled with it. Hard to get it to cool. Once the temps were under control and he could fly it stuff started breaking. Heads, valves, cylinders. Last straw was the oil pump housing that cracked and spewed oil while he was over the hills in north Georgia. Luckily he was able to get to a grass strip before oil pressure was lost. Had to leave it and come back with a new part. Bad casting.
Support? He must be running it too hard, too hot, etc. Bull!